10 Healthy Dessert Recipes That Feel Indulgent
10 Healthy Dessert Recipes That Feel Indulgent
Craving something sweet but want to keep things healthy? These dessert recipes are your answer! Packed with natural ingredients and flavor, they satisfy your sweet tooth without the guilt. From smoothies to cakes, enjoy treats that will leave you feeling great and keep you energized!
Indulge In Guilt-Free Chocolate Avocado Mousse
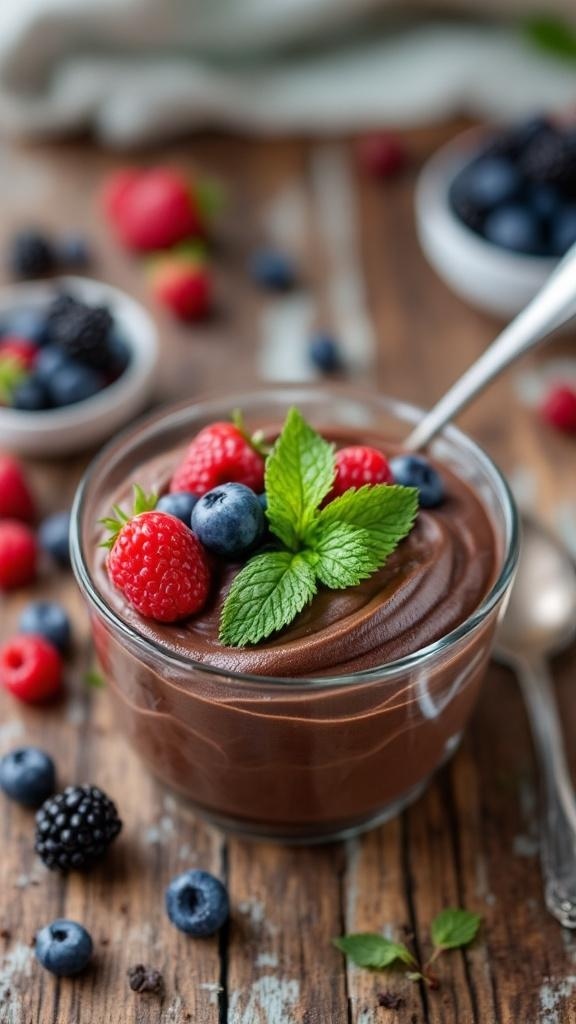
Chocolate avocado mousse is a delightful treat that feels rich and indulgent, yet it's packed with healthy ingredients. The creamy texture comes from ripe avocados, which blend beautifully with cocoa powder and a touch of sweetener. Topped with fresh berries and mint, this dessert is as pleasing to the eye as it is to the palate.
Imagine digging into a smooth, velvety mousse that satisfies your chocolate cravings without the guilt. This recipe is perfect for anyone looking to enjoy a sweet treat while keeping things healthy. Plus, it’s super easy to whip up!
Ingredients
- 2 ripe avocados
- 1/4 cup unsweetened cocoa powder
- 1/4 cup maple syrup or honey
- 1 teaspoon vanilla extract
- 1/4 cup almond milk (or any milk of choice)
- Fresh berries (raspberries, blueberries, blackberries) for topping
- Fresh mint leaves for garnish
Instructions
- Prepare the Avocados: Cut the avocados in half, remove the pit, and scoop the flesh into a blender or food processor.
- Add Ingredients: To the avocados, add cocoa powder, maple syrup, vanilla extract, and almond milk.
- Blend Until Smooth: Blend everything together until you achieve a creamy, smooth consistency. You may need to scrape down the sides a couple of times.
- Taste and Adjust: Taste the mousse and adjust sweetness if needed by adding more maple syrup or honey.
- Chill: Transfer the mousse to serving bowls and refrigerate for at least 30 minutes to set.
- Serve: Top with fresh berries and mint leaves before serving. Enjoy your guilt-free dessert!
Delight In Berry Bliss With Healthy Fruit Sorbet
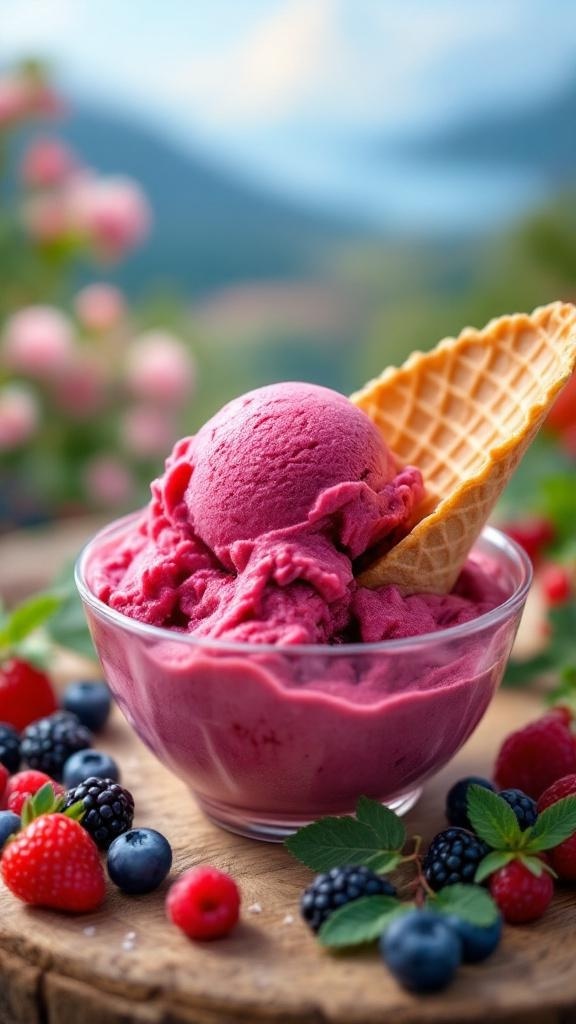
When the sun is shining and the temperatures rise, nothing beats a refreshing treat. This healthy fruit sorbet is a perfect way to enjoy the sweetness of berries without any guilt. The vibrant colors and rich flavors of raspberries, blueberries, and blackberries make it a delightful dessert that feels indulgent.
Making sorbet at home is simple and fun. You can use fresh or frozen berries, and the result is a creamy, fruity delight that everyone will love. Plus, it’s a great way to sneak in some extra fruit into your diet!
Let’s get started with this easy recipe that will have you enjoying berry bliss in no time.
Ingredients
- 2 cups mixed berries (raspberries, blueberries, blackberries)
- 1/2 cup honey or maple syrup
- 1 tablespoon lemon juice
- 1 cup coconut water or fruit juice
Instructions
- Blend the Berries: In a blender, combine the mixed berries, honey (or maple syrup), lemon juice, and coconut water. Blend until smooth.
- Strain (Optional): If you prefer a smoother texture, strain the mixture through a fine mesh sieve to remove seeds.
- Freeze: Pour the berry mixture into a shallow dish and freeze for about 2 hours, or until it starts to harden.
- Stir: Remove from the freezer and stir the mixture with a fork to break up any ice crystals. Return to the freezer for another hour.
- Serve: Scoop the sorbet into bowls and enjoy! You can garnish with fresh berries or mint leaves for an extra touch.
Enjoy The Sweetness Of Banana Oatmeal Cookies

Banana oatmeal cookies are a delightful treat that combines the natural sweetness of ripe bananas with the heartiness of oats. These cookies are not just tasty; they are also a healthier option for dessert lovers. The bananas add moisture and flavor, while oats provide a satisfying texture. Plus, you can easily customize them with your favorite mix-ins!
In the image, you can see a beautiful plate of freshly baked banana oatmeal cookies, topped with chocolate chips. The cookies are golden brown, soft, and inviting, making them hard to resist. Surrounding the plate are vibrant bananas and a jar of oats, emphasizing the wholesome ingredients used in this recipe.
These cookies are perfect for an afternoon snack or a sweet treat after dinner. They are easy to make and require minimal ingredients, making them a go-to recipe for busy days. Let’s get started on making these delicious cookies!
GET 21 QUICK & EASY LOW-CALORIE MEAL PLANS
Treat Yourself With Healthy Peanut Butter Energy Balls
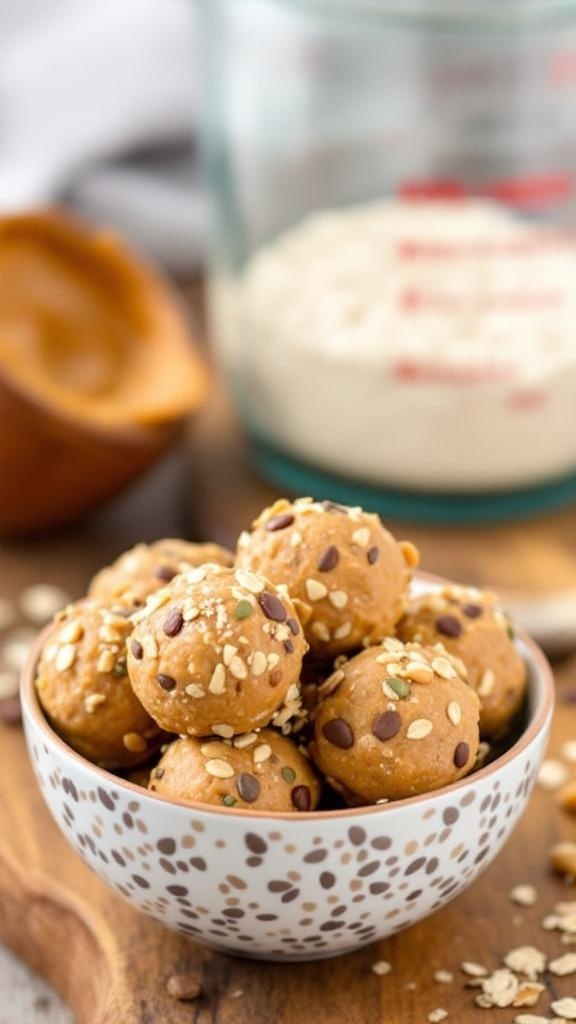
Peanut Butter Energy Balls are a fantastic way to satisfy your sweet tooth without the guilt. These little bites are packed with flavor and nutrition, making them perfect for a quick snack or a post-workout treat. The image shows a delightful bowl of these energy balls, sprinkled with seeds and chocolate chips, ready to be enjoyed.
These energy balls are not only tasty but also super easy to make. You can whip them up in no time, and they require minimal ingredients. The combination of peanut butter, oats, and honey creates a chewy texture that is hard to resist. Plus, you can customize them with your favorite add-ins!
Let’s get to the fun part—making these delicious treats!
Ingredients
- 1 cup natural peanut butter
- 1/2 cup honey or maple syrup
- 1 cup rolled oats
- 1/2 cup ground flaxseed
- 1/2 cup mini chocolate chips
- 1/4 cup chia seeds or pumpkin seeds (optional)
- 1 teaspoon vanilla extract
Instructions
- Mix Ingredients: In a large bowl, combine peanut butter, honey, and vanilla extract. Stir until smooth.
- Add Dry Ingredients: Gradually mix in rolled oats, ground flaxseed, and seeds if using. Fold in mini chocolate chips.
- Form Balls: Once the mixture is well combined, use your hands to form small balls, about 1 inch in diameter.
- Chill: Place the energy balls on a baking sheet lined with parchment paper. Refrigerate for at least 30 minutes to firm up.
- Enjoy: Store in an airtight container in the fridge for up to a week. Snack on them whenever you need a boost!
Experience The Freshness Of Fruit-Infused Greek Yogurt
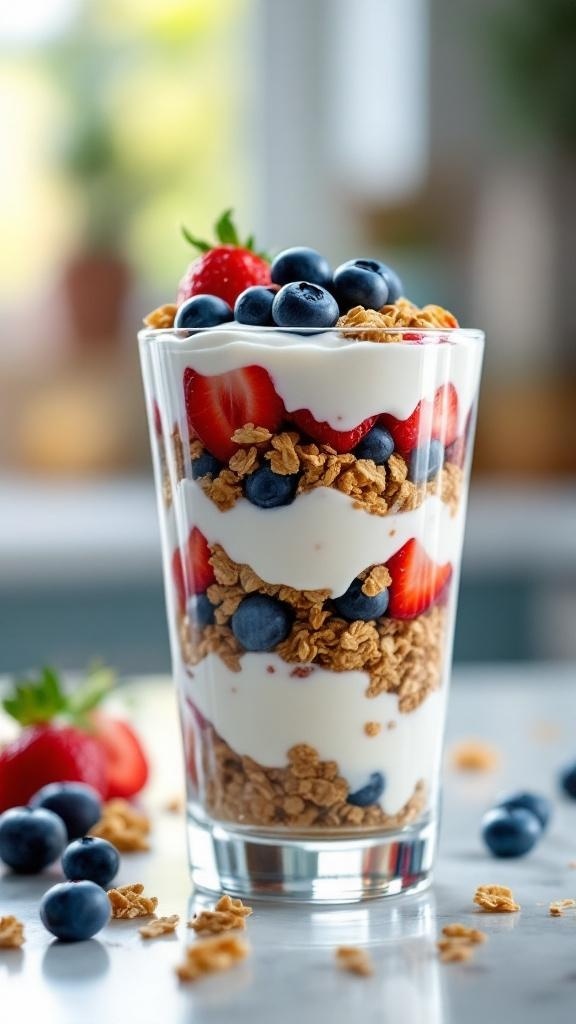
Fruit-infused Greek yogurt is a delightful way to enjoy a healthy dessert. The vibrant layers of fresh strawberries and blueberries create a colorful treat that looks as good as it tastes. The creamy yogurt pairs perfectly with the crunchy granola, making each bite a mix of textures. This dessert is not just visually appealing; it’s packed with nutrients too!
Making this yogurt parfait is simple. Start with a glass or bowl, and layer Greek yogurt with your choice of fruits and granola. The combination of sweet and tart flavors from the berries complements the creamy yogurt beautifully. It’s a refreshing option for breakfast or a snack, and it feels indulgent without the guilt.
Ingredients
- 2 cups Greek yogurt
- 1 cup strawberries, sliced
- 1 cup blueberries
- 1 cup granola
- 1 tablespoon honey (optional)
Instructions
- In a glass or bowl, add a layer of Greek yogurt at the bottom.
- Top with a layer of sliced strawberries and blueberries.
- Add a layer of granola for crunch.
- Repeat the layers until the glass is full, finishing with a layer of berries on top.
- If desired, drizzle honey over the top for added sweetness.
- Serve immediately and enjoy your fresh, healthy dessert!
Delight In The Creamy Texture Of Cashew Cheesecake
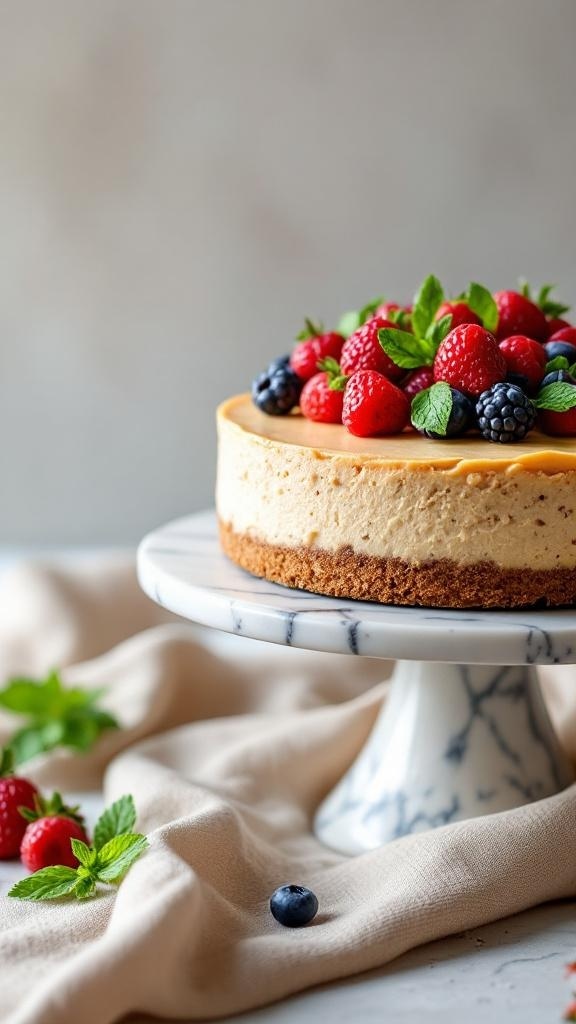
Cashew cheesecake is a delightful treat that feels indulgent while being healthy. The creamy texture comes from blended cashews, making it a fantastic dairy-free option. This cheesecake is not just about taste; it’s also visually appealing. Topped with fresh berries and mint, it looks as good as it tastes.
The base is often made from nuts and dates, providing a crunchy contrast to the smooth filling. Each bite is a blend of flavors that satisfy your sweet tooth without the guilt. Whether you’re enjoying it at a gathering or as a personal treat, this cheesecake is sure to impress.
Ingredients
- 1 cup raw cashews (soaked for at least 4 hours)
- 1/4 cup coconut oil, melted
- 1/4 cup maple syrup
- 1/4 cup lemon juice
- 1 teaspoon vanilla extract
- 1 cup almond flour (for the crust)
- 1/4 cup pitted dates (for the crust)
- 1/4 teaspoon salt
- Fresh berries (for topping)
- Mint leaves (for garnish)
Instructions
- Prepare the Crust: In a food processor, combine almond flour, pitted dates, and salt. Process until the mixture resembles coarse crumbs. Press this mixture into the bottom of a springform pan to form the crust.
- Make the Filling: Drain and rinse the soaked cashews. In the same food processor, combine cashews, melted coconut oil, maple syrup, lemon juice, and vanilla extract. Blend until smooth and creamy.
- Assemble: Pour the cashew filling over the crust in the springform pan. Smooth the top with a spatula.
- Chill: Place the cheesecake in the refrigerator for at least 4 hours or overnight to set.
- Serve: Once set, remove from the pan and top with fresh berries and mint leaves before slicing and serving.
Enjoy A Twist With Healthy Chocolate-Dipped Fruit

Chocolate-dipped fruit is a delightful way to enjoy a sweet treat without the guilt. The image showcases a colorful platter filled with fresh strawberries and banana slices, all elegantly drizzled with rich chocolate. This combination not only looks appealing but also offers a burst of flavor and nutrition.
Using ripe strawberries and bananas ensures that you get the best taste. The sweetness of the fruit pairs perfectly with the rich chocolate, making it a satisfying dessert. Plus, it’s easy to prepare and can be customized with your favorite fruits.
Gather your friends or family for a fun dessert-making session. This treat is perfect for gatherings or just a cozy night in. The vibrant colors and textures will surely impress everyone!
Ingredients
- 1 cup dark chocolate chips
- 2 cups strawberries, washed and dried
- 2 bananas, sliced
- 1 tablespoon coconut oil (optional)
- Chopped nuts or sprinkles for topping (optional)
Instructions
- Melt the Chocolate: In a microwave-safe bowl, combine dark chocolate chips and coconut oil. Heat in 30-second intervals, stirring in between, until smooth.
- Dip the Fruit: Hold each strawberry by the stem and dip it into the melted chocolate, allowing excess to drip off. For banana slices, dip each piece in the chocolate.
- Add Toppings: If desired, sprinkle chopped nuts or sprinkles on the chocolate-dipped fruit before it sets.
- Set and Serve: Place the dipped fruit on a parchment-lined tray. Refrigerate for about 30 minutes to let the chocolate harden. Enjoy your healthy dessert!
GET 8-WEEKS OF WORKOUTS TO LOSE INCHES
Treat Yourself To Healthy Zucchini Bread Muffins

These healthy zucchini bread muffins are a delightful way to enjoy a sweet treat without the guilt. Packed with shredded zucchini, they are moist and flavorful. The addition of chocolate chips gives them a fun twist, making them perfect for breakfast or a snack. Plus, they are easy to make and can be enjoyed by everyone!
The muffins are beautifully arranged in a basket, with some peeking out and others stacked high. A cup of tea sits nearby, inviting you to take a moment to relax and enjoy. The fresh zucchini and yellow squash in the background highlight the healthy ingredients used in this recipe.
Let’s get started on making these delicious muffins!
Ingredients
- 1 cup grated zucchini
- 1 cup whole wheat flour
- 1/2 cup rolled oats
- 1/2 cup brown sugar
- 1/4 cup honey or maple syrup
- 1/4 cup unsweetened applesauce
- 1/4 cup coconut oil, melted
- 2 large eggs
- 1 teaspoon vanilla extract
- 1 teaspoon baking soda
- 1/2 teaspoon baking powder
- 1/2 teaspoon salt
- 1/2 cup chocolate chips (optional)
Instructions
- Preheat the oven to 350°F (175°C) and line a muffin tin with paper liners.
- In a large bowl, mix together the grated zucchini, brown sugar, honey, applesauce, melted coconut oil, eggs, and vanilla extract until well combined.
- In another bowl, whisk together the whole wheat flour, rolled oats, baking soda, baking powder, and salt.
- Gradually add the dry ingredients to the wet ingredients, stirring until just combined. If using, fold in the chocolate chips.
- Divide the batter evenly among the muffin cups, filling each about 2/3 full.
- Bake for 18-20 minutes, or until a toothpick inserted into the center comes out clean.
- Allow the muffins to cool in the pan for a few minutes before transferring them to a wire rack to cool completely.
Delight In The Sweetness Of Raspberry Oat Bars

Raspberry oat bars are a delightful way to enjoy a sweet treat without the guilt. These bars combine the tartness of fresh raspberries with the wholesome goodness of oats. They are perfect for a snack or a light dessert, and they feel indulgent while being healthy.
The image showcases beautifully baked raspberry oat bars, cut into squares and topped with a sprinkle of oats. The vibrant red of the raspberries peeks through the golden-brown crust, making them visually appealing. Surrounding the bars are fresh raspberries, adding a pop of color and hinting at the delicious flavor inside.
Making these bars is simple and requires just a few ingredients. You can enjoy them warm or let them cool completely for a chewy texture. They are great for meal prep, too, as they store well in the fridge.
Ingredients
- 2 cups rolled oats
- 1 cup almond flour
- 1/2 cup honey or maple syrup
- 1/4 cup coconut oil, melted
- 1 teaspoon vanilla extract
- 1/2 teaspoon baking powder
- 1/4 teaspoon salt
- 1 cup fresh raspberries
Instructions
- Preheat the oven to 350°F (175°C) and line an 8x8 inch baking dish with parchment paper.
- In a large bowl, mix rolled oats, almond flour, baking powder, and salt.
- Add honey or maple syrup, melted coconut oil, and vanilla extract. Stir until well combined.
- Gently fold in the fresh raspberries, being careful not to crush them.
- Spread the mixture evenly in the prepared baking dish.
- Bake for 25-30 minutes, or until the edges are golden brown.
- Let cool for a few minutes before cutting into squares. Enjoy!
Satisfy Your Cravings With Banana Nice Cream

Banana nice cream is a delightful treat that feels indulgent without the guilt. This creamy dessert is made from frozen bananas, blended until smooth and fluffy. It’s a fantastic way to enjoy a sweet treat while keeping things healthy. The image shows a bowl filled with this delicious nice cream, topped with a slice of banana and a drizzle of honey, making it look even more tempting.
This dessert is not only easy to make but also customizable. You can add in your favorite toppings like nuts, chocolate chips, or even a sprinkle of cinnamon for extra flavor. The best part? You only need one main ingredient: ripe bananas!
Ingredients
- 4 ripe bananas
- 1 tablespoon honey or maple syrup (optional)
- 1/2 teaspoon vanilla extract (optional)
- Chopped nuts or chocolate chips for topping (optional)
Instructions
- Prep the Bananas: Peel and slice the ripe bananas. Lay them out on a baking sheet and freeze for about 2 hours, or until solid.
- Blend: Once frozen, place the banana slices in a blender or food processor. Blend until smooth and creamy, scraping down the sides as needed.
- Add Sweetness: If desired, add honey or maple syrup and vanilla extract. Blend again until well combined.
- Serve: Scoop the nice cream into bowls and top with your favorite toppings like nuts or chocolate chips. Enjoy immediately!
Struggling to Stay on Track with Your Eating?
You’re not alone. One of the biggest obstacles I see people
face is not knowing what to eat. Between busy schedules, endless diet
advice online, and trying to cook healthy meals that actually taste good—it’s
easy to feel stuck or overwhelmed.
That’s why I created my 21 Quick & Easy Custom
Low-Calorie Meal Plans Program. These plans are built specifically for
you—your goals, your lifestyle, and your food preferences. You won’t find
any cookie-cutter diets here. Just real, satisfying meals that help you stay
full, energized, and on track without the stress.
✅ No more guessing.
✅
No more skipping meals or eating “diet food” you hate.
✅
Just a clear, doable plan that fits your life.
👉 Ready to eat better,
feel better, and finally make progress? [Click here to get your custom meal plans today.]
Not Seeing the Inches Drop No Matter What You Do?
If you’re working out but still not seeing the results in
the mirror, I hear you. So many people come to me after months of doing cardio
or random workouts—and still struggling to lose inches or tone up. The truth
is, your body needs more than just movement. It needs a proven strategy.
My 8-Week Workout Program to Lose Inches is designed
to do just that—burn fat, tighten up, and give you visible results.
These workouts are fun, effective, and designed for real people with real
lives. Whether you’re getting back into fitness or ready to take it to the next
level, this program gives you a clear path to success.
✅ Just 8 weeks to build strength,
confidence, and a fitter shape.
✅
No endless cardio.
✅
No gym required (unless you want it).
👉 If you're ready to
drop inches and feel amazing in your own skin, [click here to start the 8-Week Workout Program].


Comments
Post a Comment