15 Spooktacular Halloween Party Food Ideas
15 Spooktacular Halloween Party Food Ideas
Get ready to whip up some spooktacular treats with these 15 Halloween party food ideas! These recipes feature fun and creative ways to transform classic flavors into festive delights that will impress your guests. From easy finger foods to delightful desserts, you’ll learn techniques for crafting eerie yet delicious dishes that celebrate the holiday's spirit while keeping everyone satisfied. Whether you're mixing up vibrant colors or using playful shapes, these ideas will elevate your Halloween feast in no time!
Spooky Spider Deviled Eggs
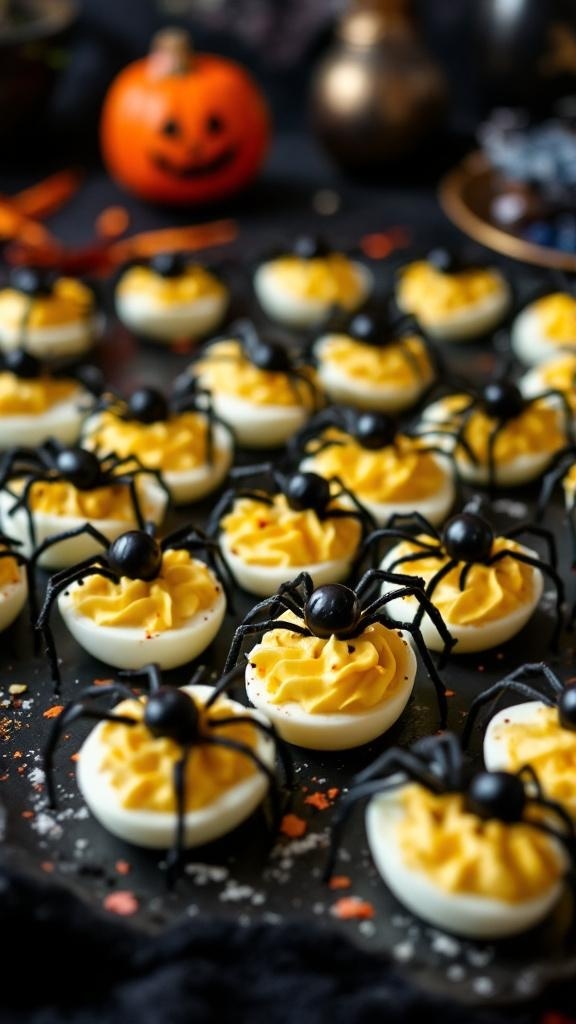
Spooky Spider Deviled Eggs are a fun and creepy twist on a classic appetizer. With their creamy, tangy filling and the addition of plastic spiders, these eggs are sure to be a hit at your Halloween party. They’re simple to make, requiring just a few ingredients and minimal prep time, making them perfect for any host.
The rich flavor of the deviled egg filling pairs perfectly with the visual fright of the spiders, creating a dish that’s both tasty and entertaining. These eggs are not only delicious but also add a playful element to your Halloween spread!
Ingredients
- 6 large eggs
- 1/4 cup mayonnaise
- 1 teaspoon Dijon mustard
- 1 teaspoon apple cider vinegar
- Salt and pepper to taste
- 1/4 teaspoon paprika
- Plastic spiders for decoration
Instructions
- Hard boil the eggs: Place eggs in a pot and cover with water. Bring to a boil, then cover and remove from heat. Let sit for 12 minutes. Transfer eggs to an ice bath to cool.
- Peel the eggs: Once cooled, peel the eggs under running water to make it easier. Cut each egg in half lengthwise.
- Make the filling: Remove the yolks and place them in a bowl. Mash the yolks with mayonnaise, Dijon mustard, apple cider vinegar, salt, and pepper until smooth.
- Fill the egg whites: Spoon or pipe the yolk mixture back into the egg whites. Sprinkle with paprika for a little extra flavor and color.
- Add the spiders: Top each deviled egg with a plastic spider for a spooky touch. Arrange on a platter and serve!
Witch'S Brew Punch

Witch's Brew Punch is a fun and spooky drink that’s perfect for Halloween parties. This vibrant green concoction is not only eye-catching but also deliciously sweet, making it a hit with guests of all ages. With floating eyeball candies, it adds a playful twist that will surely delight everyone.
Making this punch is a breeze! Just mix a few simple ingredients, and you’ll have a festive drink ready in no time. Whether you’re hosting a big gathering or a small get-together, this punch will add a magical touch to your Halloween celebration.
Ingredients
- 1 cup lime sherbet
- 4 cups lemon-lime soda
- 2 cups pineapple juice
- 1 cup green fruit punch
- Eyeball candies (for garnish)
Instructions
- In a large punch bowl, combine the pineapple juice and green fruit punch.
- Slowly pour in the lemon-lime soda to add fizz.
- Add scoops of lime sherbet on top for a frothy effect.
- Garnish with eyeball candies to create a spooky look.
- Serve immediately and enjoy the eerie delight!
Mummy Meatballs
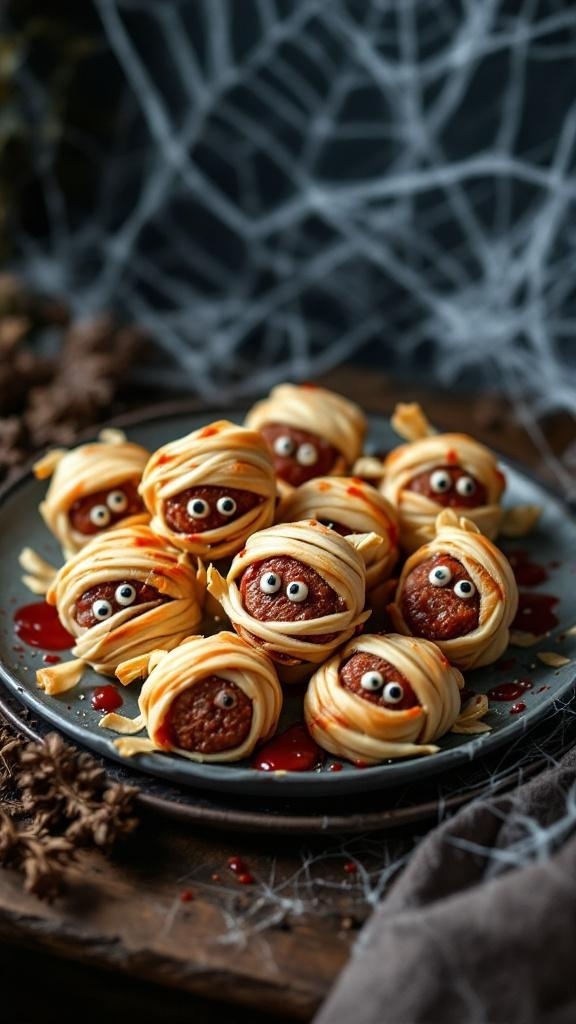
Mummy Meatballs are a fun and spooky addition to your Halloween party spread. These little bites are made with juicy meatballs wrapped in strips of dough, resembling mummies. They are savory, slightly crispy on the outside, and oh-so-delicious!
Making these meatballs is simple and perfect for both kids and adults. Just roll your meatballs, wrap them up, and bake. Serve them with a side of marinara sauce for dipping, and watch your guests enjoy this festive treat!
Ingredients
- 1 pound ground beef
- 1/2 cup breadcrumbs
- 1/4 cup grated Parmesan cheese
- 1 egg
- 1 teaspoon garlic powder
- 1 teaspoon onion powder
- Salt and pepper to taste
- 1 package of crescent roll dough
- Olive oil for brushing
- 2 tablespoons marinara sauce (for serving)
- Edible eyes (for decoration)
Instructions
- Preheat your oven to 375°F (190°C).
- In a bowl, mix together ground beef, breadcrumbs, Parmesan cheese, egg, garlic powder, onion powder, salt, and pepper until well combined.
- Form the mixture into small meatballs, about 1 inch in diameter.
- Roll out the crescent dough and cut it into thin strips.
- Wrap each meatball with the dough strips, leaving a small opening for the eyes.
- Place the wrapped meatballs on a baking sheet lined with parchment paper. Brush with olive oil.
- Bake for 15-20 minutes or until the dough is golden brown and the meatballs are cooked through.
- Once out of the oven, place edible eyes on the meatballs to give them a spooky look.
- Serve with marinara sauce for dipping.
Graveyard Taco Dip
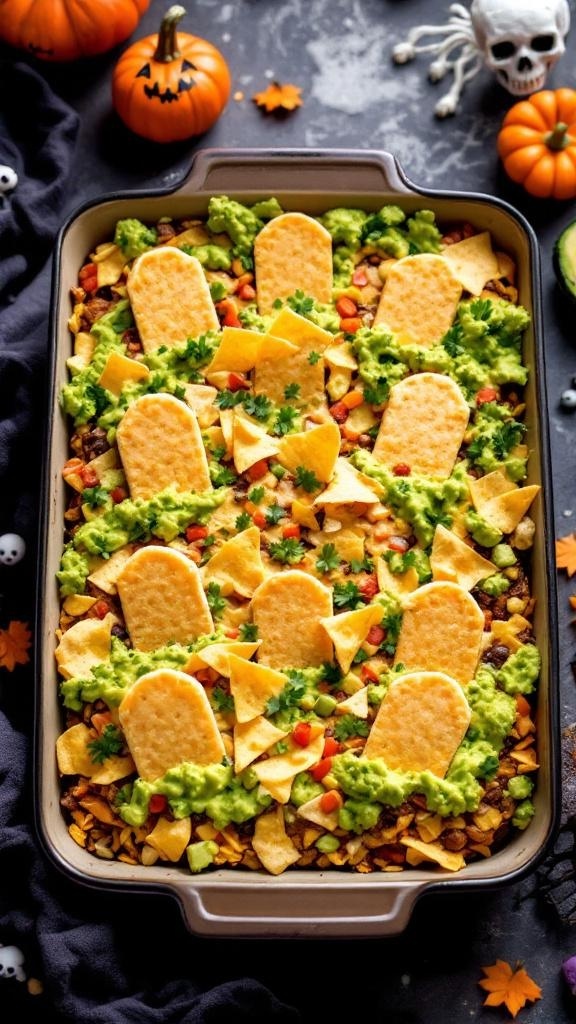
Graveyard Taco Dip is a fun and festive dish perfect for Halloween parties. This layered dip combines creamy guacamole, savory taco meat, and crunchy tortilla chips, all topped with cheese tombstones. It's a delightful mix of flavors that everyone will love!
Making this dip is super simple and requires minimal prep time. Just layer your ingredients in a dish, and you’re ready to impress your guests with this spooky treat!
Ingredients
- 1 pound ground beef
- 1 packet taco seasoning
- 1 can refried beans
- 2 cups guacamole
- 1 cup shredded cheese (cheddar or Mexican blend)
- 1 cup diced tomatoes
- 1 cup chopped lettuce
- 1 bag tortilla chips
- 4-6 cheese slices (for tombstones)
- Fresh cilantro (for garnish)
Instructions
- Cook the Beef: In a skillet, brown the ground beef over medium heat. Drain any excess fat and stir in the taco seasoning according to package instructions. Set aside to cool.
- Layer the Dip: In a large serving dish, spread the refried beans evenly on the bottom. Next, layer the seasoned beef, followed by guacamole, diced tomatoes, and chopped lettuce.
- Add Cheese: Sprinkle the shredded cheese on top of the layers.
- Create Tombstones: Cut the cheese slices into tombstone shapes and place them upright in the dip. You can use a knife to carve little details if you like!
- Garnish: Finish with fresh cilantro for a pop of color. Serve with tortilla chips for dipping.
Pumpkin Patch Brownies
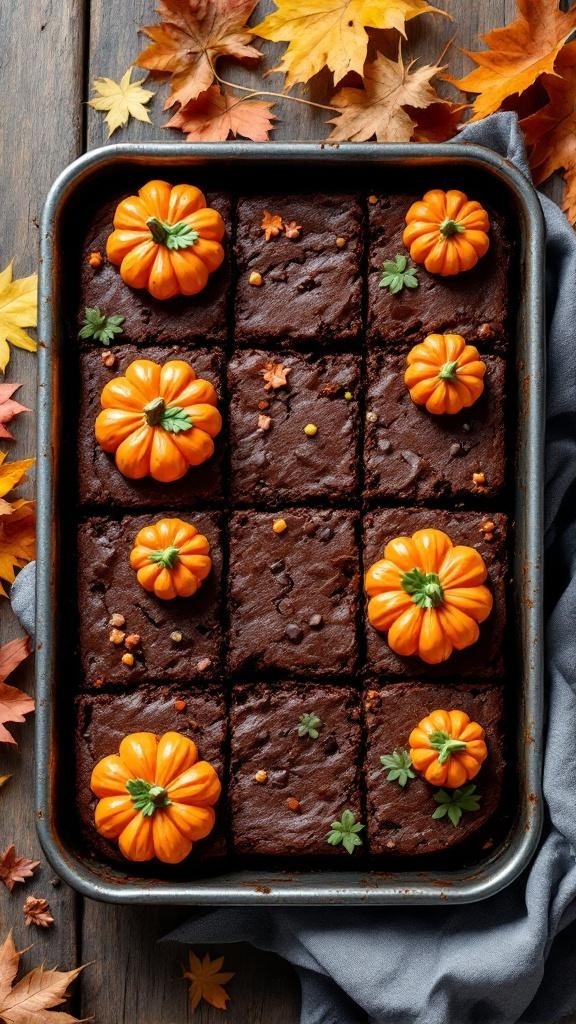
These Pumpkin Patch Brownies are a fun and festive treat for your Halloween party. Rich, fudgy brownies topped with adorable mini pumpkin decorations bring a delightful touch to your dessert table. They are easy to make and perfect for both kids and adults to enjoy.
With a chocolatey flavor that pairs beautifully with the fall season, these brownies are sure to be a hit. The combination of sweetness from the brownies and the playful pumpkin toppings makes them irresistible. Plus, they come together quickly, so you can spend more time enjoying the party!
Ingredients
- 1 cup unsalted butter
- 2 cups granulated sugar
- 4 large eggs
- 1 teaspoon vanilla extract
- 1 cup all-purpose flour
- 1 cup unsweetened cocoa powder
- 1/2 teaspoon salt
- 1/2 teaspoon baking powder
- 1 cup chocolate chips
- Mini pumpkin candies for decoration
- Green icing for leaves (optional)
Instructions
- Preheat your oven to 350°F (175°C) and grease a 9x13 inch baking pan.
- In a large saucepan, melt the butter over medium heat. Remove from heat and stir in sugar, eggs, and vanilla until well combined.
- Add flour, cocoa powder, salt, and baking powder to the mixture. Stir until just combined, then fold in the chocolate chips.
- Pour the batter into the prepared baking pan and spread it evenly. Bake for 25-30 minutes, or until a toothpick inserted in the center comes out clean.
- Let the brownies cool completely in the pan. Once cooled, cut them into squares and decorate with mini pumpkin candies and green icing for leaves if desired.
Ghostly Banana Pops
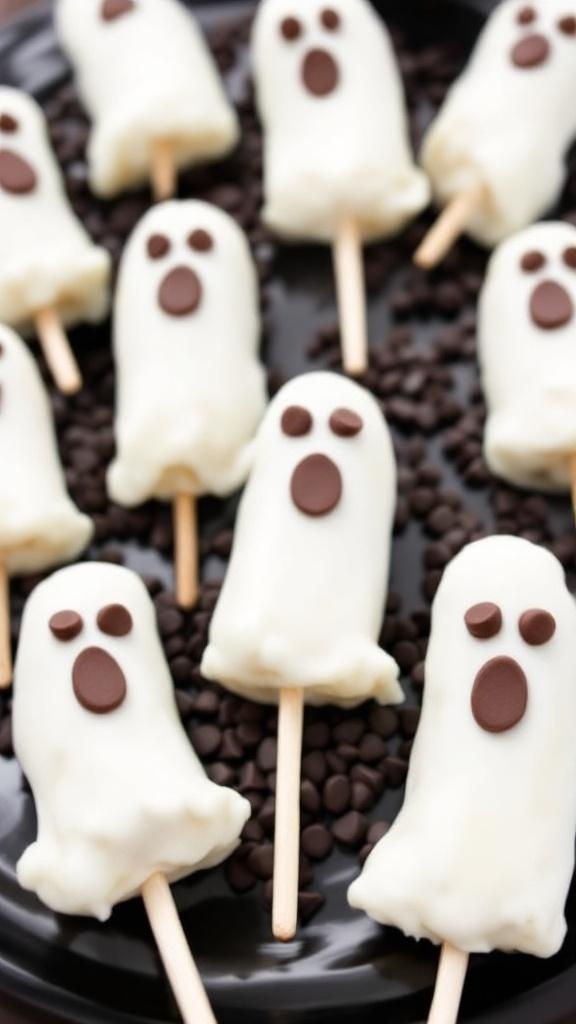
Ghostly Banana Pops are a fun and spooky treat perfect for Halloween parties. These delightful snacks combine the sweetness of bananas with creamy white chocolate, making them a hit for both kids and adults. They are simple to make, requiring just a few ingredients and minimal prep time.
With their cute ghostly appearance, these pops are not only tasty but also a healthy alternative to traditional Halloween sweets. The combination of banana and chocolate creates a delicious flavor that everyone will love!
Ingredients
- 4 ripe bananas
- 1 cup white chocolate chips
- 1 tablespoon coconut oil
- Mini chocolate chips (for eyes)
- Wooden popsicle sticks
Instructions
- Prepare the Bananas: Peel the bananas and cut them in half. Insert a popsicle stick into the cut end of each banana half.
- Melt the Chocolate: In a microwave-safe bowl, combine the white chocolate chips and coconut oil. Heat in the microwave in 30-second intervals, stirring until smooth.
- Coat the Bananas: Dip each banana half into the melted chocolate, ensuring they are fully coated. Allow any excess chocolate to drip off.
- Add the Eyes: Place mini chocolate chips on the chocolate-coated bananas to create ghost eyes. You can also sprinkle some chocolate chips on for added texture.
- Chill: Place the coated banana pops on a baking sheet lined with parchment paper. Freeze for at least 1 hour until the chocolate is set.
- Serve: Once frozen, serve the Ghostly Banana Pops on a platter and enjoy!
Bloody Beet Hummus
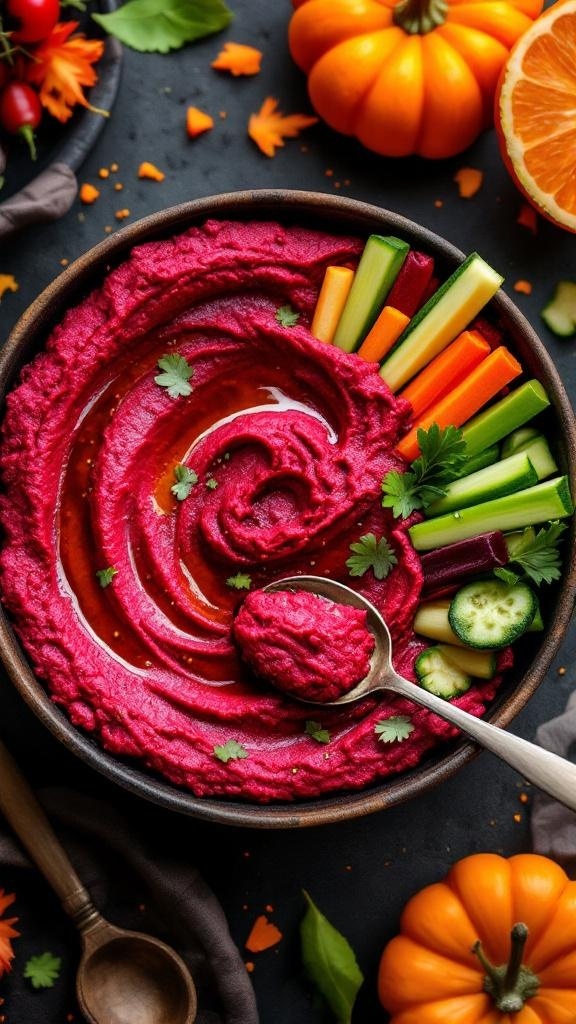
Get ready for a spooky twist on a classic dip with this Bloody Beet Hummus! This vibrant, ruby-red hummus is not only visually striking but also packed with earthy flavors from the beets and a hint of garlic. It’s creamy, slightly sweet, and perfect for dipping fresh veggies or spreading on sandwiches.
Making this hummus is a breeze! Just toss the ingredients into a food processor, blend until smooth, and you’re ready to impress your guests. It’s a fun and healthy addition to your Halloween party spread that everyone will love.
Ingredients
- 1 cup cooked beets, peeled and chopped
- 1 can (15 oz) chickpeas, drained and rinsed
- 1/4 cup tahini
- 2 tablespoons olive oil
- 2 tablespoons lemon juice
- 1 garlic clove
- Salt and pepper to taste
- Fresh herbs for garnish (like cilantro or parsley)
Instructions
- Blend the Ingredients: In a food processor, combine the cooked beets, chickpeas, tahini, olive oil, lemon juice, and garlic. Blend until smooth.
- Season: Taste the hummus and add salt and pepper as needed. If it's too thick, you can add a little water to reach your desired consistency.
- Serve: Transfer the hummus to a serving bowl, drizzle with a bit of olive oil, and garnish with fresh herbs. Serve with an assortment of fresh veggies for dipping.
Monster Eye Cookies
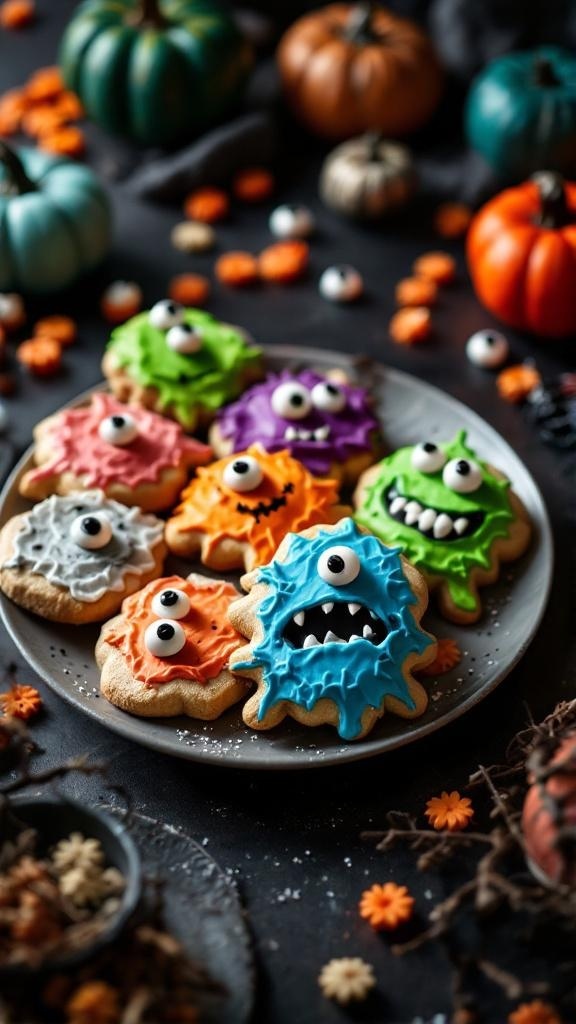
Monster Eye Cookies are a fun and spooky treat perfect for Halloween parties. These colorful cookies are not only adorable but also delicious, with a soft and chewy texture that everyone will love. The vibrant icing and playful designs make them a hit with kids and adults alike.
Making these cookies is simple and enjoyable. With just a few ingredients and some creative decorating, you can whip up a batch that will impress your guests. Get ready for some tasty fun!
Ingredients
- 2 3/4 cups all-purpose flour
- 1 teaspoon baking soda
- 1/2 teaspoon salt
- 1 cup unsalted butter, softened
- 1 1/2 cups granulated sugar
- 1 large egg
- 1 teaspoon vanilla extract
- 1/2 teaspoon almond extract
- 4 cups powdered sugar
- 1/4 cup milk
- Food coloring (various colors)
- Candy eyeballs for decoration
Instructions
- Preheat your oven to 350°F (175°C). In a bowl, whisk together flour, baking soda, and salt. Set aside.
- In a large bowl, cream the softened butter and granulated sugar until light and fluffy. Beat in the egg, vanilla extract, and almond extract.
- Gradually add the dry ingredients to the wet mixture, mixing until combined. Chill the dough for about 30 minutes.
- Roll the dough into balls and place them on a baking sheet lined with parchment paper. Flatten slightly and bake for 10-12 minutes until the edges are golden.
- Let the cookies cool completely before decorating. In a separate bowl, mix powdered sugar and milk to create a smooth icing. Divide into bowls and add food coloring to achieve desired colors.
- Decorate the cookies with icing and place candy eyeballs on top. Let the icing set before serving.
Creepy Crawly Cupcakes
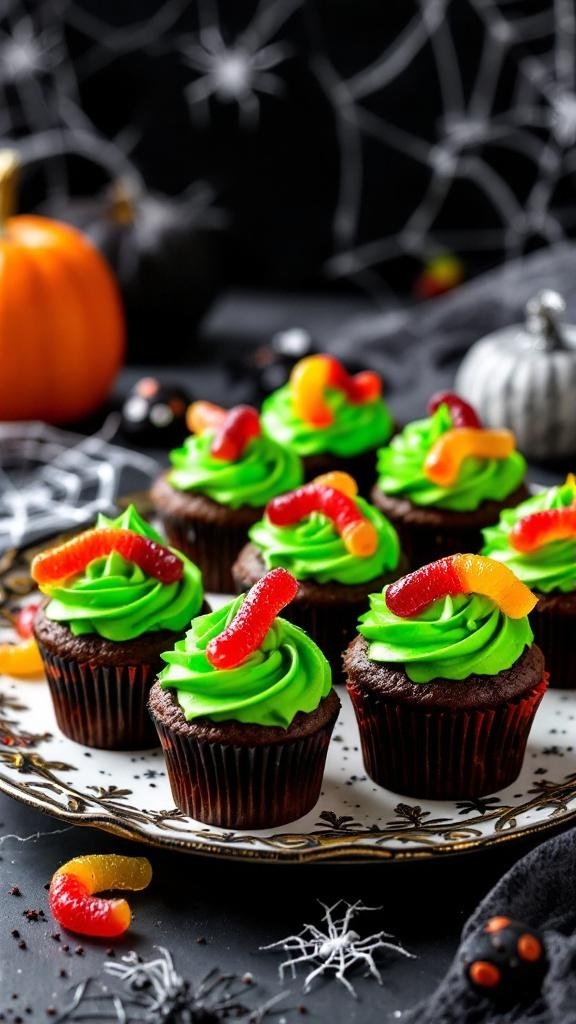
Creepy Crawly Cupcakes are a fun and spooky treat perfect for Halloween parties. These chocolate cupcakes are topped with vibrant green frosting and adorned with gummy worms, making them both delicious and visually striking. They have a rich chocolate flavor that pairs wonderfully with the sweet, creamy frosting.
Making these cupcakes is simple and enjoyable, making them a great activity for kids and adults alike. With just a few ingredients and steps, you can create a delightful dessert that will impress your guests and add a festive touch to your Halloween celebration!
Ingredients
- 1 3/4 cups all-purpose flour
- 1 3/4 cups granulated sugar
- 3/4 cup unsweetened cocoa powder
- 1 1/2 teaspoons baking powder
- 1 1/2 teaspoons baking soda
- 1 teaspoon salt
- 2 large eggs
- 1 cup whole milk
- 1/2 cup vegetable oil
- 2 teaspoons vanilla extract
- 1 cup boiling water
- 1 cup green frosting (store-bought or homemade)
- Gummy worms for decoration
Instructions
- Preheat the oven to 350°F (175°C) and line a cupcake pan with paper liners.
- In a large bowl, mix together the flour, sugar, cocoa powder, baking powder, baking soda, and salt.
- Add the eggs, milk, vegetable oil, and vanilla extract to the dry ingredients. Mix until well combined.
- Carefully stir in the boiling water until the batter is smooth. The batter will be thin.
- Pour the batter into the prepared cupcake liners, filling each about 2/3 full.
- Bake for 18-20 minutes, or until a toothpick inserted in the center comes out clean. Let the cupcakes cool completely.
- Once cooled, frost each cupcake with green frosting and top with gummy worms for a creepy touch.
Witch Hat Cookies
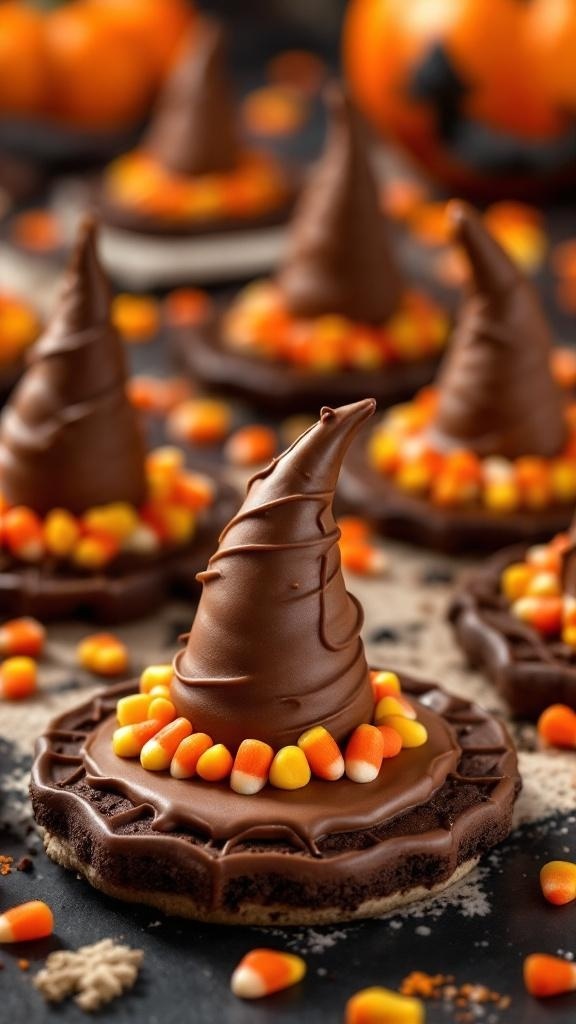
Witch Hat Cookies are a fun and festive treat perfect for Halloween parties. These cookies combine a sweet, buttery base with a chocolate topping and a cute candy hat, making them a delightful addition to any spooky spread. They are simple to make, so even novice bakers can whip them up in no time!
The combination of flavors is sure to please everyone. The cookies are sweet and buttery, while the chocolate adds a rich touch. Plus, the candy decorations give them a playful look that kids and adults alike will enjoy.
Ingredients
- 1 cup unsalted butter, softened
- 1 cup granulated sugar
- 1 large egg
- 1 teaspoon vanilla extract
- 2 ½ cups all-purpose flour
- 1 teaspoon baking powder
- ½ teaspoon salt
- 1 cup chocolate chips
- 1 cup candy corn
- 1 cup orange and yellow candy squares (for decoration)
Instructions
- Preheat the oven to 350°F (175°C). Line a baking sheet with parchment paper.
- In a large bowl, cream together the softened butter and sugar until light and fluffy. Add the egg and vanilla, mixing well.
- In another bowl, whisk together the flour, baking powder, and salt. Gradually add the dry ingredients to the wet mixture, mixing until just combined.
- Roll the dough into small balls and place them on the prepared baking sheet, spacing them about 2 inches apart. Flatten each ball slightly.
- Bake for 10-12 minutes or until the edges are lightly golden. Remove from the oven and let cool on the baking sheet for a few minutes before transferring to a wire rack.
- Once the cookies are cool, melt the chocolate chips in a microwave-safe bowl. Dip the top of each cookie into the melted chocolate, then place a candy corn on top to create the witch hat.
- Use the orange and yellow candy squares to decorate the base of the hat. Let the chocolate set before serving.
Cheesy Monster Nachos
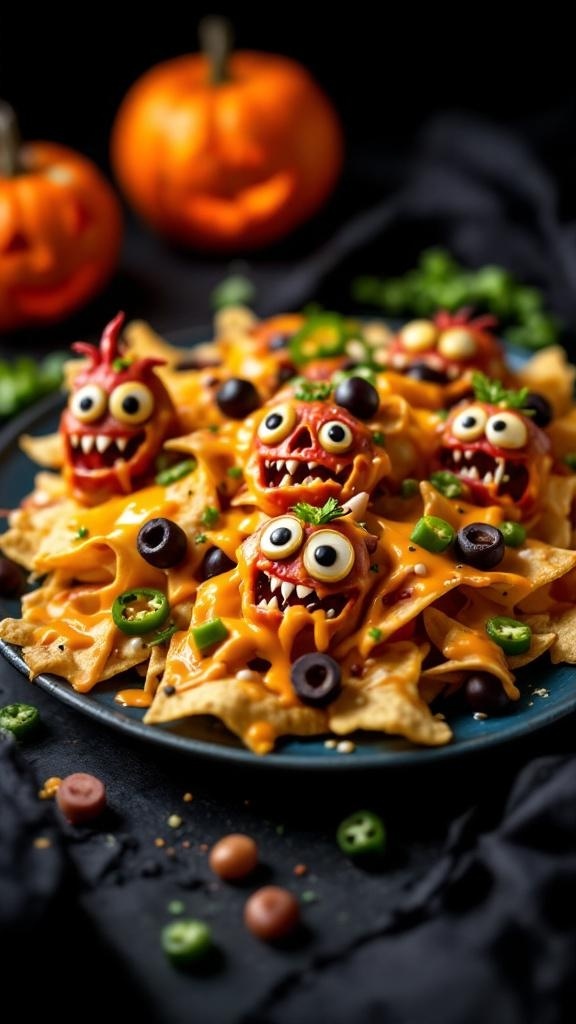
Cheesy Monster Nachos are a fun and spooky twist on a classic snack, perfect for Halloween parties. These nachos are loaded with gooey cheese and topped with playful monster faces made from colorful ingredients. They are not only delicious but also super easy to make, making them a hit with both kids and adults.
The combination of crunchy tortilla chips, melted cheese, and fresh toppings creates a satisfying flavor that everyone will love. Plus, the monster faces add a playful touch that will get everyone in the Halloween spirit!
Ingredients
- 1 bag of tortilla chips
- 2 cups shredded cheddar cheese
- 1 cup sliced black olives
- 1 cup diced green bell peppers
- 1 cup cherry tomatoes
- 1/2 cup sour cream
- 1/4 cup sliced jalapeños
- 1/4 cup chopped green onions
Instructions
- Preheat your oven to 350°F (175°C).
- Spread the tortilla chips evenly on a baking sheet.
- Sprinkle the shredded cheddar cheese generously over the chips.
- Place the baking sheet in the oven and bake for about 10 minutes, or until the cheese is melted and bubbly.
- While the nachos are baking, prepare the monster faces: cut the cherry tomatoes in half and place them on top of the melted cheese. Use black olives for eyes and green bell peppers for hair.
- Once the nachos are out of the oven, add jalapeños and green onions for extra flavor.
- Serve with sour cream on the side for dipping. Enjoy your spooky snack!
Cauldron Chili
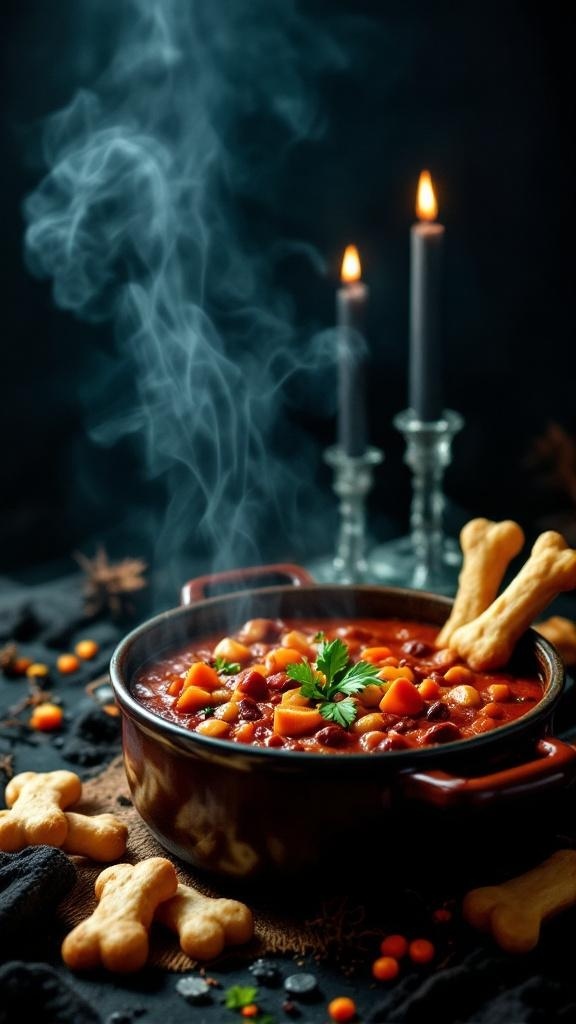
Cauldron Chili is the perfect dish for your Halloween gathering. This hearty chili is packed with beans, veggies, and spices that create a warm and comforting flavor. It’s simple to whip up, making it a great choice for both seasoned cooks and beginners alike.
With its rich taste and festive presentation, this chili will surely be a hit at your party. Serve it in a cauldron for a spooky touch, and watch your guests enjoy every spoonful!
Ingredients
- 1 tablespoon olive oil
- 1 onion, chopped
- 2 cloves garlic, minced
- 1 bell pepper, diced
- 2 carrots, diced
- 1 can (15 oz) kidney beans, drained and rinsed
- 1 can (15 oz) black beans, drained and rinsed
- 1 can (28 oz) diced tomatoes
- 2 cups vegetable broth
- 2 tablespoons chili powder
- 1 teaspoon cumin
- Salt and pepper to taste
- Fresh cilantro for garnish
- Optional: Tortilla chips or bread for serving
Instructions
- Heat olive oil in a large pot over medium heat. Add chopped onion and sauté until translucent, about 5 minutes.
- Add minced garlic, bell pepper, and carrots. Cook for another 5 minutes until veggies are tender.
- Stir in kidney beans, black beans, diced tomatoes, vegetable broth, chili powder, cumin, salt, and pepper. Bring to a boil.
- Reduce heat and let simmer for 20-30 minutes, stirring occasionally. Adjust seasoning as needed.
- Serve hot, garnished with fresh cilantro. Pair with tortilla chips or bread for a complete meal.
Pumpkin Spice Rice Krispie Treats
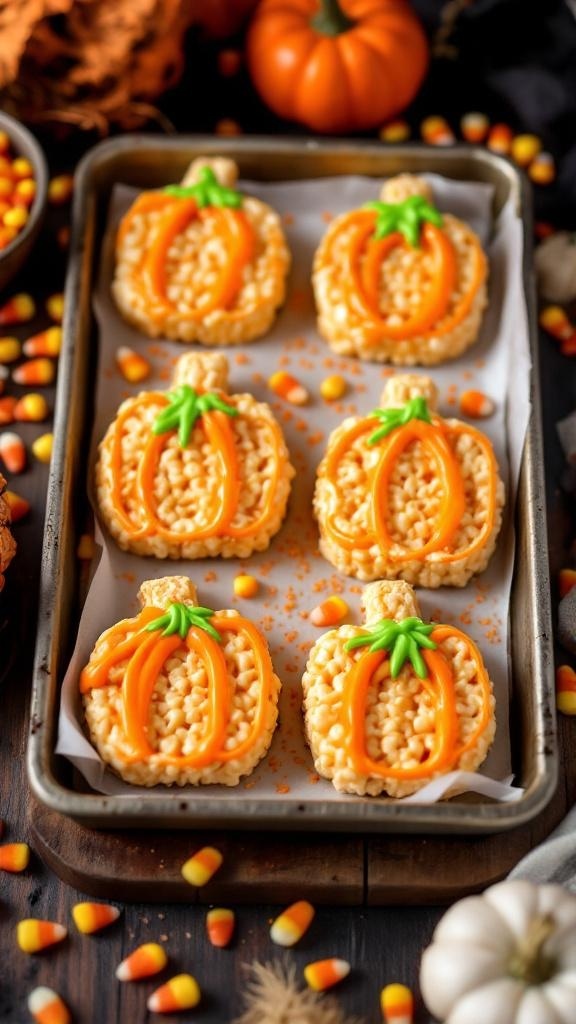
These Pumpkin Spice Rice Krispie Treats are a fun twist on a classic favorite. With a delightful blend of pumpkin spice flavor and a chewy texture, they make for a perfect Halloween treat. Not only do they taste great, but they are also super easy to whip up, making them a hit for both kids and adults alike!
Decorated to look like little pumpkins, these treats are sure to bring a festive vibe to your Halloween party. The combination of marshmallows and crispy rice cereal, along with the warm spices, creates a deliciously sweet snack that everyone will love.
Ingredients
- 6 cups Rice Krispies cereal
- 4 cups mini marshmallows
- 3 tablespoons unsalted butter
- 1 teaspoon pumpkin pie spice
- 1/4 cup orange candy melts
- 1/4 cup green candy melts
- Cooking spray (for greasing)
Instructions
- Prepare the Pan: Grease a 9x13 inch baking dish with cooking spray.
- Melt the Butter: In a large saucepan over low heat, melt the butter. Add the mini marshmallows and stir until completely melted and smooth.
- Add Pumpkin Spice: Stir in the pumpkin pie spice until well combined.
- Mix in Cereal: Remove from heat and add the Rice Krispies cereal. Stir until evenly coated with the marshmallow mixture.
- Shape the Treats: Press the mixture into the prepared baking dish, spreading it evenly. Allow it to cool for about 30 minutes.
- Cut into Shapes: Once cooled, cut the treats into pumpkin shapes using a cookie cutter.
- Decorate: Melt the orange candy melts in a microwave-safe bowl and drizzle over the pumpkin-shaped treats. Use the green candy melts to create the pumpkin stems.
- Let Set: Allow the candy melts to harden before serving.
Frankenstein Fruit Salad
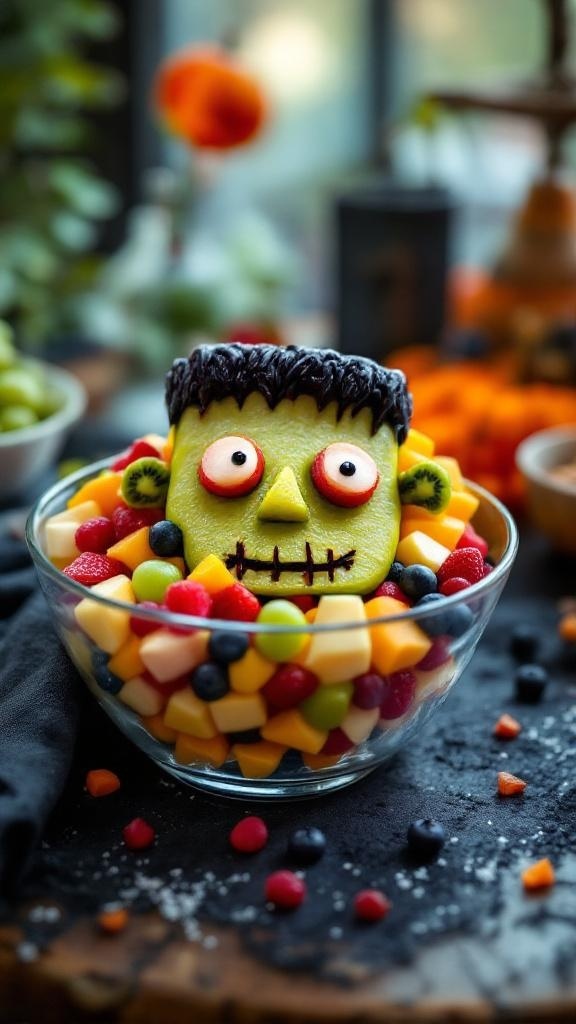
Frankenstein Fruit Salad is a fun and festive treat perfect for Halloween parties. This colorful mix of fruits is not only visually appealing but also deliciously refreshing. The playful presentation, featuring a Frankenstein face made from melon, adds a spooky twist that kids and adults will love.
Making this salad is a breeze! You can customize the fruit selection based on your preferences or what’s in season. It’s a simple, healthy option that brings a smile to everyone’s face while keeping the Halloween spirit alive.
Ingredients
- 1 medium green melon (honeydew or cantaloupe)
- 1 cup strawberries, sliced
- 1 cup blueberries
- 1 cup diced pineapple
- 1 cup diced mango
- 1 cup mini marshmallows
- 1/4 cup chocolate syrup (for decoration)
- 2 candy eyes
- 1 piece of black licorice (for hair)
- 1 tablespoon edible black glitter (optional)
Instructions
- Prepare the Melon: Cut the green melon in half and scoop out the seeds. Use one half to create the Frankenstein face. Carve out eyes and a mouth, then place candy eyes in the eye sockets.
- Assemble the Salad: In a large bowl, combine strawberries, blueberries, pineapple, mango, and mini marshmallows. Toss gently to mix.
- Decorate: Place the carved melon half on top of the fruit salad. Use black licorice to create hair and drizzle chocolate syrup for a spooky effect. Sprinkle edible glitter if desired.
- Serve: Enjoy immediately or chill in the refrigerator until ready to serve. This salad is best enjoyed fresh!
Zombie Brain Jello
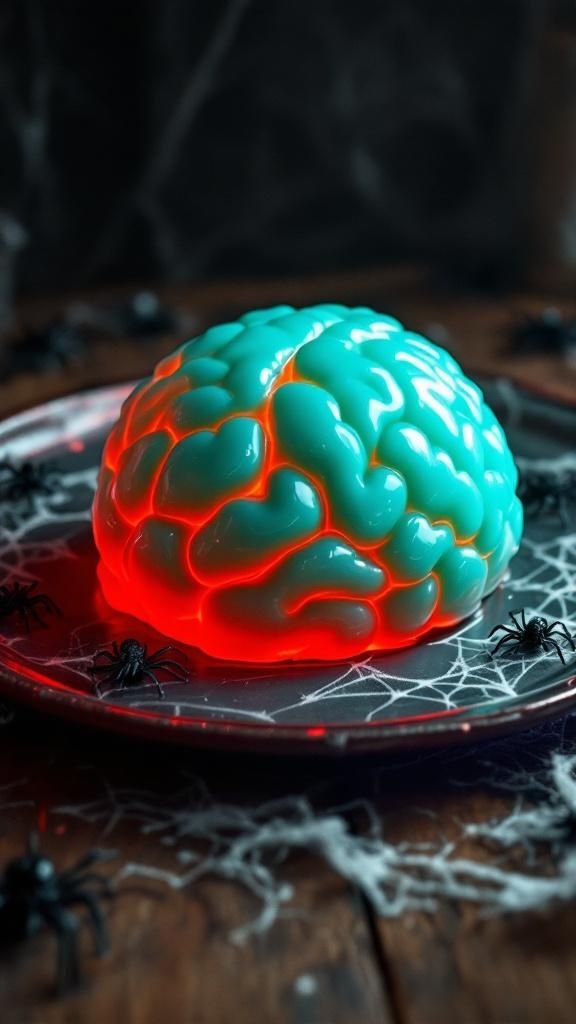
Zombie Brain Jello is a fun and spooky treat that’s perfect for Halloween parties. This vibrant, wobbly dessert looks just like a brain, making it a hit among guests of all ages. The sweet and fruity flavor is sure to please, and it’s surprisingly easy to whip up!
With just a few ingredients, you can create this eye-catching centerpiece that adds a playful touch to your Halloween spread. It’s a simple recipe that doesn’t require any baking, making it a great option for those who want to impress without spending hours in the kitchen.
Ingredients
- 2 cups fruit juice (like grape or cranberry)
- 1 cup water
- 1 packet (3 oz) raspberry or strawberry gelatin
- 1 packet (1 oz) unflavored gelatin
- 1/2 cup whipped cream (optional, for serving)
Instructions
- Prepare the Mold: Lightly grease a brain-shaped mold with cooking spray to make it easier to remove the jello later.
- Mix the Gelatin: In a saucepan, combine the fruit juice and water. Heat over medium until warm, but not boiling. Stir in the flavored gelatin and unflavored gelatin until fully dissolved.
- Chill: Pour the mixture into the prepared mold and refrigerate for at least 4 hours, or until fully set.
- Serve: Once set, carefully remove the jello from the mold and place it on a serving platter. If desired, serve with whipped cream for an extra treat!
Struggling to Stay on Track with Your Eating?
You’re not alone. One of the biggest obstacles I see people
face is not knowing what to eat. Between busy schedules, endless diet
advice online, and trying to cook healthy meals that actually taste good—it’s
easy to feel stuck or overwhelmed.
That’s why I created my 21 Quick & Easy Custom
Low-Calorie Meal Plans Program. These plans are built specifically for
you—your goals, your lifestyle, and your food preferences. You won’t find
any cookie-cutter diets here. Just real, satisfying meals that help you stay
full, energized, and on track without the stress.
✅ No more guessing.
✅
No more skipping meals or eating “diet food” you hate.
✅
Just a clear, doable plan that fits your life.
👉 Ready to eat better,
feel better, and finally make progress? [Click here to get your custom meal plans today.]
Not Seeing the Inches Drop No Matter What You Do?
If you’re working out but still not seeing the results in
the mirror, I hear you. So many people come to me after months of doing cardio
or random workouts—and still struggling to lose inches or tone up. The truth
is, your body needs more than just movement. It needs a proven strategy.
My 8-Week Workout Program to Lose Inches is designed
to do just that—burn fat, tighten up, and give you visible results.
These workouts are fun, effective, and designed for real people with real
lives. Whether you’re getting back into fitness or ready to take it to the next
level, this program gives you a clear path to success.
✅ Just 8 weeks to build strength,
confidence, and a fitter shape.
✅
No endless cardio.
✅
No gym required (unless you want it).
👉 If you're ready to
drop inches and feel amazing in your own skin, [click here to start the 8-WeekWorkout Program].


Comments
Post a Comment