18 Delicious No Bake Dessert Recipes for a Guilt-Free Treat
18 Delicious No Bake Dessert Recipes for a Guilt-Free Treat
These 18 healthy no-bake dessert recipes are perfect for satisfying your sweet tooth without turning on the oven. From creamy cheesecakes to chewy energy bites, each recipe highlights fresh ingredients and simple techniques that keep flavors vibrant and textures delightful. Get ready to whip up some guilt-free indulgences that are as easy to make as they are enjoyable to eat!
Decadent Chocolate Avocado Mousse
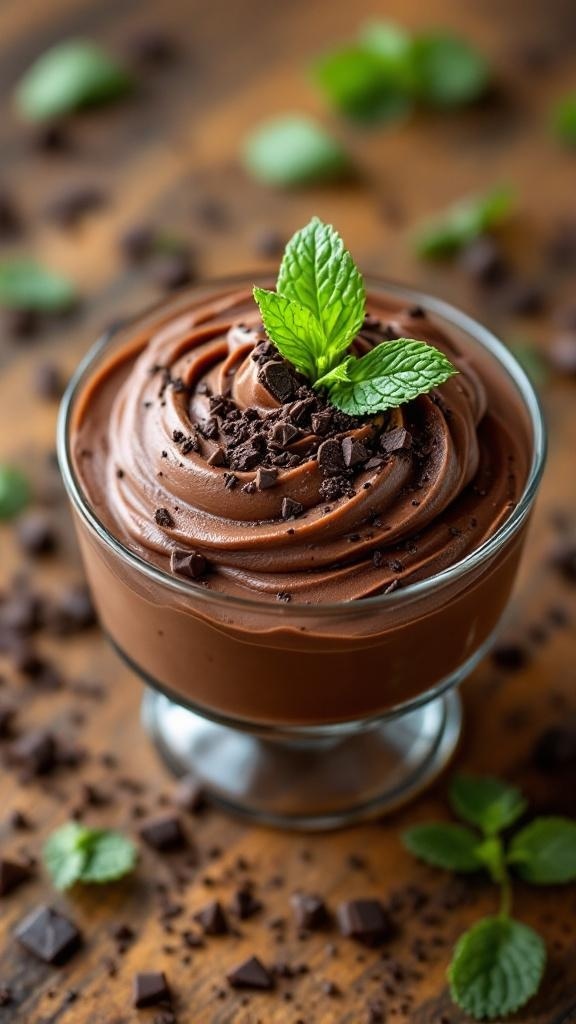
This Chocolate Avocado Mousse is a delightful treat that combines rich chocolate flavor with the creaminess of avocado. It’s surprisingly simple to whip up, making it a perfect dessert for any occasion. The mousse is smooth, velvety, and has a hint of sweetness that satisfies your chocolate cravings without the guilt.
With just a few ingredients, you can create a dessert that feels indulgent yet is packed with healthy fats. The avocado adds a unique twist, making this mousse not only delicious but also nutritious. Serve it chilled for a refreshing finish to your meal!
Ingredients
- 2 ripe avocados
- 1/2 cup unsweetened cocoa powder
- 1/2 cup maple syrup or honey
- 1/4 cup almond milk (or any milk of choice)
- 1 teaspoon vanilla extract
- A pinch of salt
- Chocolate shavings or fresh mint for garnish
Instructions
- Prepare the Avocados: Cut the avocados in half, remove the pit, and scoop the flesh into a blender or food processor.
- Add Ingredients: Add cocoa powder, maple syrup, almond milk, vanilla extract, and salt to the blender.
- Blend Until Smooth: Blend all ingredients until you achieve a creamy and smooth texture, scraping down the sides as needed.
- Taste and Adjust: Taste the mousse and adjust sweetness if necessary by adding more maple syrup or honey.
- Chill: Transfer the mousse into serving bowls and refrigerate for at least 30 minutes to set.
- Serve: Garnish with chocolate shavings or fresh mint before serving. Enjoy your delicious and healthy dessert!
Refreshing Coconut Chia Pudding
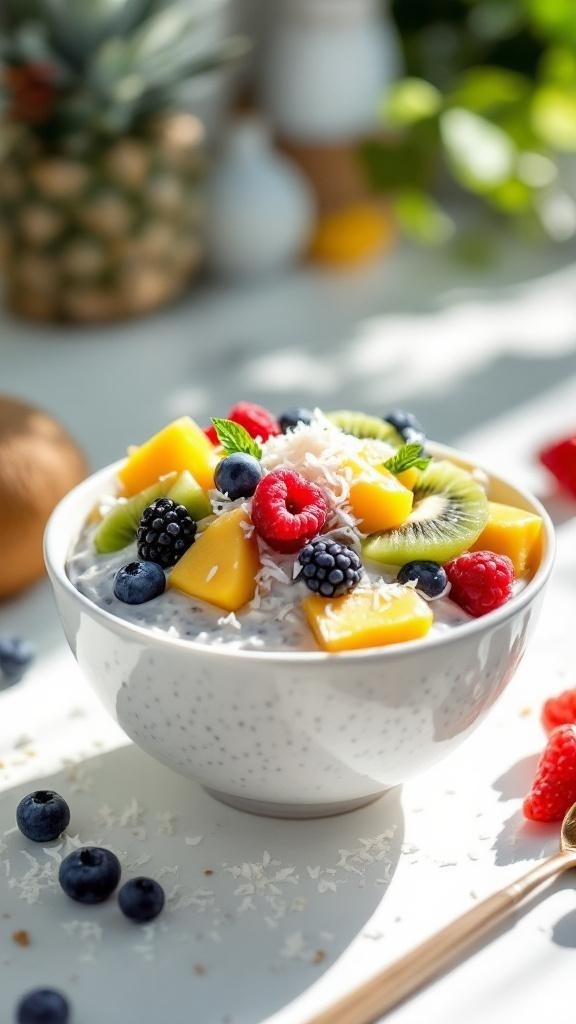
This Coconut Chia Pudding is a light and refreshing treat that’s perfect for any time of day. With a creamy coconut base and a delightful crunch from chia seeds, it’s a simple dessert that feels indulgent without the guilt. The natural sweetness from fresh fruits adds a burst of flavor, making each spoonful a delightful experience.
Making this pudding is a breeze! Just mix the ingredients, let it chill, and you’re ready to enjoy a healthy dessert that’s both satisfying and nutritious. It’s a fantastic option for meal prep, too, as it keeps well in the fridge for several days.
Ingredients
- 1 cup coconut milk
- 1/4 cup chia seeds
- 2 tablespoons honey or maple syrup
- 1 teaspoon vanilla extract
- Fresh fruits (mango, kiwi, berries) for topping
- Shredded coconut for garnish
Instructions
- In a bowl, whisk together coconut milk, chia seeds, honey (or maple syrup), and vanilla extract until well combined.
- Cover the bowl and refrigerate for at least 4 hours or overnight, allowing the chia seeds to swell and thicken the mixture.
- Once set, stir the pudding to break up any clumps. Serve in bowls topped with fresh fruits and a sprinkle of shredded coconut.
- Enjoy your refreshing Coconut Chia Pudding!
Nutty Almond Butter Energy Bites
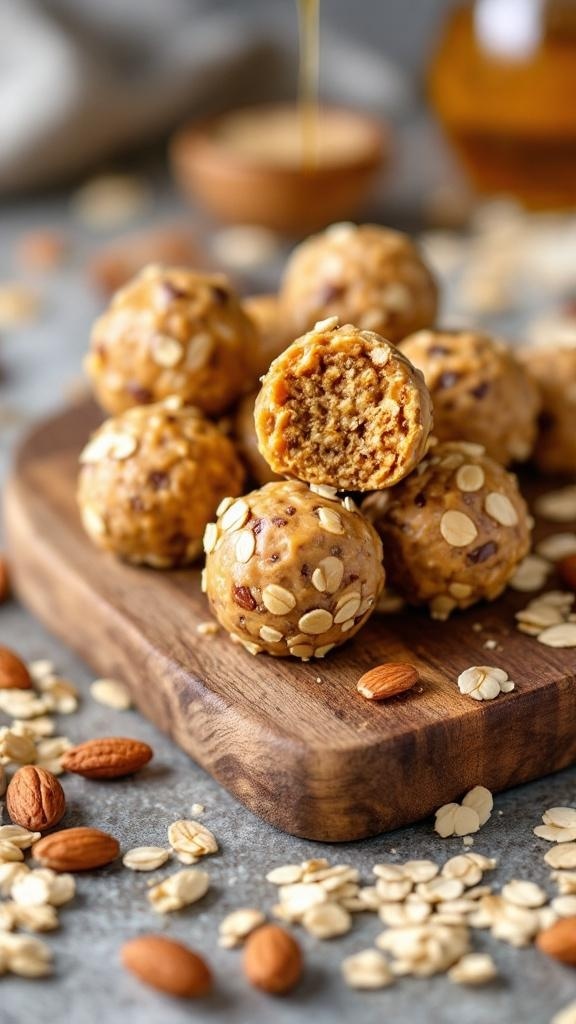
Nutty Almond Butter Energy Bites are a quick and easy treat that packs a punch of flavor and nutrition. These little bites are sweet, nutty, and satisfying, making them perfect for a snack or a post-workout boost.
With just a few simple ingredients, you can whip these up in no time. They’re no-bake, which means less mess and more time to enjoy! Perfect for busy days, these energy bites are sure to become a favorite.
Ingredients
- 1 cup rolled oats
- 1/2 cup almond butter
- 1/4 cup honey or maple syrup
- 1/4 cup mini chocolate chips (optional)
- 1/4 cup chopped almonds
- 1 teaspoon vanilla extract
- 1/2 teaspoon cinnamon
Instructions
- In a large bowl, combine rolled oats, almond butter, honey or maple syrup, mini chocolate chips, chopped almonds, vanilla extract, and cinnamon. Mix until well combined.
- Using your hands, form the mixture into small balls, about 1 inch in diameter.
- Place the energy bites on a baking sheet lined with parchment paper and refrigerate for at least 30 minutes to firm up.
- Once set, store them in an airtight container in the fridge for up to a week. Enjoy your tasty and healthy snacks!
Berry-Licious No Bake Cheesecake
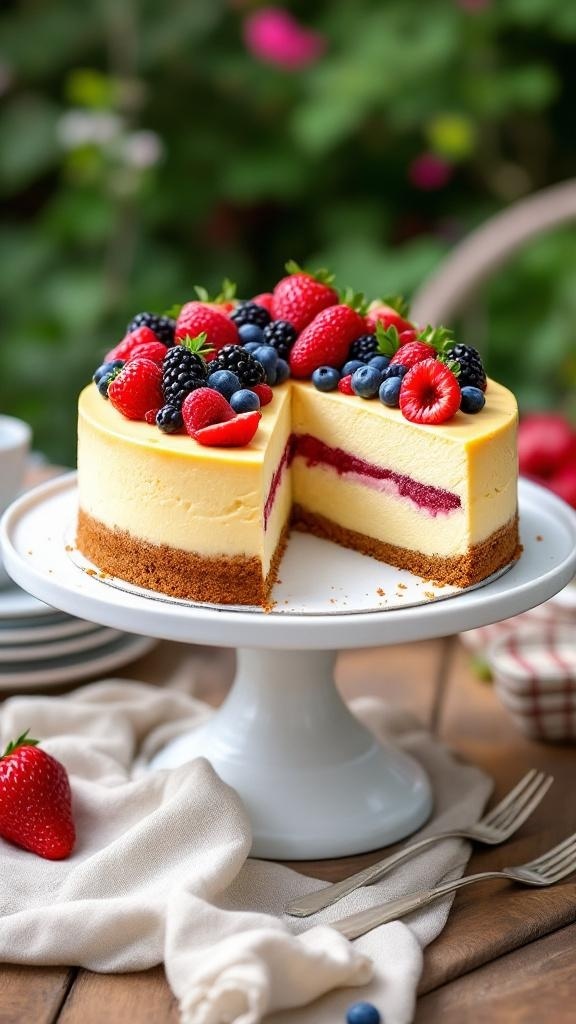
This Berry-Licious No Bake Cheesecake is a delightful treat that’s perfect for any occasion. It combines a creamy cheesecake filling with a vibrant berry layer, making it both refreshing and satisfying. The taste is a wonderful balance of sweet and tart, thanks to the mix of fresh berries on top.
Making this cheesecake is super simple! With no baking required, you can whip it up quickly and let it chill while you enjoy your day. It’s a great way to impress guests or treat yourself without spending hours in the kitchen.
Ingredients
- 1 ½ cups graham cracker crumbs
- ½ cup unsalted butter, melted
- 2 cups cream cheese, softened
- 1 cup powdered sugar
- 1 teaspoon vanilla extract
- 1 cup heavy cream
- 1 cup mixed berries (strawberries, blueberries, raspberries)
- ¼ cup berry jam or puree
Instructions
- Prepare the Crust: In a bowl, mix graham cracker crumbs and melted butter until well combined. Press the mixture into the bottom of a springform pan to form an even layer.
- Make the Cheesecake Filling: In a large bowl, beat the cream cheese until smooth. Gradually add powdered sugar and vanilla, mixing until well combined. In another bowl, whip the heavy cream until stiff peaks form, then gently fold it into the cream cheese mixture.
- Layer the Cheesecake: Spread half of the cheesecake filling over the crust. Drizzle the berry jam or puree on top, then add the remaining cheesecake filling. Smooth the top with a spatula.
- Chill: Cover the cheesecake and refrigerate for at least 4 hours or until set.
- Top with Berries: Before serving, arrange the mixed berries on top for a beautiful finish. Slice and enjoy!
Zesty Lemon Coconut Bars
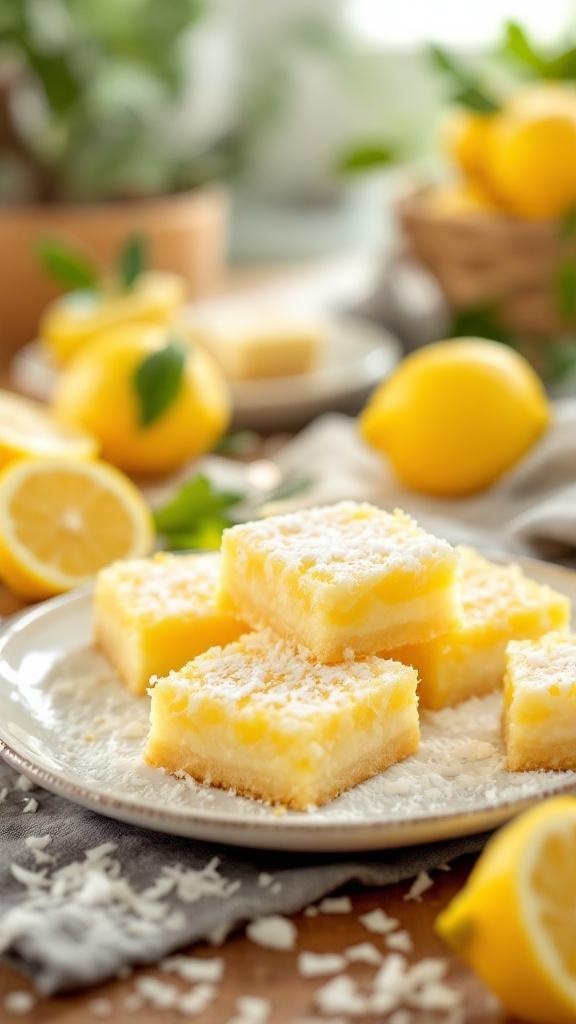
These Zesty Lemon Coconut Bars are a delightful treat that brings a burst of sunshine to your day. With a perfect balance of tangy lemon and sweet coconut, they are refreshing and satisfying. Plus, they are incredibly easy to whip up, making them a great option for a quick dessert.
Each bite is a combination of creamy and chewy textures, making them a hit for both kids and adults. No baking is required, so you can enjoy these bars without the hassle of turning on the oven. Perfect for warm days or as a light dessert after a meal!
Ingredients
- 1 cup shredded coconut
- 1/2 cup almond flour
- 1/4 cup maple syrup
- 1/4 cup coconut oil, melted
- 1/4 cup fresh lemon juice
- 1 tablespoon lemon zest
- 1/4 teaspoon salt
- 1/4 teaspoon vanilla extract
Instructions
- Prepare the Base: In a mixing bowl, combine shredded coconut, almond flour, maple syrup, melted coconut oil, lemon juice, lemon zest, salt, and vanilla extract. Mix until well combined.
- Press into Pan: Line an 8x8 inch baking dish with parchment paper. Press the mixture firmly into the bottom of the dish to create an even layer.
- Chill: Place the dish in the refrigerator for at least 2 hours to set.
- Slice and Serve: Once set, remove from the dish and cut into squares. Enjoy chilled or at room temperature!
Indulgent Peanut Butter Chocolate Bars

These Peanut Butter Chocolate Bars are a delightful treat that combines creamy peanut butter with rich chocolate. They’re sweet, satisfying, and perfect for anyone craving a quick dessert. Plus, they require no baking, making them super easy to whip up!
With just a handful of ingredients, you can create a deliciously indulgent snack that everyone will love. The combination of flavors is simply irresistible, and you’ll find yourself reaching for seconds!
Ingredients
- 1 cup peanut butter
- 1/2 cup honey or maple syrup
- 2 cups rolled oats
- 1/2 cup chocolate chips
- 1/4 cup coconut oil
- 1/4 cup powdered sugar
- 1/2 teaspoon vanilla extract
Instructions
- Mix Peanut Butter and Sweetener: In a large bowl, combine peanut butter and honey (or maple syrup) until smooth.
- Add Dry Ingredients: Stir in rolled oats, powdered sugar, and vanilla extract until well combined.
- Prepare the Pan: Press the mixture into a lined 8x8 inch baking dish, spreading it evenly.
- Melt Chocolate: In a small saucepan, melt chocolate chips and coconut oil over low heat, stirring until smooth.
- Top the Bars: Pour the melted chocolate over the peanut butter mixture, spreading it evenly. Refrigerate for at least 1 hour to set.
- Cut and Serve: Once set, cut into bars and enjoy your delicious treats!
GET 21 QUICK & EASY LOW-CALORIE MEAL PLANS
Vibrant Fruit Salad With Honey Lime Dressing
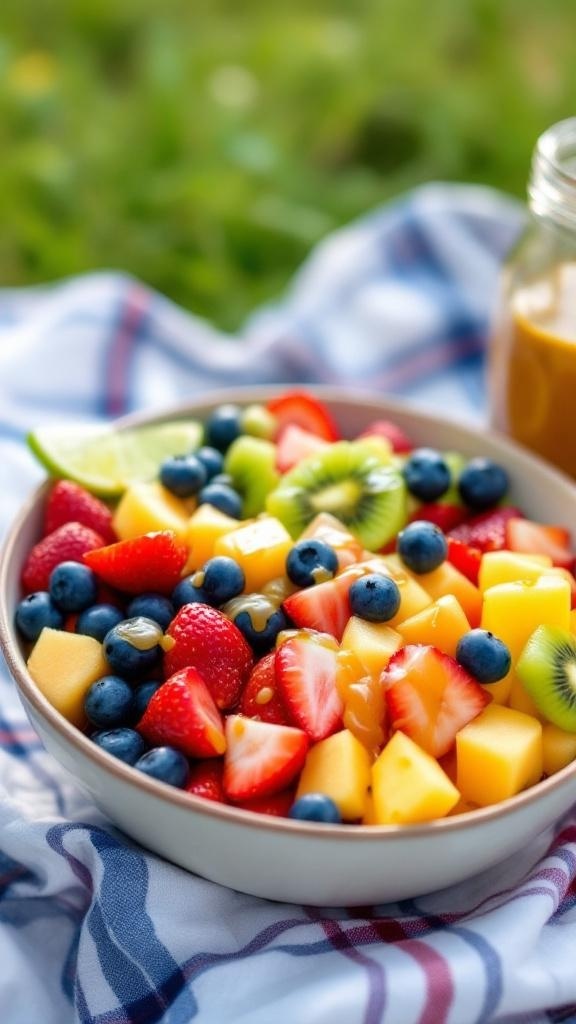
This vibrant fruit salad is a refreshing treat that bursts with flavor. The combination of sweet and tangy fruits, drizzled with a honey lime dressing, makes it a delightful addition to any meal or gathering. Plus, it's super easy to whip up, making it a perfect choice for busy days.
Each bite is a mix of juicy strawberries, blueberries, and tropical mango, all coming together in a colorful bowl. Whether you're serving it as a side dish or a light dessert, this fruit salad is sure to please everyone!
Ingredients
- 2 cups strawberries, hulled and quartered
- 1 cup blueberries
- 2 cups mango, diced
- 1 cup kiwi, peeled and sliced
- 1/4 cup honey
- 2 tablespoons lime juice
- 1 teaspoon lime zest
Instructions
- In a large bowl, combine the strawberries, blueberries, mango, and kiwi.
- In a small bowl, whisk together honey, lime juice, and lime zest until well combined.
- Drizzle the honey lime dressing over the fruit and gently toss to coat.
- Serve immediately or chill in the refrigerator for 30 minutes before serving for a refreshing treat.
Creamy Vanilla Bean Yogurt Parfait
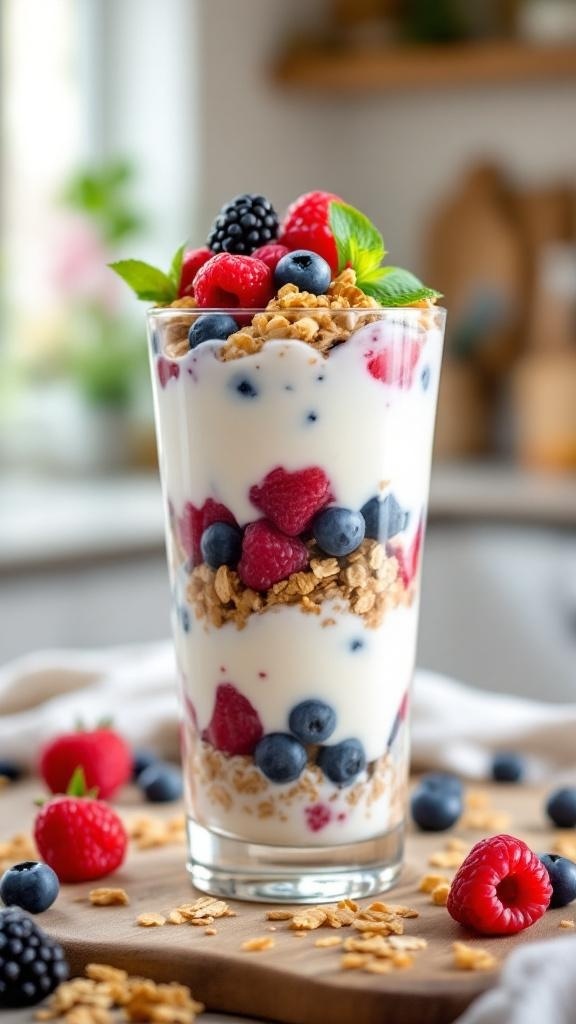
This Creamy Vanilla Bean Yogurt Parfait is a delightful treat that combines layers of creamy yogurt, fresh berries, and crunchy granola. It’s sweet, refreshing, and perfect for any time of day. Making this parfait is super easy and requires no baking, making it a great option for a quick dessert or a healthy breakfast.
The combination of smooth vanilla yogurt and vibrant berries creates a delicious balance of flavors. Each bite is a mix of creamy, crunchy, and fruity goodness that will leave you wanting more. Plus, it’s customizable, so you can switch up the fruits or granola based on what you have on hand!
Ingredients
- 2 cups vanilla bean yogurt
- 1 cup granola
- 1 cup mixed berries (blueberries, raspberries, blackberries)
- Fresh mint leaves for garnish
Instructions
- In a tall glass or bowl, start by adding a layer of yogurt at the bottom.
- Add a layer of granola on top of the yogurt.
- Next, add a layer of mixed berries.
- Repeat the layers until the glass is full, finishing with a layer of yogurt and a sprinkle of granola on top.
- Garnish with fresh mint leaves and serve immediately.
Rich No Bake Tiramisu Cups
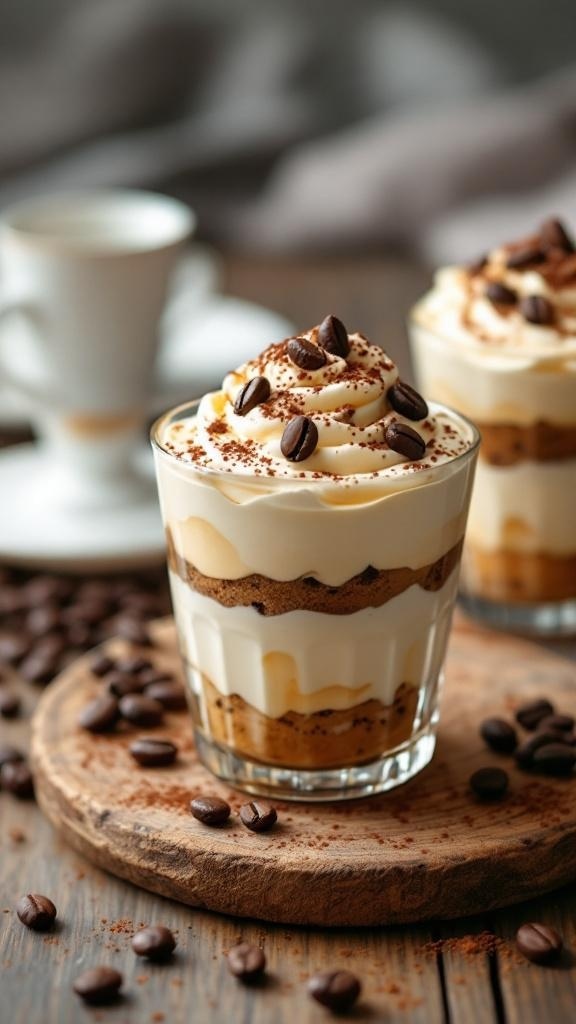
These Rich No Bake Tiramisu Cups are a delightful twist on the classic Italian dessert. With layers of creamy mascarpone and coffee-soaked ladyfingers, they offer a perfect balance of sweetness and a hint of bitterness from the coffee. The best part? They come together in no time, making them a fantastic choice for any occasion.
Each spoonful is a treat for your taste buds, with a smooth texture and rich flavors that will leave you wanting more. Plus, there’s no baking involved, so you can whip these up easily and impress your friends and family without the fuss!
Ingredients
- 1 cup strong brewed coffee, cooled
- 2 tablespoons coffee liqueur (optional)
- 8 ounces mascarpone cheese
- 1 cup heavy cream
- 1/2 cup powdered sugar
- 1 teaspoon vanilla extract
- 12-15 ladyfinger cookies
- Cocoa powder for dusting
- Chocolate-covered coffee beans for garnish (optional)
Instructions
- Prepare the Coffee: In a bowl, mix the cooled coffee with coffee liqueur if using. Set aside.
- Make the Cream Mixture: In a separate bowl, beat the mascarpone cheese, heavy cream, powdered sugar, and vanilla extract until soft peaks form.
- Assemble the Cups: Quickly dip each ladyfinger into the coffee mixture and layer them at the bottom of serving cups. Add a layer of the mascarpone mixture on top.
- Repeat Layers: Continue layering until the cups are filled, finishing with the mascarpone mixture on top.
- Chill: Cover the cups and refrigerate for at least 2 hours to allow the flavors to meld.
- Serve: Before serving, dust the tops with cocoa powder and garnish with chocolate-covered coffee beans if desired.
Delicious No Bake Pumpkin Pie

This No Bake Pumpkin Pie is a delightful treat that captures the essence of fall in every bite. With its creamy pumpkin filling and a buttery crust, it’s both satisfying and refreshing. Plus, it’s super easy to whip up, making it perfect for gatherings or a cozy night in.
The flavors of pumpkin, cinnamon, and nutmeg blend beautifully, creating a dessert that’s not only delicious but also comforting. You won’t need to turn on the oven, which is a win in any season!
Ingredients
- 1 1/2 cups graham cracker crumbs
- 1/4 cup granulated sugar
- 1/2 cup unsalted butter, melted
- 1 can (15 oz) pumpkin puree
- 1 cup cream cheese, softened
- 1 cup powdered sugar
- 1 teaspoon vanilla extract
- 1 teaspoon ground cinnamon
- 1/2 teaspoon ground nutmeg
- 1/4 teaspoon salt
- 1 cup whipped cream (for topping)
Instructions
- Make the Crust: In a bowl, mix graham cracker crumbs, sugar, and melted butter until combined. Press this mixture into the bottom and up the sides of a pie dish to form the crust.
- Prepare the Filling: In another bowl, beat together the pumpkin puree, cream cheese, powdered sugar, vanilla, cinnamon, nutmeg, and salt until smooth and creamy.
- Assemble the Pie: Pour the pumpkin filling into the prepared crust, smoothing the top with a spatula. Refrigerate for at least 4 hours or until set.
- Serve: Top with whipped cream before slicing and enjoy your delicious no bake pumpkin pie!
GET 8-WEEKS OF WORKOUTS TO LOSE INCHES
Chocolate-Covered Strawberry Bites

Chocolate-covered strawberry bites are a delightful treat that combines the sweetness of ripe strawberries with rich chocolate. These bites are not only tasty but also super easy to whip up, making them perfect for any occasion.
With just a few ingredients, you can create a dessert that looks fancy but takes minimal effort. The contrast of the juicy strawberry and smooth chocolate creates a satisfying flavor that everyone will love.
Ingredients
- 1 pound fresh strawberries
- 8 ounces dark chocolate, chopped
- 4 ounces white chocolate, chopped
- 1 tablespoon coconut oil (optional, for smoothness)
Instructions
- Prepare the Strawberries: Wash the strawberries and dry them thoroughly. Make sure there is no moisture, as it can affect the chocolate coating.
- Melt the Dark Chocolate: In a microwave-safe bowl, combine the dark chocolate and coconut oil. Heat in 30-second intervals, stirring in between, until melted and smooth.
- Dip the Strawberries: Hold each strawberry by the stem and dip it into the melted dark chocolate, covering about two-thirds of the berry. Allow excess chocolate to drip off.
- Set on a Baking Sheet: Place the dipped strawberries on a baking sheet lined with parchment paper. Repeat with all strawberries.
- Melt the White Chocolate: In a separate bowl, melt the white chocolate using the same method as before. Once melted, drizzle it over the dark chocolate-covered strawberries for decoration.
- Chill: Place the baking sheet in the refrigerator for about 30 minutes to allow the chocolate to set.
- Serve: Once the chocolate is firm, serve the strawberry bites on a platter and enjoy!
Nutritious No Bake Granola Bars
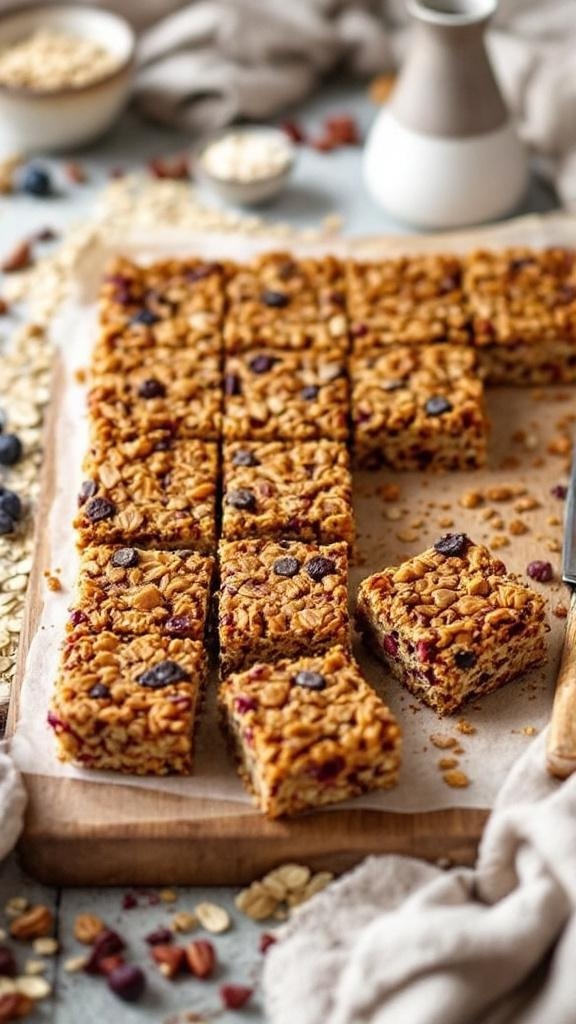
These no bake granola bars are a fantastic treat that combines health and taste in every bite. They are chewy, nutty, and packed with flavor, making them perfect for a quick snack or a healthy dessert. Plus, they are super easy to whip up, requiring just a few simple ingredients and no oven time!
With a delightful mix of oats, nuts, and dried fruits, these bars are not only satisfying but also nutritious. You can customize them with your favorite add-ins, making them versatile for any taste preference. Whether you’re on the go or enjoying a cozy afternoon at home, these granola bars will hit the spot!
Ingredients
- 2 cups rolled oats
- 1 cup nut butter (like almond or peanut butter)
- 1/2 cup honey or maple syrup
- 1/2 cup mixed nuts, chopped
- 1/2 cup dried fruits (like cranberries or raisins)
- 1/4 cup chocolate chips (optional)
- 1 teaspoon vanilla extract
Instructions
- Prepare the Base: In a large mixing bowl, combine the rolled oats, nut butter, honey, and vanilla extract. Stir until well mixed.
- Add Mix-Ins: Fold in the chopped nuts, dried fruits, and chocolate chips if using. Mix until everything is evenly distributed.
- Press into Pan: Line an 8x8 inch baking dish with parchment paper. Transfer the mixture to the dish and press it down firmly to create an even layer.
- Chill: Place the dish in the refrigerator for at least 1-2 hours to allow the bars to set.
- Slice and Serve: Once set, remove from the dish and cut into squares. Enjoy your homemade granola bars!
Creamy Chocolate Banana Ice Cream
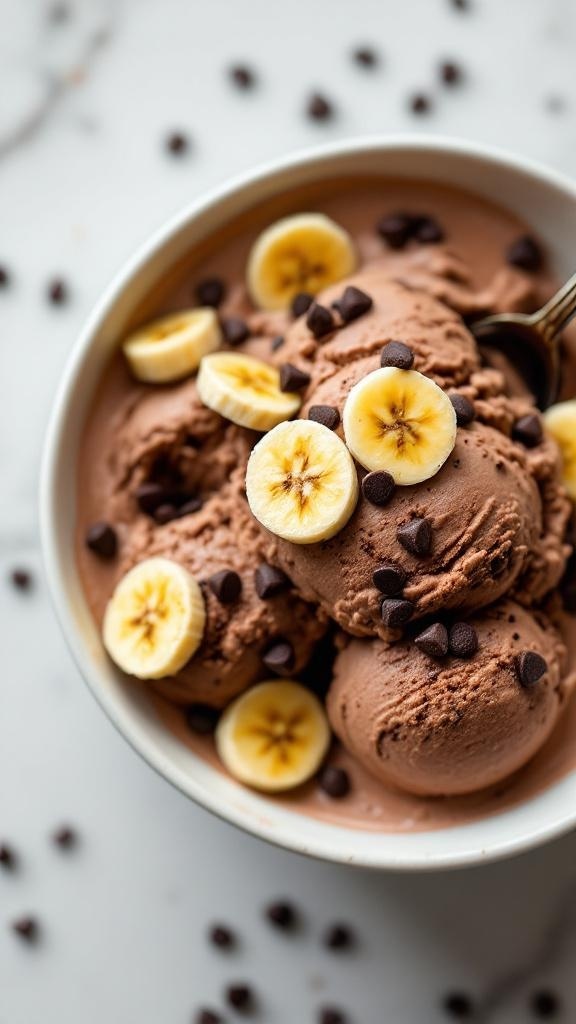
This creamy chocolate banana ice cream is a delightful treat that combines the rich flavor of chocolate with the natural sweetness of bananas. It's incredibly simple to whip up, making it a perfect choice for a quick dessert or snack.
The smooth texture and chocolatey goodness will satisfy your sweet tooth without any guilt. Plus, it requires no baking, so you can enjoy this delicious ice cream in no time!
Ingredients
- 4 ripe bananas, sliced and frozen
- 1/4 cup unsweetened cocoa powder
- 1/2 cup almond milk (or any milk of your choice)
- 1 teaspoon vanilla extract
- 1/4 cup chocolate chips (optional)
Instructions
- Blend the Ingredients: In a blender or food processor, combine the frozen banana slices, cocoa powder, almond milk, and vanilla extract. Blend until smooth and creamy.
- Mix in Chocolate Chips: If desired, fold in the chocolate chips for added texture and flavor.
- Freeze: Transfer the mixture to an airtight container and freeze for about 2 hours, or until firm.
- Serve: Scoop the ice cream into bowls and enjoy! You can top it with extra banana slices or chocolate chips if you like.
Elegant No Bake Raspberry Tart
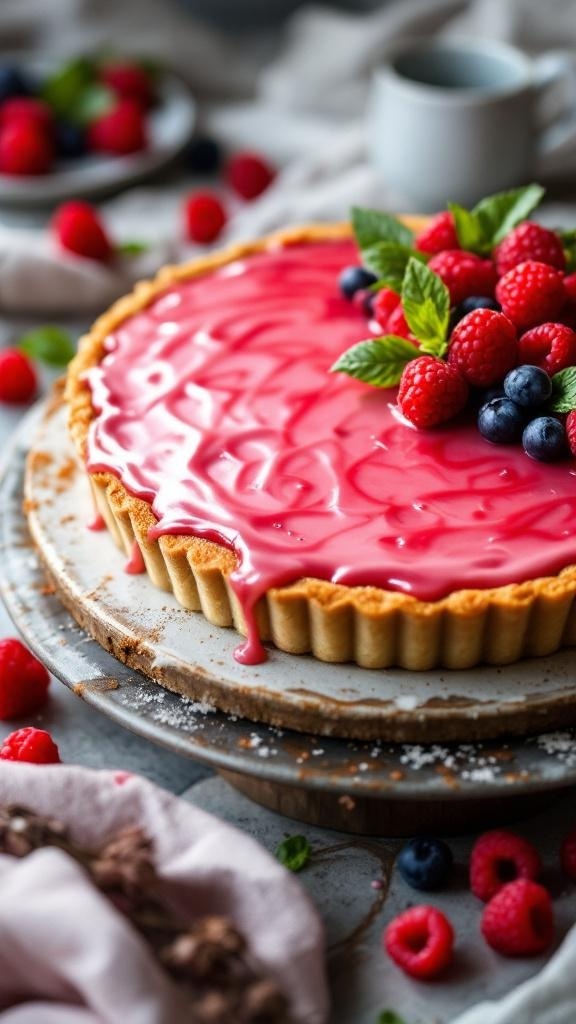
This no bake raspberry tart is a delightful treat that combines the sweetness of fresh raspberries with a creamy filling. The tart has a smooth texture and a burst of fruity flavor that makes it perfect for any occasion. Plus, it’s super simple to whip up, making it a great choice for both novice and experienced bakers.
The vibrant color and glossy finish of the tart are sure to impress your guests. With a buttery crust and a luscious raspberry topping, this dessert is not only beautiful but also refreshing. Enjoy it chilled for a light and satisfying end to any meal!
Ingredients
- 1 ½ cups graham cracker crumbs
- ½ cup unsalted butter, melted
- 2 cups fresh raspberries
- 1 cup cream cheese, softened
- ½ cup powdered sugar
- 1 teaspoon vanilla extract
- 1 cup whipped cream
- ½ cup raspberry puree (optional for drizzling)
Instructions
- Prepare the Crust: In a bowl, mix graham cracker crumbs and melted butter until combined. Press the mixture into the bottom and sides of a tart pan. Chill in the refrigerator for about 30 minutes.
- Make the Filling: In another bowl, beat the softened cream cheese, powdered sugar, and vanilla extract until smooth. Gently fold in the whipped cream until well combined.
- Assemble the Tart: Spread the cream cheese mixture evenly over the chilled crust. Top with fresh raspberries, arranging them as desired.
- Drizzle with Puree: If using, drizzle raspberry puree over the top for added flavor and presentation.
- Chill and Serve: Refrigerate the tart for at least 2 hours before serving. Slice and enjoy this refreshing dessert!
Cocoa Almond Energy Balls
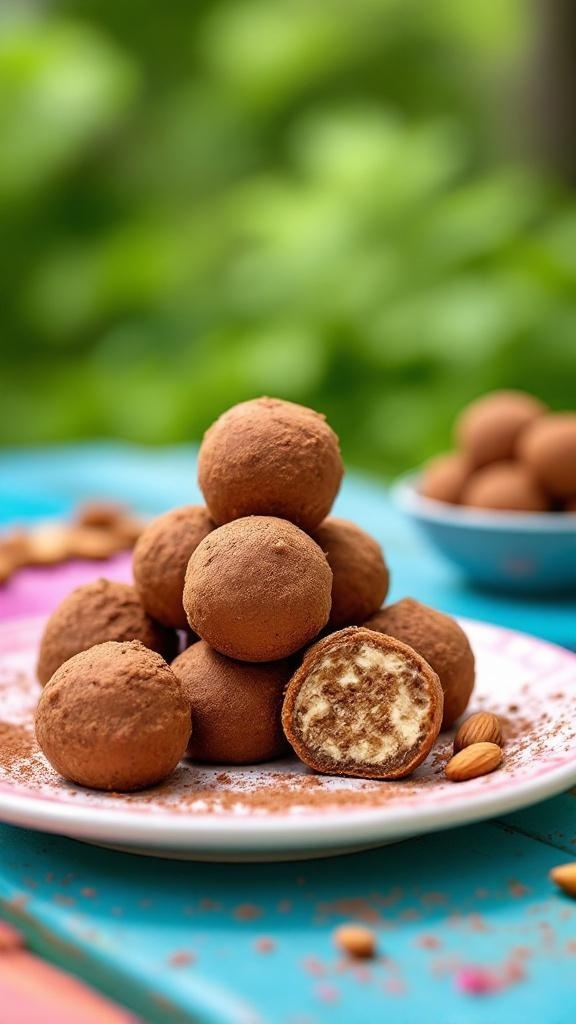
Cocoa Almond Energy Balls are a delightful treat that combines rich chocolate flavor with the crunch of almonds. These little bites are not only tasty but also packed with nutrients, making them a perfect snack for any time of the day. They are simple to whip up, requiring no baking and just a few ingredients.
With a smooth texture and a hint of sweetness, these energy balls are great for satisfying cravings without the guilt. Whether you need a quick pick-me-up or a post-workout snack, they are sure to please!
Ingredients
- 1 cup almonds
- 1 cup Medjool dates, pitted
- 1/4 cup unsweetened cocoa powder
- 1/4 cup nut butter (like almond or peanut butter)
- 1 teaspoon vanilla extract
- 1/4 teaspoon salt
- 1/4 cup shredded coconut (optional)
Instructions
- In a food processor, combine the almonds and pulse until they are finely chopped.
- Add the pitted dates, cocoa powder, nut butter, vanilla extract, and salt. Blend until the mixture is sticky and well combined.
- If using, fold in the shredded coconut until evenly distributed.
- Using your hands, roll the mixture into small balls, about 1 inch in diameter.
- Place the energy balls on a baking sheet lined with parchment paper and refrigerate for at least 30 minutes to firm up.
- Once set, enjoy immediately or store in an airtight container in the fridge for up to a week.
Tropical No Bake Mango Coconut Bars
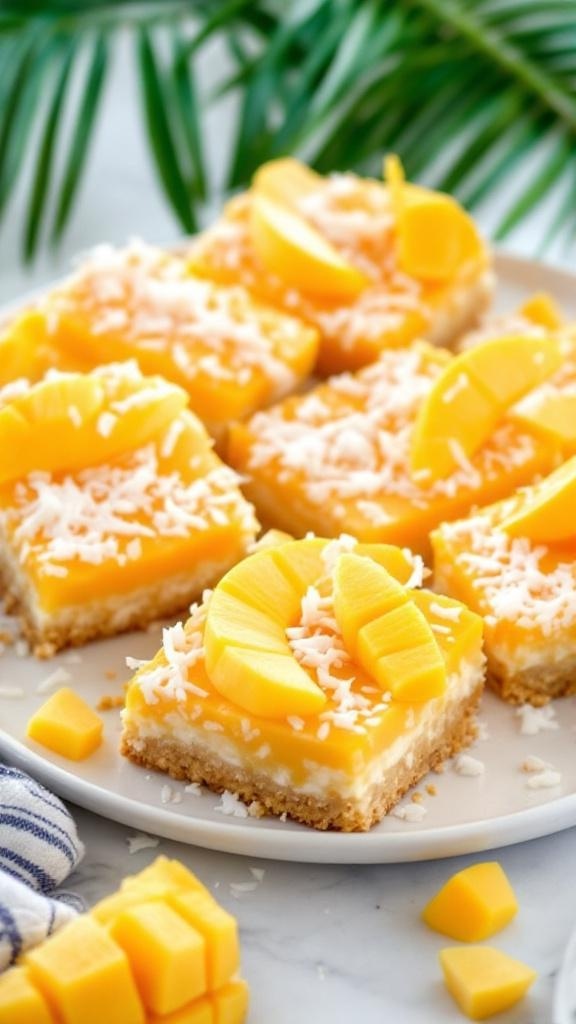
These Tropical No Bake Mango Coconut Bars are a delightful treat that brings a taste of the tropics right to your kitchen. With a creamy coconut base topped with fresh mango and a hint of sweetness, they are both refreshing and satisfying. Plus, they are super easy to make, requiring no baking at all!
The combination of coconut and mango creates a light and fruity flavor that is perfect for warm days or any time you need a sweet escape. You’ll love how simple it is to whip these up, making them a great option for gatherings or a quick snack at home.
Ingredients
- 1 cup graham cracker crumbs
- 1/2 cup unsweetened shredded coconut
- 1/4 cup melted coconut oil
- 1/4 cup honey or maple syrup
- 1 cup coconut cream
- 1 cup mango puree (fresh or canned)
- 1/4 cup powdered sugar
- Fresh mango slices and extra coconut for topping
Instructions
- Prepare the Base: In a mixing bowl, combine graham cracker crumbs, shredded coconut, melted coconut oil, and honey. Mix until well combined. Press the mixture into the bottom of a lined 8x8 inch baking dish.
- Make the Filling: In another bowl, whisk together coconut cream, mango puree, and powdered sugar until smooth. Pour this mixture over the crust and spread evenly.
- Chill: Refrigerate the bars for at least 2 hours, or until set.
- Serve: Once set, cut into squares and top with fresh mango slices and extra shredded coconut before serving.
Refreshing Coconut Lime Chia Pudding: Tropical Delight
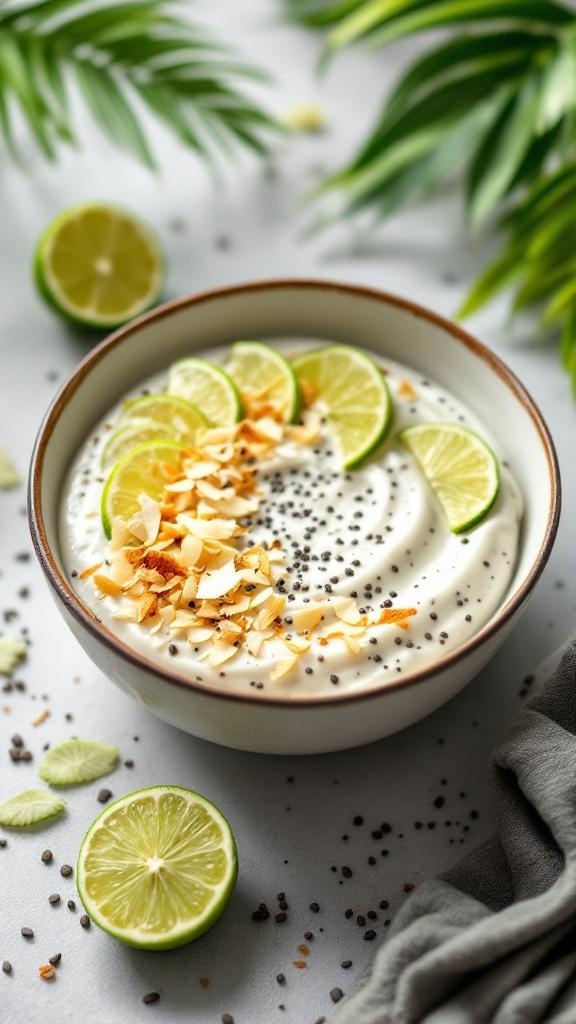
This Coconut Lime Chia Pudding is a refreshing treat that brings a taste of the tropics right to your kitchen. The creamy coconut pairs perfectly with the zesty lime, creating a delightful balance of flavors that’s both light and satisfying. Plus, it’s super easy to whip up, making it a great choice for a quick dessert or snack.
With just a few simple ingredients, you can create a delicious pudding that’s packed with nutrients. The chia seeds add a fun texture and are loaded with fiber and omega-3 fatty acids. Serve it chilled, topped with fresh lime slices and toasted coconut for an extra touch of tropical flair!
Ingredients
- 1 cup coconut milk
- 1/4 cup chia seeds
- 2 tablespoons honey or maple syrup
- Juice and zest of 1 lime
- 1/2 teaspoon vanilla extract
- Toasted coconut flakes for topping
- Fresh lime slices for garnish
Instructions
- In a mixing bowl, combine coconut milk, chia seeds, honey or maple syrup, lime juice, lime zest, and vanilla extract. Whisk until well combined.
- Cover the bowl and refrigerate for at least 4 hours or overnight, allowing the chia seeds to swell and thicken the mixture.
- Once set, give the pudding a good stir. Serve in bowls and top with toasted coconut flakes and fresh lime slices.
- Enjoy your refreshing Coconut Lime Chia Pudding!
Fruity Almond Butter Energy Bites: Perfect For Snacking
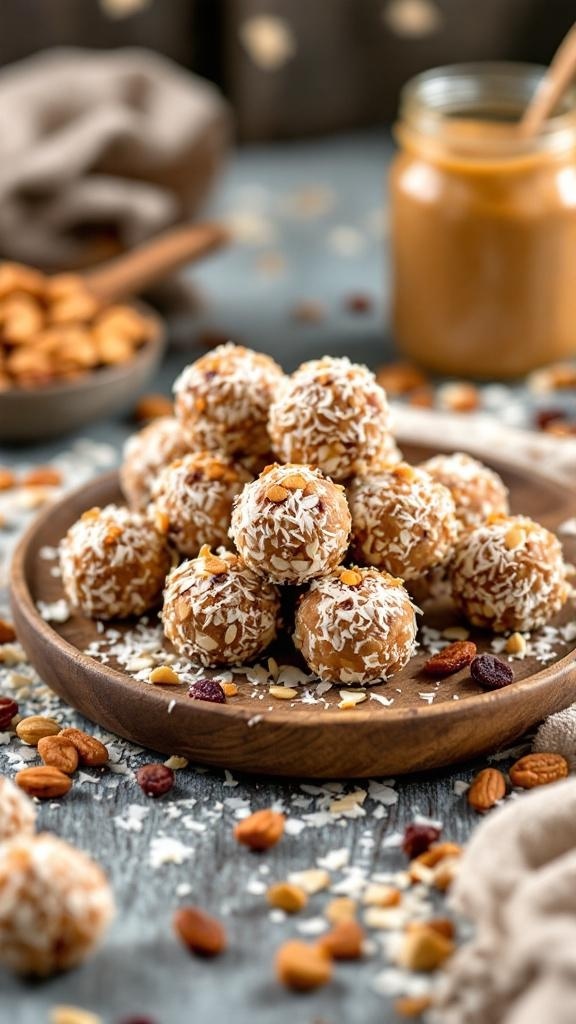
Fruity Almond Butter Energy Bites are a delightful treat that combines the creaminess of almond butter with the sweetness of dried fruits. These bites are not only tasty but also packed with nutrients, making them a fantastic snack option for any time of the day.
Making these energy bites is super simple and requires no baking at all. Just mix the ingredients, roll them into balls, and you’re ready to enjoy a healthy snack that satisfies your sweet tooth!
Ingredients
- 1 cup almond butter
- 1 cup rolled oats
- 1/2 cup honey or maple syrup
- 1/2 cup dried fruit (like cranberries or raisins)
- 1/4 cup shredded coconut
- 1/4 cup chopped nuts (like almonds or walnuts)
- 1 teaspoon vanilla extract
- 1/2 teaspoon cinnamon
Instructions
- In a large bowl, combine almond butter, rolled oats, honey or maple syrup, dried fruit, shredded coconut, chopped nuts, vanilla extract, and cinnamon.
- Mix everything together until well combined. You may need to use your hands to ensure everything sticks together.
- Once mixed, take small portions of the mixture and roll them into bite-sized balls.
- Place the energy bites on a baking sheet lined with parchment paper and refrigerate for at least 30 minutes to firm up.
- Store in an airtight container in the fridge for up to a week. Enjoy your healthy snacks!
Struggling to Stay on Track with Your Eating?
You’re not alone. One of the biggest obstacles I see people
face is not knowing what to eat. Between busy schedules, endless diet
advice online, and trying to cook healthy meals that actually taste good—it’s
easy to feel stuck or overwhelmed.
That’s why I created my 21 Quick & Easy Custom
Low-Calorie Meal Plans Program. These plans are built specifically for
you—your goals, your lifestyle, and your food preferences. You won’t find
any cookie-cutter diets here. Just real, satisfying meals that help you stay
full, energized, and on track without the stress.
✅ No more guessing.
✅
No more skipping meals or eating “diet food” you hate.
✅
Just a clear, doable plan that fits your life.
👉 Ready to eat better,
feel better, and finally make progress? [Click here to get your custom meal plan today.]
Not Seeing the Inches Drop No Matter What You Do?
If you’re working out but still not seeing the results in
the mirror, I hear you. So many people come to me after months of doing cardio
or random workouts—and still struggling to lose inches or tone up. The truth
is, your body needs more than just movement. It needs a proven strategy.
My 8-Week Workout Program to Lose Inches is designed
to do just that—burn fat, tighten up, and give you visible results.
These workouts are fun, effective, and designed for real people with real
lives. Whether you’re getting back into fitness or ready to take it to the next
level, this program gives you a clear path to success.
✅ Just 8 weeks to build strength,
confidence, and a fitter shape.
✅
No endless cardio.
✅
No gym required (unless you want it).
👉 If you're ready to
drop inches and feel amazing in your own skin, [click here to start the 8-Week Workout Program].


Comments
Post a Comment