13 Delicious Make-Ahead Easy Appetizers for Effortless Hosting
13 Delicious Make-Ahead Easy Appetizers for Effortless Hosting
Hosting made easy is the name of the game with these make-ahead appetizers! These simple yet satisfying bites take the stress out of entertaining, allowing you to enjoy the company of your guests without being tethered to the kitchen. From savory dips to finger foods, get ready to impress everyone without the last-minute rush.
Quick And Delicious Spinach And Artichoke Dip
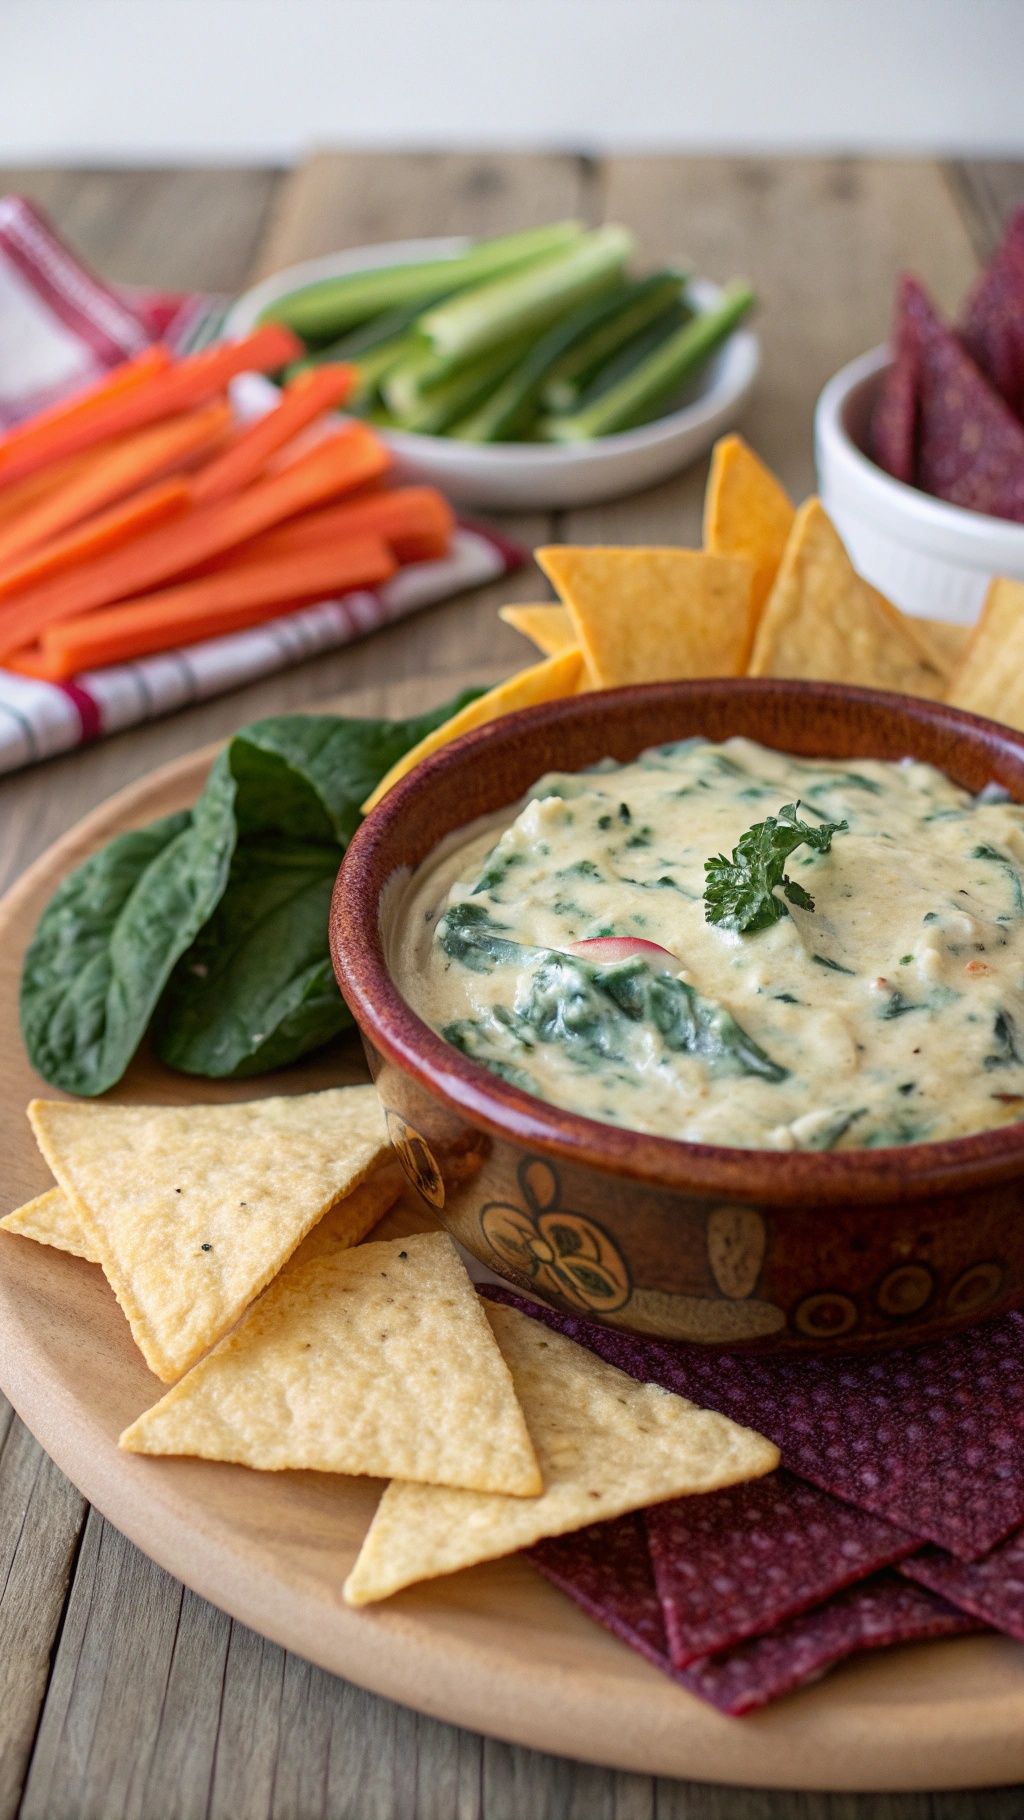
Spinach and artichoke dip is a classic appetizer that never fails to impress. This creamy, cheesy delight is perfect for any gathering. It pairs wonderfully with crispy tortilla chips, fresh veggies, or even toasted bread. The vibrant colors of the dip, combined with the crunchy textures of the sides, make for an inviting presentation.
In the image, you can see a bowl of spinach and artichoke dip, garnished with a sprig of parsley. Surrounding the bowl are crispy tortilla chips and fresh vegetables like carrots and celery, ready for dipping. This setup is not only visually appealing but also encourages guests to dig in and enjoy.
Making this dip ahead of time is a breeze. You can prepare it the day before and simply warm it up when your guests arrive. This way, you can spend more time with your friends and family instead of being stuck in the kitchen.
Ingredients
- 1 cup frozen spinach, thawed and drained
- 1 cup canned artichoke hearts, drained and chopped
- 1 cup cream cheese, softened
- 1/2 cup sour cream
- 1/2 cup mayonnaise
- 1 cup shredded mozzarella cheese
- 1/2 cup grated Parmesan cheese
- 2 cloves garlic, minced
- 1 teaspoon lemon juice
- Salt and pepper to taste
Instructions
- Preheat your oven to 350°F (175°C).
- In a large bowl, mix together the cream cheese, sour cream, and mayonnaise until smooth.
- Add the spinach, artichoke hearts, mozzarella cheese, Parmesan cheese, garlic, lemon juice, salt, and pepper. Stir until well combined.
- Transfer the mixture to a baking dish and spread it evenly.
- Bake for 25-30 minutes, or until the dip is hot and bubbly.
- Serve warm with tortilla chips, fresh veggies, or bread. Enjoy!
Classic Bruschetta With Tomato And Basil
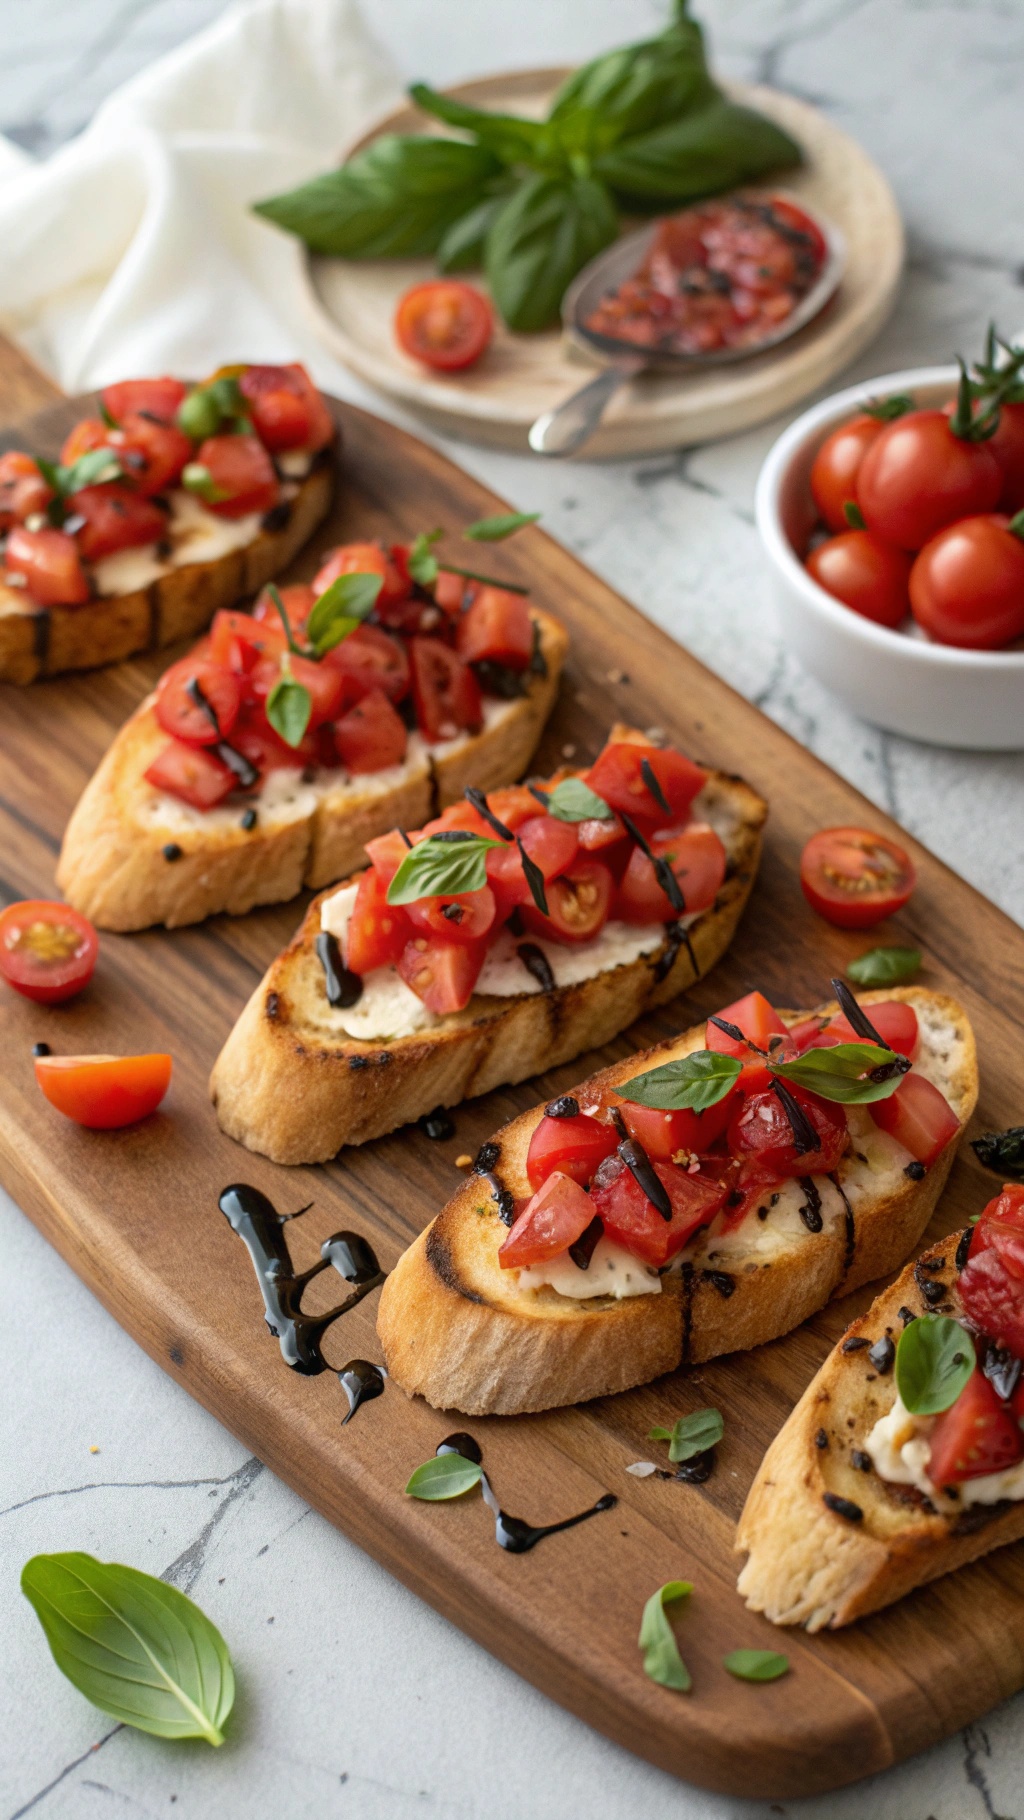
Bruschetta is a timeless appetizer that brings a burst of flavor to any gathering. The image showcases beautifully toasted bread topped with a vibrant mix of fresh tomatoes and fragrant basil. This dish is not only visually appealing but also incredibly easy to prepare, making it a perfect choice for stress-free hosting.
The key to great bruschetta lies in the quality of the ingredients. Fresh, ripe tomatoes are essential for that juicy, sweet flavor. Pair them with aromatic basil and a drizzle of balsamic glaze, and you have a crowd-pleaser that everyone will love. Serve it on a wooden platter for a rustic touch, and watch your guests dig in!
Ingredients
- 1 French baguette or Italian bread
- 4 ripe tomatoes, diced
- 1 clove garlic, minced
- 1/4 cup fresh basil, chopped
- 1/4 cup olive oil
- Salt and pepper to taste
- Balsamic glaze for drizzling
Instructions
- Prepare the Bread: Preheat your oven to 400°F (200°C). Slice the baguette into 1/2-inch thick pieces. Place them on a baking sheet and brush with olive oil.
- Toast the Bread: Bake the bread for about 5-7 minutes, or until golden brown and crispy.
- Make the Topping: In a bowl, combine the diced tomatoes, minced garlic, chopped basil, olive oil, salt, and pepper. Mix well.
- Assemble: Once the bread is toasted, top each slice with the tomato mixture. Drizzle with balsamic glaze for added flavor.
- Serve: Arrange the bruschetta on a platter and enjoy immediately!
Hearty Meatballs In Tangy Bbq Sauce

These hearty meatballs in tangy BBQ sauce are a crowd-pleaser at any gathering. The image shows a rustic wooden bowl filled with juicy meatballs, each coated in a glossy, rich barbecue sauce. Garnished with fresh parsley, they look inviting and delicious. The skewers make them easy to grab, perfect for mingling guests.
Making these meatballs ahead of time means you can enjoy your party without the stress of last-minute cooking. They are simple to prepare and can be served warm or at room temperature. Just pop them in the oven or slow cooker before your guests arrive, and you’re set!
These meatballs are versatile too. You can serve them as an appetizer or as part of a main dish. Pair them with some crusty bread or a fresh salad for a complete meal. Everyone will love the sweet and tangy flavor that makes these meatballs irresistible.
Ingredients
- 1 pound ground beef
- 1/2 cup breadcrumbs
- 1/4 cup grated Parmesan cheese
- 1/4 cup chopped parsley
- 1 large egg
- 2 cloves garlic, minced
- 1 teaspoon salt
- 1/2 teaspoon black pepper
- 1 cup barbecue sauce
- 1 tablespoon Worcestershire sauce
Instructions
- Preheat your oven to 400°F (200°C).
- In a large bowl, combine ground beef, breadcrumbs, Parmesan cheese, parsley, egg, garlic, salt, and pepper. Mix until well combined.
- Shape the mixture into meatballs, about 1 inch in diameter, and place them on a baking sheet lined with parchment paper.
- Bake for 20-25 minutes, or until cooked through and browned.
- While the meatballs are baking, mix the barbecue sauce and Worcestershire sauce in a saucepan over medium heat until warm.
- Once the meatballs are done, add them to the sauce and stir to coat.
- Serve warm, garnished with additional parsley if desired.
Creamy Deviled Eggs With A Twist
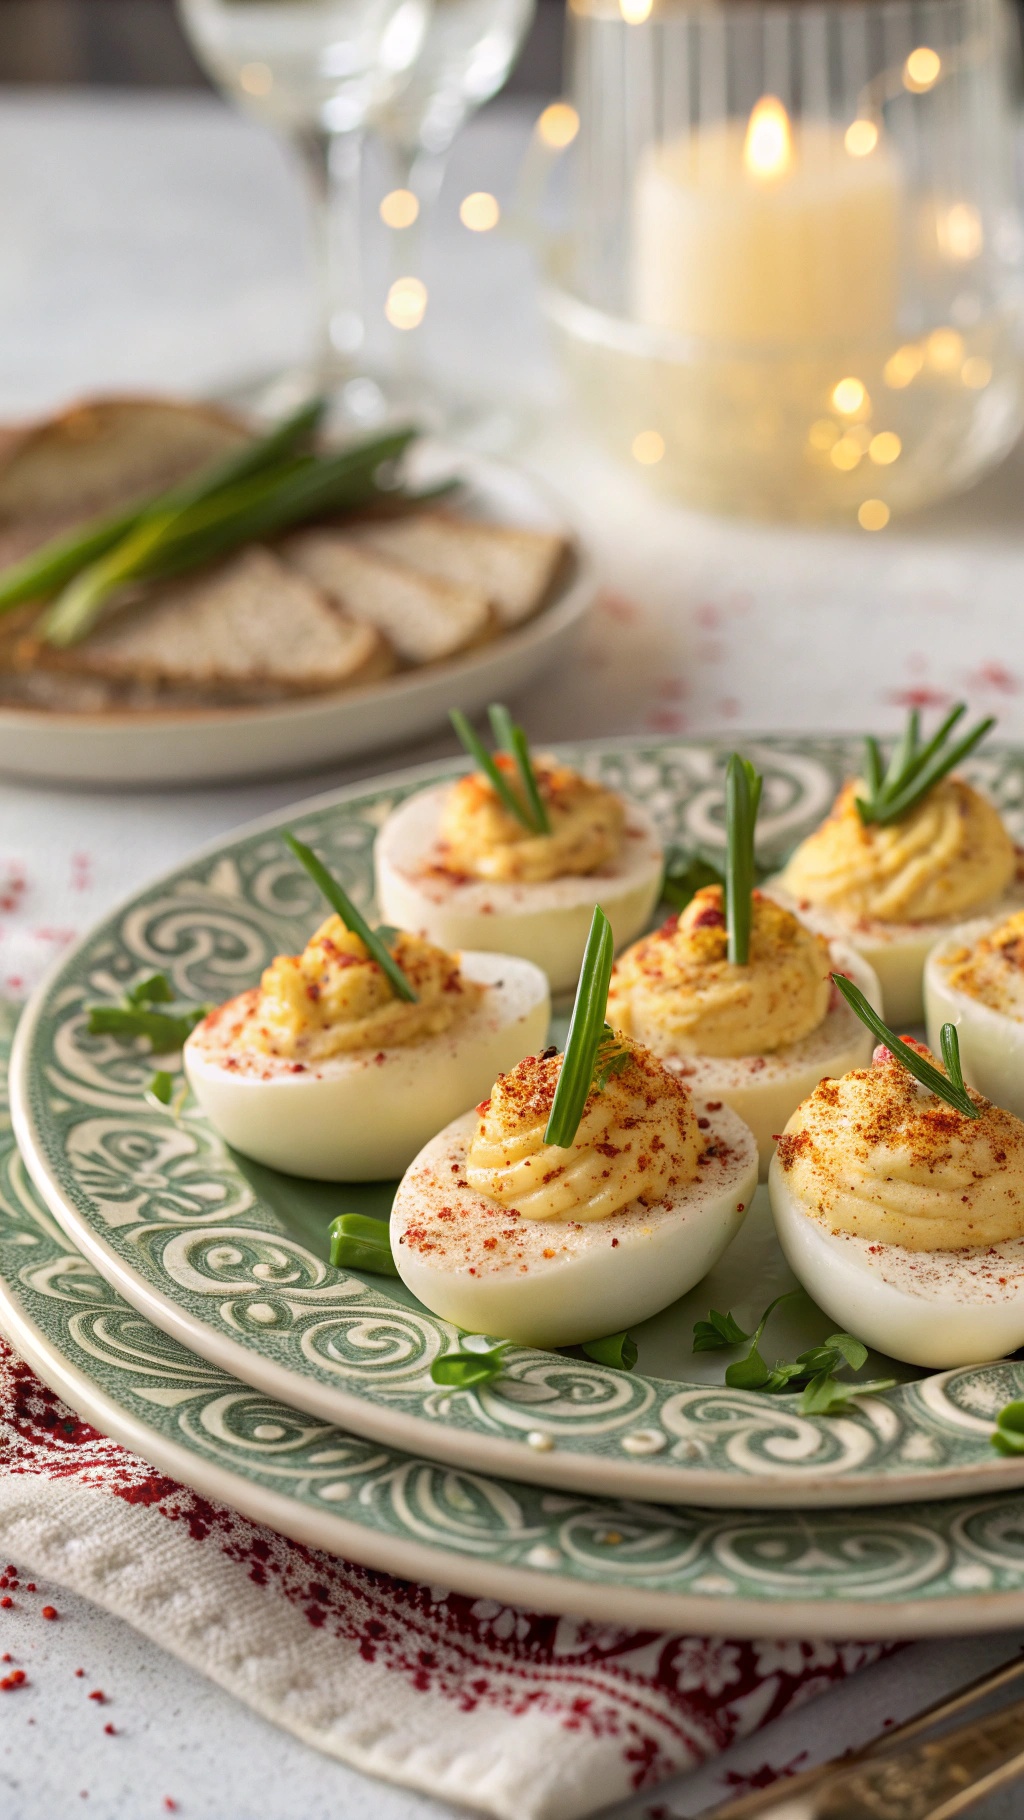
Deviled eggs are a classic appetizer that never goes out of style. They’re simple to make and always a hit at gatherings. In the image, you can see beautifully presented deviled eggs, topped with a sprinkle of paprika and fresh chives. The creamy filling is piped high, giving them a delightful look that’s sure to impress your guests.
These eggs are not just your average deviled eggs. The twist comes from adding unique ingredients that elevate the flavor. Think of ingredients like avocado, bacon, or even a hint of sriracha for a spicy kick. This makes them a fun and tasty option for any occasion.
Preparing these ahead of time is a breeze. You can make them a day in advance and store them in the fridge. Just be sure to cover them tightly to keep them fresh. When it’s time to serve, they’ll be ready to go, allowing you to enjoy the party without stress.
Ingredients
- 6 large eggs
- 1/4 cup mayonnaise
- 1 teaspoon Dijon mustard
- 1 teaspoon white vinegar
- Salt and pepper to taste
- 1/4 teaspoon smoked paprika
- Chives for garnish
Instructions
- Hard boil the eggs: Place eggs in a pot and cover with water. Bring to a boil, then cover and remove from heat. Let sit for 12 minutes.
- Cool the eggs: Transfer the eggs to an ice bath for 5 minutes to cool. Peel the eggs and slice them in half lengthwise.
- Make the filling: Remove the yolks and place them in a bowl. Mash the yolks with mayonnaise, Dijon mustard, white vinegar, salt, and pepper until smooth.
- Fill the eggs: Spoon or pipe the yolk mixture back into the egg whites. Sprinkle with smoked paprika and garnish with chives.
- Chill and serve: Refrigerate until ready to serve. Enjoy your creamy deviled eggs with a twist!
Spicy Shrimp Cocktail With Homemade Sauce
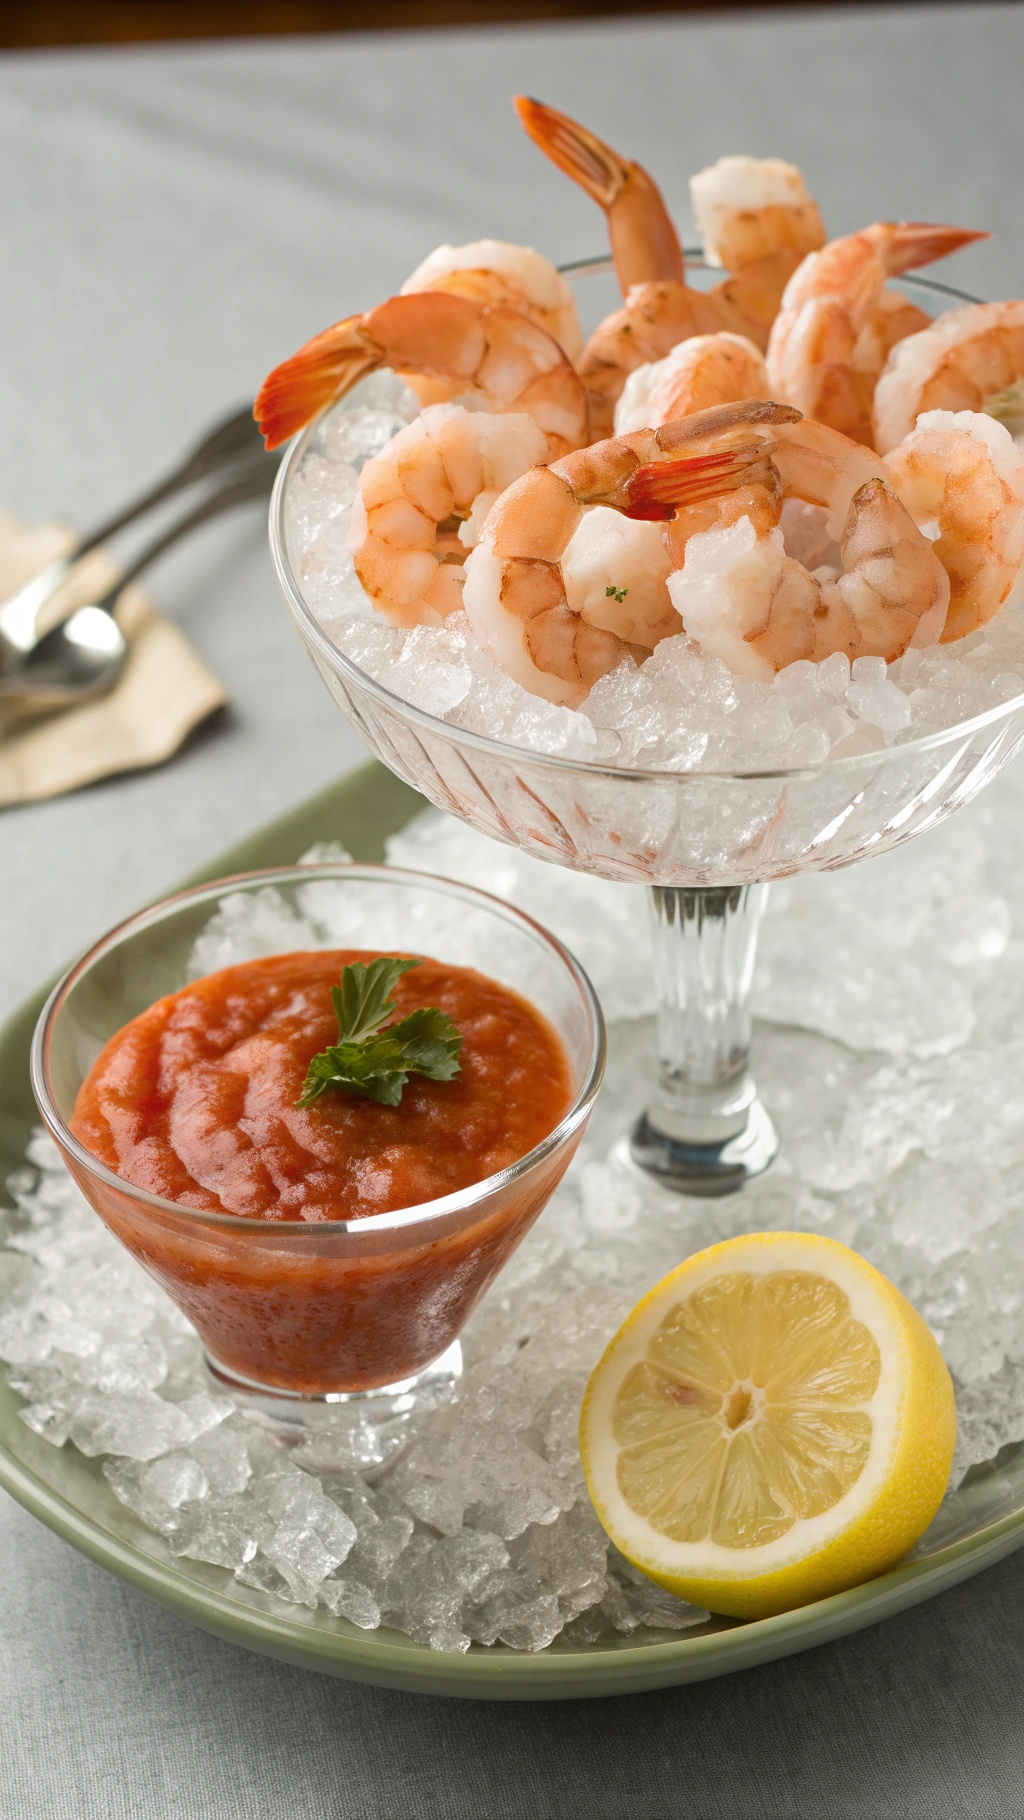
Spicy shrimp cocktail is a classic appetizer that never fails to impress. The image showcases a beautiful presentation of succulent shrimp served over a bed of ice, paired with a vibrant homemade cocktail sauce. The bright colors and fresh ingredients make this dish not only tasty but also visually appealing.
To prepare this dish, start with fresh shrimp, peeled and deveined. The homemade sauce adds a kick, combining ketchup, horseradish, lemon juice, and a dash of hot sauce. This combination creates a perfect balance of flavors that complements the shrimp beautifully.
Serving shrimp cocktail is a breeze. Just arrange the shrimp in a glass or bowl, pour the sauce into a smaller dish, and garnish with lemon wedges. It’s a simple yet elegant way to kick off any gathering!
Ingredients
- 1 pound large shrimp, peeled and deveined
- Ice for serving
- 1 cup ketchup
- 2 tablespoons horseradish
- 1 tablespoon lemon juice
- 1 teaspoon hot sauce (optional)
- 1 lemon, cut into wedges
Instructions
- Boil the Shrimp: In a pot of salted water, bring to a boil. Add the shrimp and cook for about 2-3 minutes until they turn pink. Drain and transfer to an ice bath to stop the cooking process.
- Make the Sauce: In a bowl, mix together ketchup, horseradish, lemon juice, and hot sauce. Adjust seasoning to taste.
- Assemble: Arrange the shrimp on a platter or in a glass over ice. Serve with the cocktail sauce on the side and garnish with lemon wedges.
- Enjoy: Dig in and savor the flavors of this delightful appetizer!
Tasty Cheese And Charcuterie Board
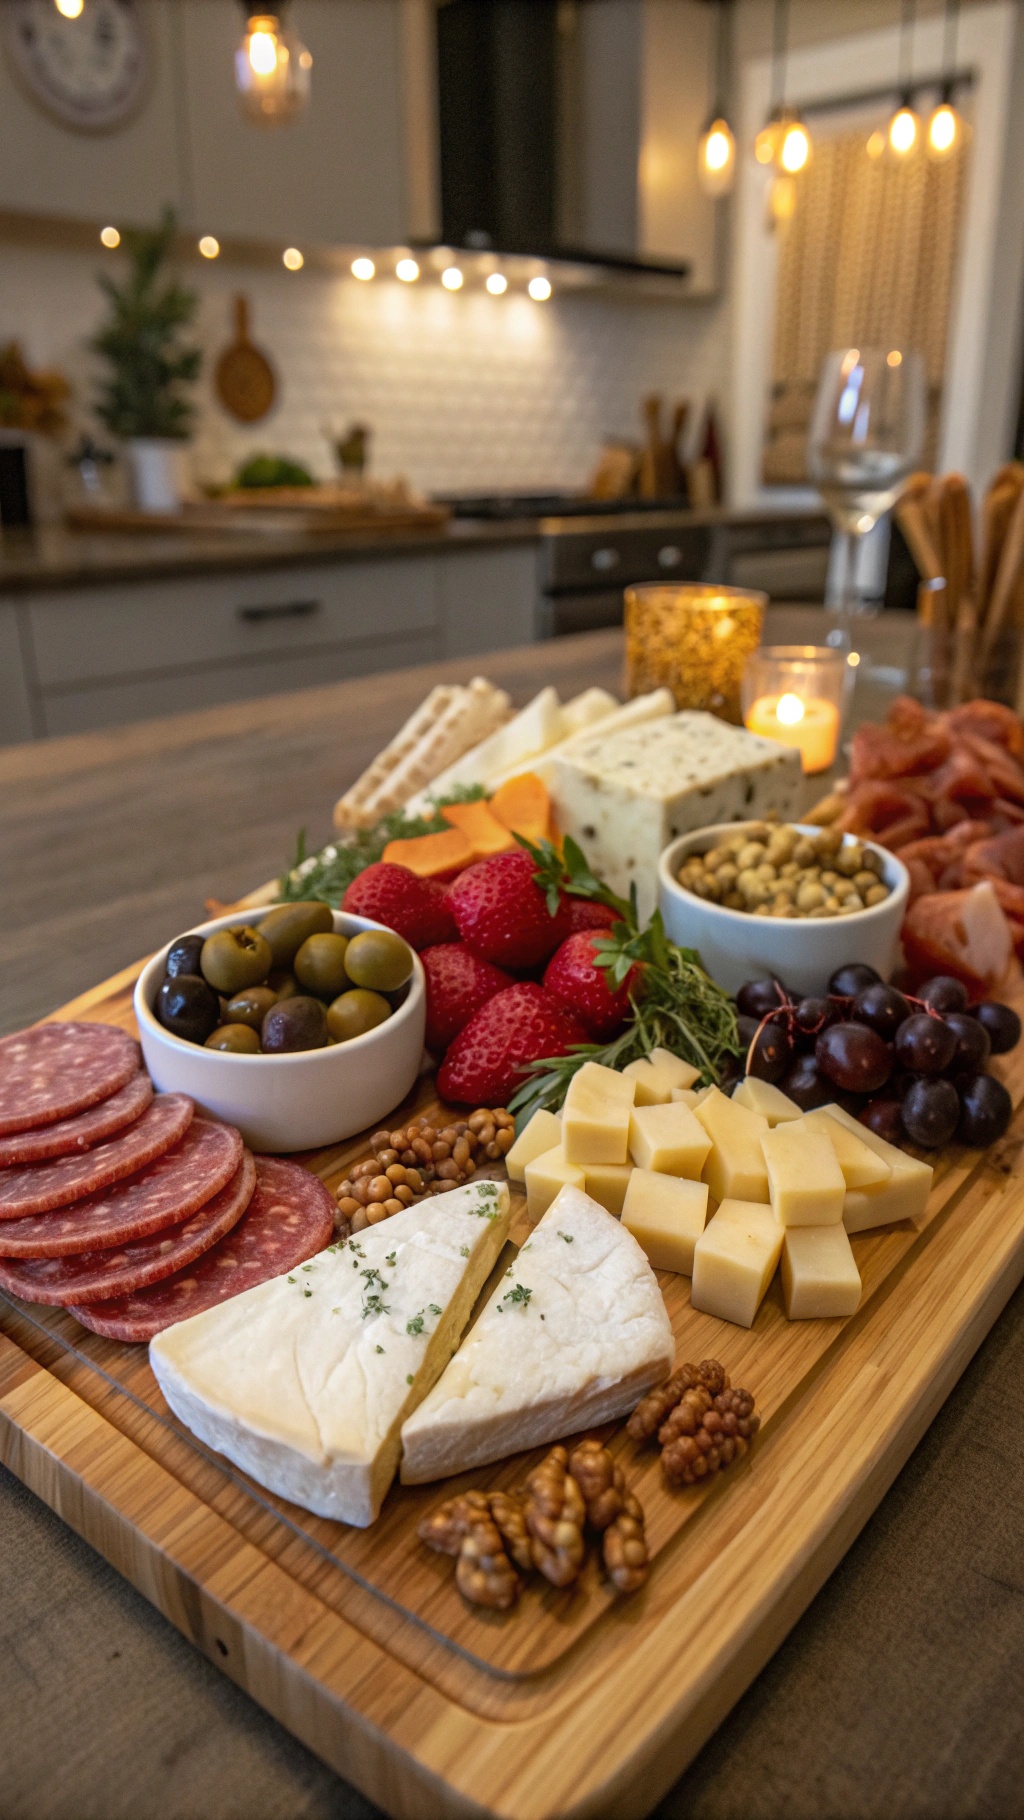
Creating a cheese and charcuterie board is a fun way to impress your guests without a lot of stress. The image shows a beautifully arranged platter filled with various cheeses, meats, fruits, and nuts. This setup not only looks appealing but also offers a variety of flavors and textures that everyone will enjoy.
Start with a selection of cheeses. Soft cheeses like brie pair well with harder varieties like cheddar. Add some cured meats such as salami and prosciutto for a savory touch. Fresh fruits like strawberries and grapes bring a sweet contrast, while olives and nuts add a salty crunch.
Don’t forget to include some crackers or breadsticks for scooping and spreading. You can also add a few sprigs of fresh herbs for a pop of color and flavor. This board is perfect for any gathering, making it easy for guests to help themselves.
Ingredients
- 1 wheel of brie cheese
- 1 block of cheddar cheese, cubed
- 4 ounces of salami, sliced
- 4 ounces of prosciutto, sliced
- 1 cup of strawberries
- 1 cup of grapes
- 1 cup of mixed olives
- 1/2 cup of nuts (walnuts or almonds)
- 1 box of assorted crackers
- Fresh herbs (like thyme or rosemary) for garnish
Instructions
- Prepare the Board: Start with a large wooden or marble board. Place the wheel of brie in the center.
- Add Cheeses: Arrange the cubed cheddar around the brie, leaving space for other items.
- Layer Meats: Fold the salami and prosciutto and place them on one side of the board.
- Incorporate Fruits: Scatter the strawberries and grapes around the cheeses and meats.
- Add Olives and Nuts: Place the olives in a small bowl and set it on the board. Scatter the nuts in another area.
- Finish with Crackers: Fill in any gaps with assorted crackers and garnish with fresh herbs.
- Serve: Let your guests dig in and enjoy!
Savory Hummus Trio With Dipping Veggies
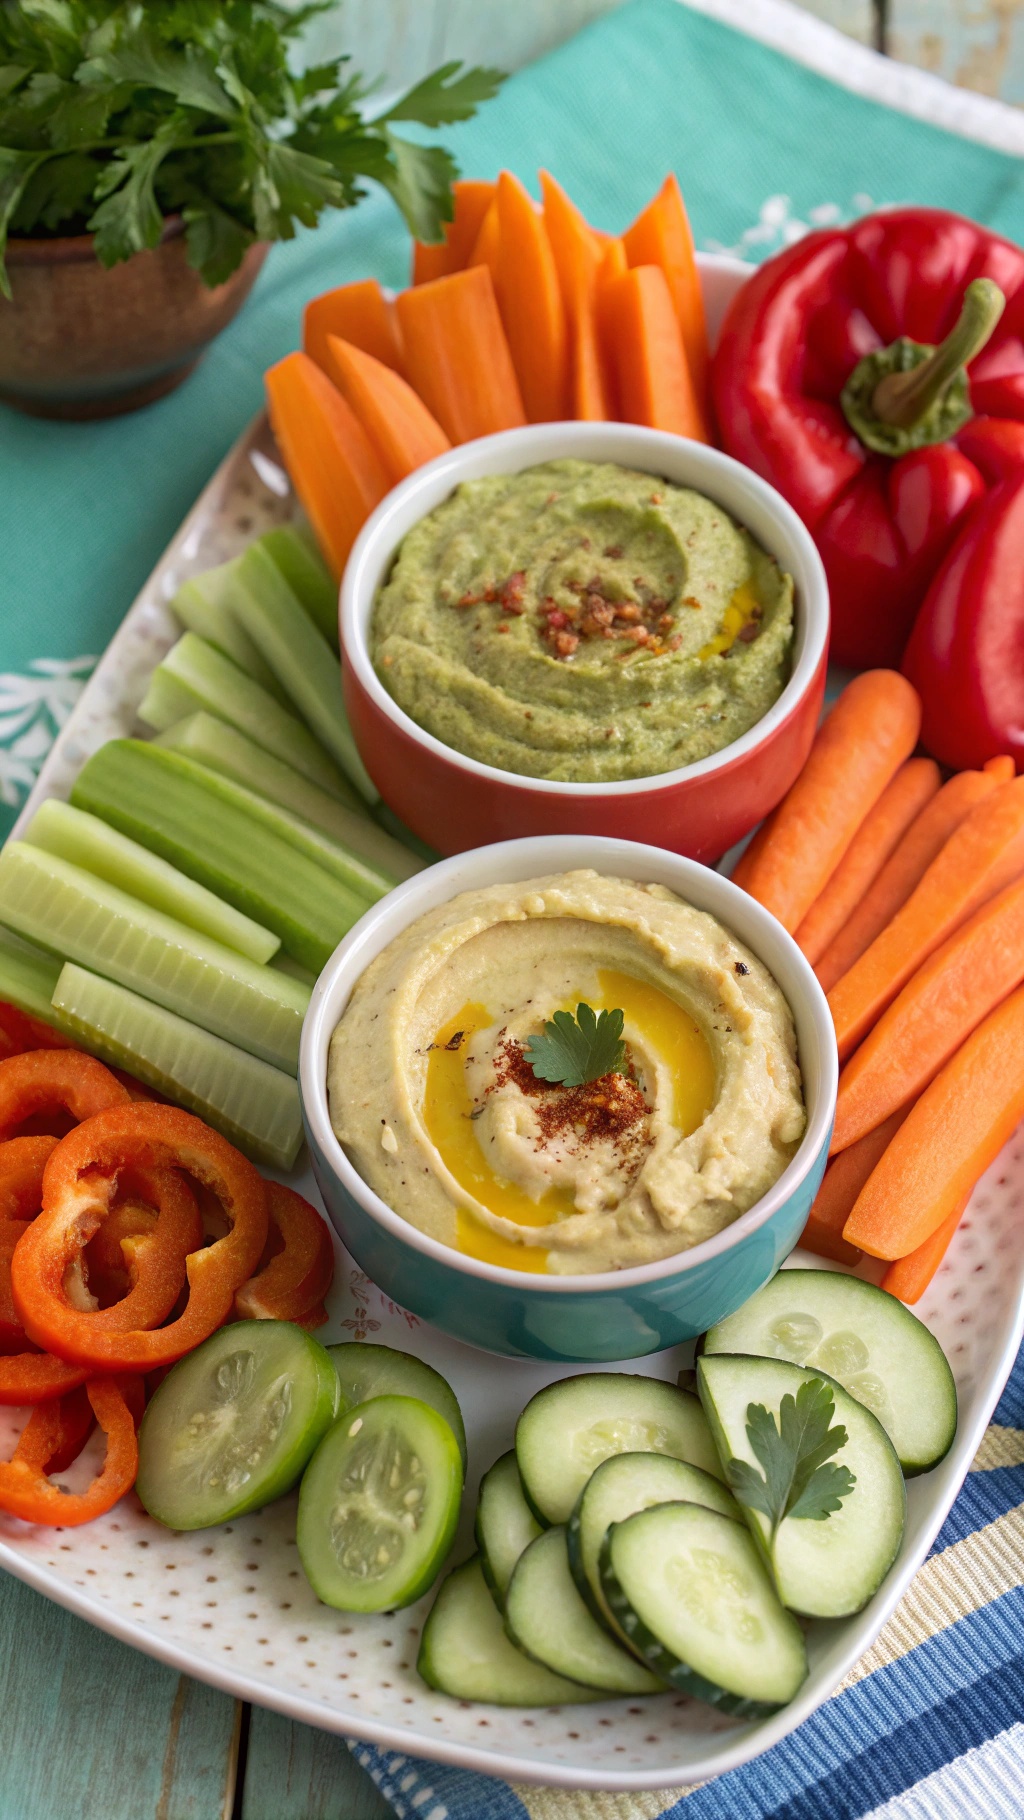
Hosting can be a breeze with a savory hummus trio that’s both delicious and easy to prepare. This colorful platter features three different types of hummus, each bringing its own unique flavor. The creamy textures and rich tastes are perfect for dipping fresh veggies like carrots, cucumbers, and bell peppers.
Picture a vibrant spread with a classic chickpea hummus, a zesty spinach and herb hummus, and a roasted red pepper hummus. Each dip is beautifully presented in bowls, surrounded by an array of crunchy vegetables. This not only looks appealing but also offers a variety of flavors for your guests to enjoy.
Preparing this trio ahead of time means you can spend more time with your guests and less time in the kitchen. Simply whip up the hummus, chop the veggies, and you’re set for a stress-free gathering!
Ingredients
- 1 can (15 oz) chickpeas, drained and rinsed
- 1/4 cup tahini
- 2 tablespoons olive oil
- 2 tablespoons lemon juice
- 1 garlic clove
- Salt to taste
- 1 cup fresh spinach
- 1/4 cup fresh herbs (like parsley or cilantro)
- 1 red bell pepper, roasted
- 1/2 teaspoon smoked paprika
- Fresh veggies for dipping (carrots, cucumbers, bell peppers)
Instructions
- Classic Hummus: In a food processor, combine chickpeas, tahini, olive oil, lemon juice, garlic, and salt. Blend until smooth. Adjust seasoning to taste.
- Spinach and Herb Hummus: In the same food processor (no need to clean), add spinach, fresh herbs, and a bit of the classic hummus. Blend until smooth. Add salt to taste.
- Roasted Red Pepper Hummus: Again, in the food processor, combine the roasted red pepper with a portion of the classic hummus and smoked paprika. Blend until creamy, adjusting seasoning as needed.
- Serve: Transfer each hummus to a bowl and drizzle with olive oil. Arrange the fresh veggies around the hummus for dipping.
Refreshing Cucumber Bites With Cream Cheese
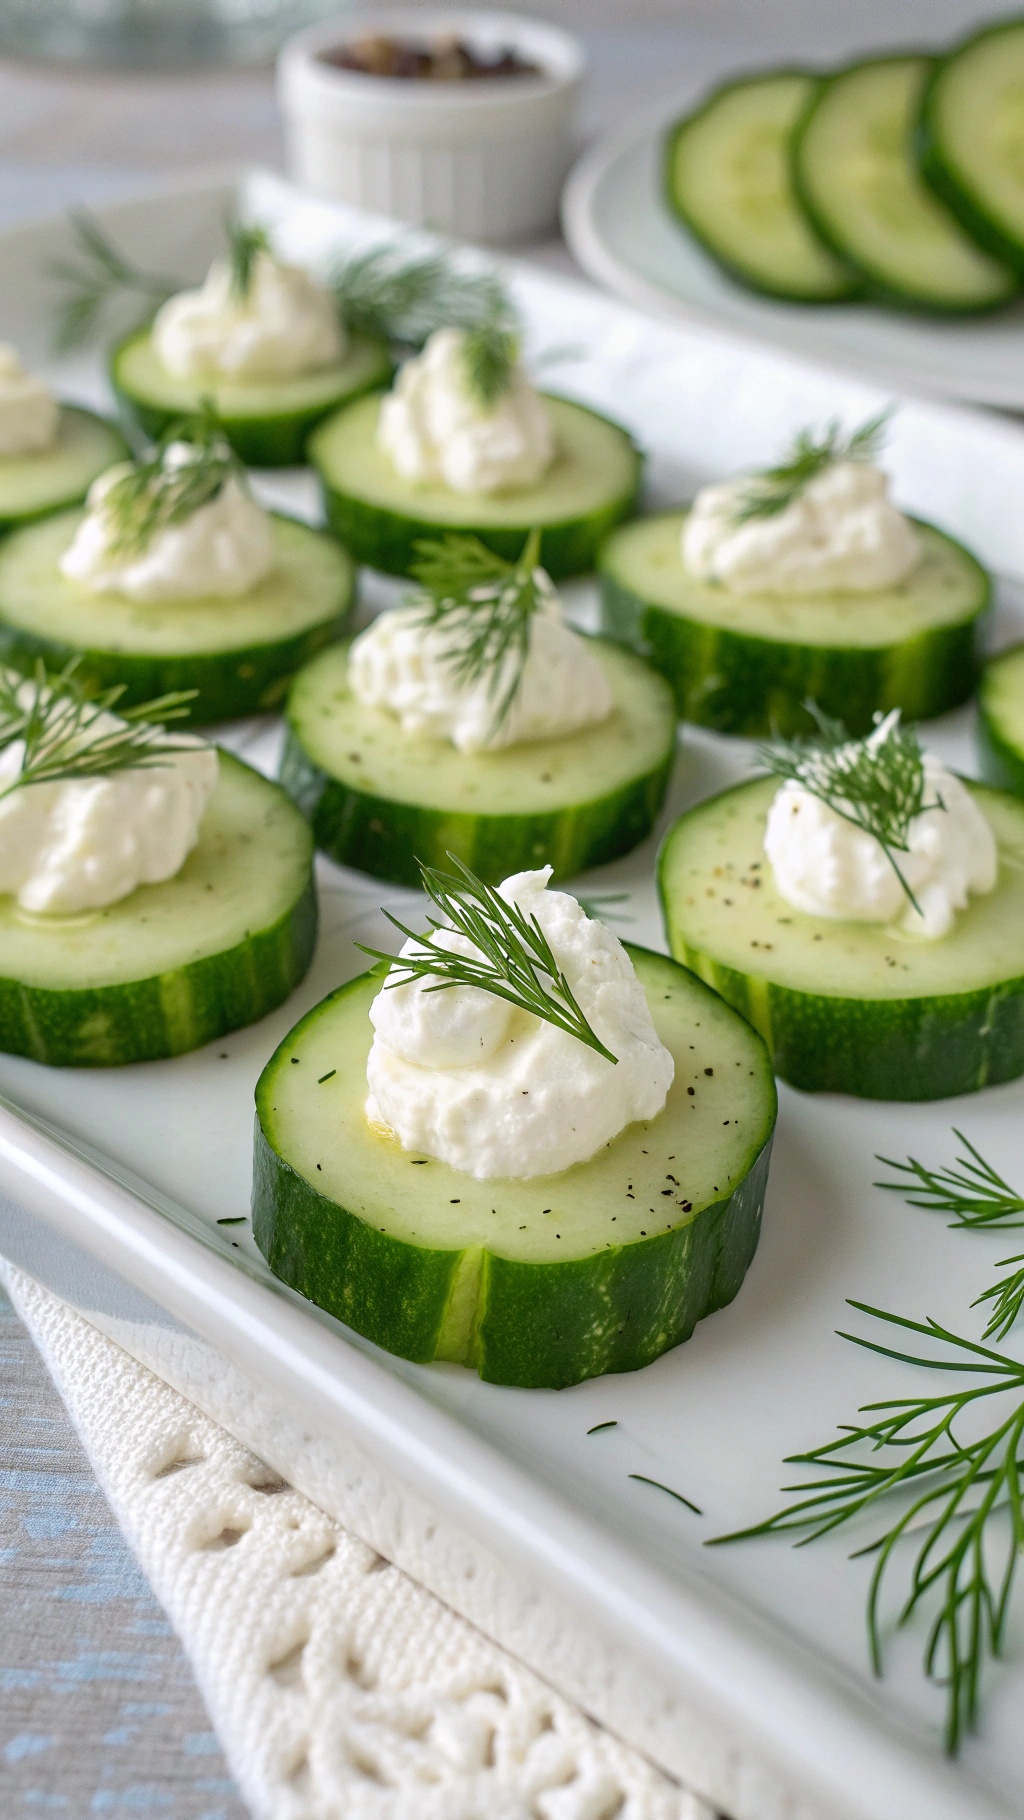
These cucumber bites are a delightful addition to any gathering. They’re light, refreshing, and easy to prepare, making them perfect for stress-free hosting. The crispness of the cucumber pairs beautifully with the creamy texture of the cream cheese, creating a snack that everyone will love.
To make these bites, simply slice cucumbers into thick rounds. Top each slice with a dollop of cream cheese and a sprinkle of fresh dill. The visual appeal of the green cucumber and white cream cheese, garnished with a touch of dill, makes for an inviting platter.
These bites can be made ahead of time, allowing you to focus on other aspects of your event. Just keep them covered in the fridge until it’s time to serve. They are not only tasty but also add a pop of color to your appetizer spread.
Ingredients
- 1 large cucumber
- 8 oz cream cheese, softened
- 1 tablespoon fresh dill, chopped
- Salt and pepper to taste
- Olive oil (optional, for drizzling)
Instructions
- Slice the cucumber into thick rounds, about 1/2 inch each.
- In a bowl, mix the softened cream cheese with chopped dill, salt, and pepper until well combined.
- Top each cucumber slice with a generous dollop of the cream cheese mixture.
- If desired, drizzle a little olive oil over the top for added flavor.
- Garnish with extra dill for a lovely presentation.
- Chill in the refrigerator until ready to serve.
Sweet And Spicy Bacon-Wrapped Dates

Sweet and spicy bacon-wrapped dates are a crowd-pleaser that combines rich flavors and a satisfying crunch. These little bites are perfect for any gathering, making them an ideal choice for stress-free hosting. The combination of crispy bacon and sweet dates creates a delightful contrast that keeps guests coming back for more.
In the image, you can see beautifully arranged bacon-wrapped dates, each secured with a toothpick. The glistening bacon adds a mouthwatering appeal, while the garnish of fresh herbs gives a touch of freshness. The warm, inviting atmosphere created by the soft lighting in the background makes these appetizers even more enticing.
To make these delicious treats, you’ll need just a few simple ingredients. They can be prepared ahead of time, allowing you to enjoy your gathering without the last-minute rush. Let’s get into the details!
Ingredients
- 12 large Medjool dates
- 6 slices of bacon, cut in half
- 1/4 cup honey
- 1/2 teaspoon cayenne pepper (adjust to taste)
- 1/4 teaspoon salt
- Fresh thyme or parsley for garnish
Instructions
- Preheat your oven to 400°F (200°C).
- Slice each date lengthwise and remove the pit. If desired, you can stuff them with cheese or nuts for added flavor.
- Wrap each date with a half slice of bacon, securing it with a toothpick.
- In a small bowl, mix honey, cayenne pepper, and salt. Brush this mixture over the bacon-wrapped dates.
- Place the dates on a baking sheet lined with parchment paper. Bake for 20-25 minutes or until the bacon is crispy.
- Remove from the oven and let cool slightly. Garnish with fresh herbs before serving.
These sweet and spicy bacon-wrapped dates are sure to impress your guests. Enjoy the flavors and the compliments!
Mouthwatering Mini Tacos For Easy Snacking

Mini tacos are a fantastic choice for any gathering. They’re easy to make and even easier to enjoy. Just picture a platter filled with soft tortillas, each one brimming with savory fillings and fresh toppings. The vibrant colors of diced tomatoes, crisp lettuce, and zesty cilantro make these tacos not just tasty, but visually appealing too.
These little bites are perfect for snacking. Guests can grab a few and customize them to their liking. Whether you prefer beef, chicken, or a vegetarian option, mini tacos can cater to everyone’s taste. Plus, they can be made ahead of time, allowing you to focus on enjoying the company of your friends and family.
To make these mini tacos, you’ll need some basic ingredients and a few simple steps. Let’s get started!
Ingredients
- 1 pound ground beef or chicken
- 1 packet taco seasoning
- 12 small corn tortillas
- 1 cup diced tomatoes
- 1 cup shredded lettuce
- 1/2 cup diced onions
- 1/2 cup chopped cilantro
- 1 cup shredded cheese (cheddar or Mexican blend)
- Sour cream and salsa for serving
Instructions
- Cook the Meat: In a skillet over medium heat, brown the ground beef or chicken. Drain any excess fat. Add taco seasoning and follow package instructions, usually adding water and simmering for a few minutes.
- Warm the Tortillas: Heat the corn tortillas in a dry skillet for about 30 seconds on each side until warm and pliable.
- Assemble the Tacos: Place a spoonful of the meat mixture in each tortilla. Top with diced tomatoes, shredded lettuce, onions, cilantro, and cheese.
- Serve: Arrange the mini tacos on a platter. Serve with sour cream and salsa on the side for dipping.
Classic Vegetable Spring Rolls With Dipping Sauce
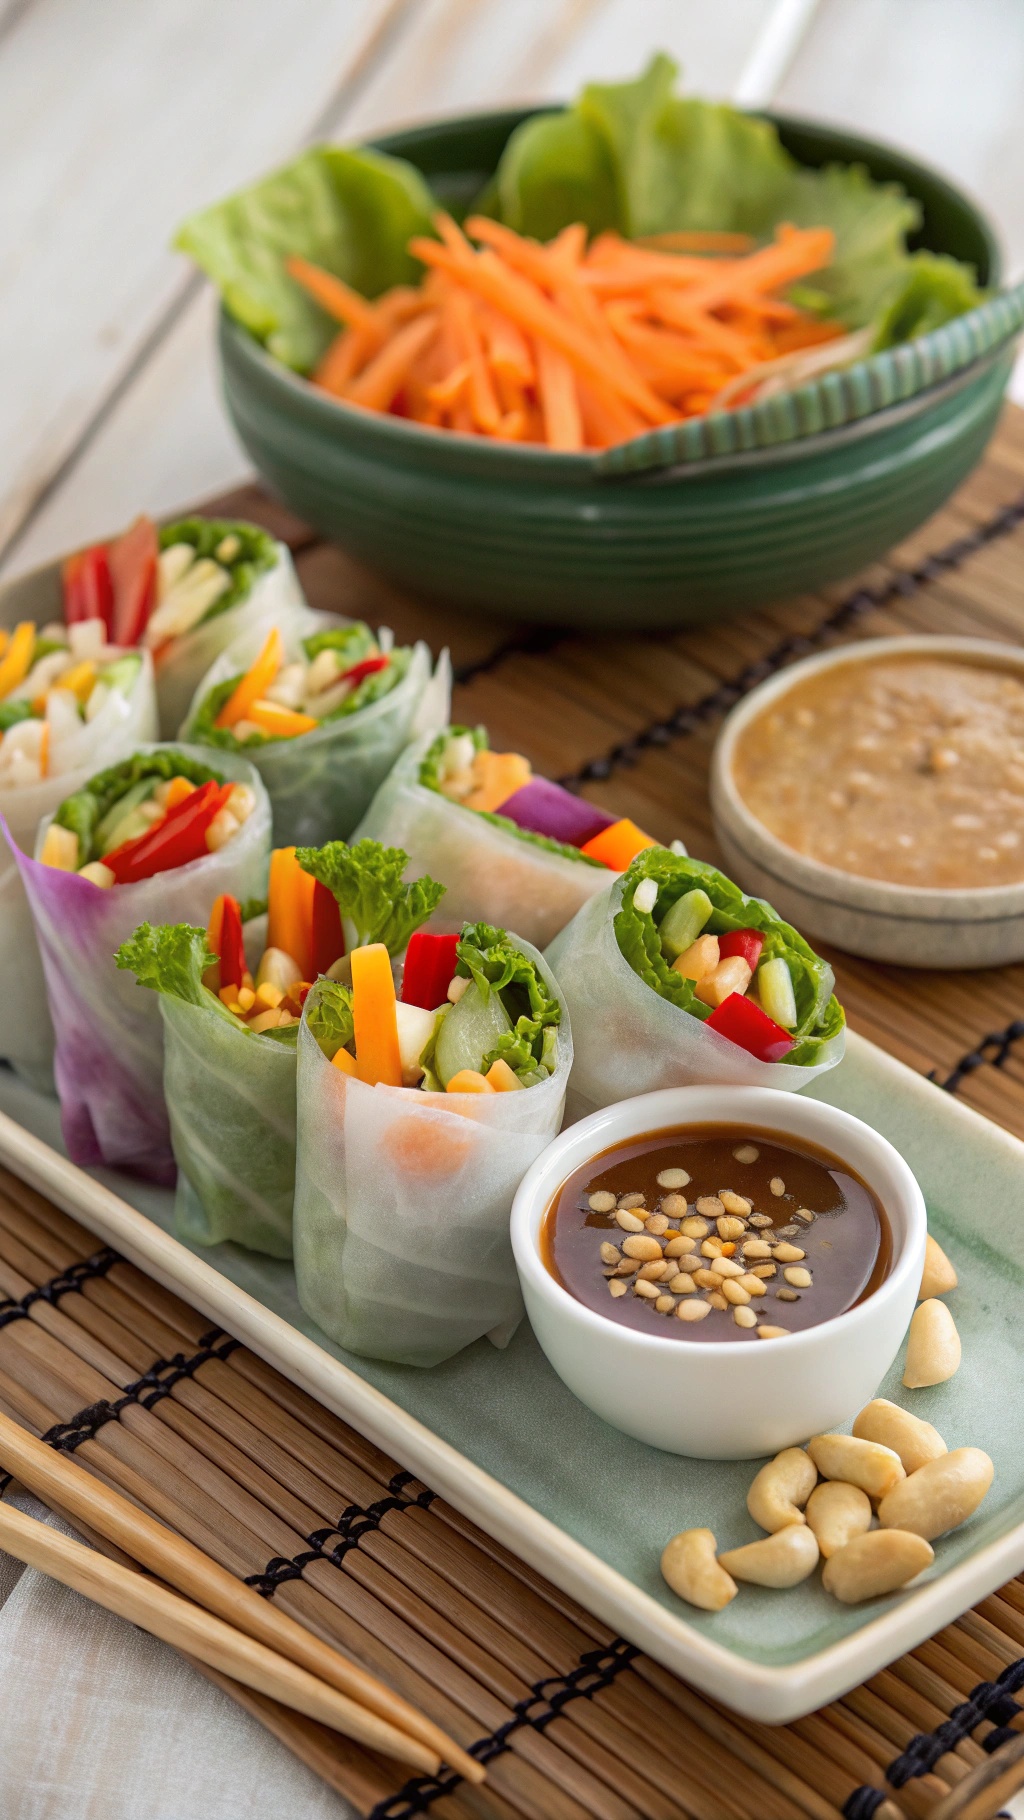
Vegetable spring rolls are a fantastic choice for easy appetizers. They’re fresh, colorful, and packed with crunch. The image shows a beautiful platter of spring rolls, neatly arranged and ready to be enjoyed. Each roll is filled with a variety of vibrant vegetables, making them not only tasty but also visually appealing.
These rolls are perfect for stress-free hosting. You can prepare them ahead of time and serve them with a delicious dipping sauce. The combination of fresh veggies and a savory sauce makes for a delightful snack that everyone will love.
To make your own classic vegetable spring rolls, gather your ingredients and follow the simple steps below!
Ingredients
- 8 rice paper wrappers
- 1 cup shredded lettuce
- 1/2 cup julienned carrots
- 1/2 cup sliced bell peppers (red, yellow, and green)
- 1/2 cup cucumber, julienned
- 1/4 cup fresh mint leaves
- 1/4 cup fresh cilantro leaves
- 1/4 cup chopped peanuts (for garnish)
Instructions
- Prepare the Filling: Start by washing and slicing all your vegetables. Set them aside.
- Soften the Rice Paper: Fill a shallow dish with warm water. Dip one rice paper wrapper into the water for about 10-15 seconds until it’s soft.
- Assemble the Rolls: Lay the softened wrapper on a clean surface. Place a small amount of lettuce, carrots, bell peppers, cucumber, mint, and cilantro in the center of the wrapper.
- Roll It Up: Fold the sides of the wrapper over the filling, then roll it tightly from the bottom to the top. Repeat with the remaining wrappers and filling.
- Make the Dipping Sauce: Serve the rolls with a simple dipping sauce made from soy sauce, peanut butter, and a splash of lime juice. Mix until smooth.
- Serve: Arrange the spring rolls on a platter, sprinkle with chopped peanuts, and enjoy!
Rich And Creamy Spinach Dip In A Bread Bowl
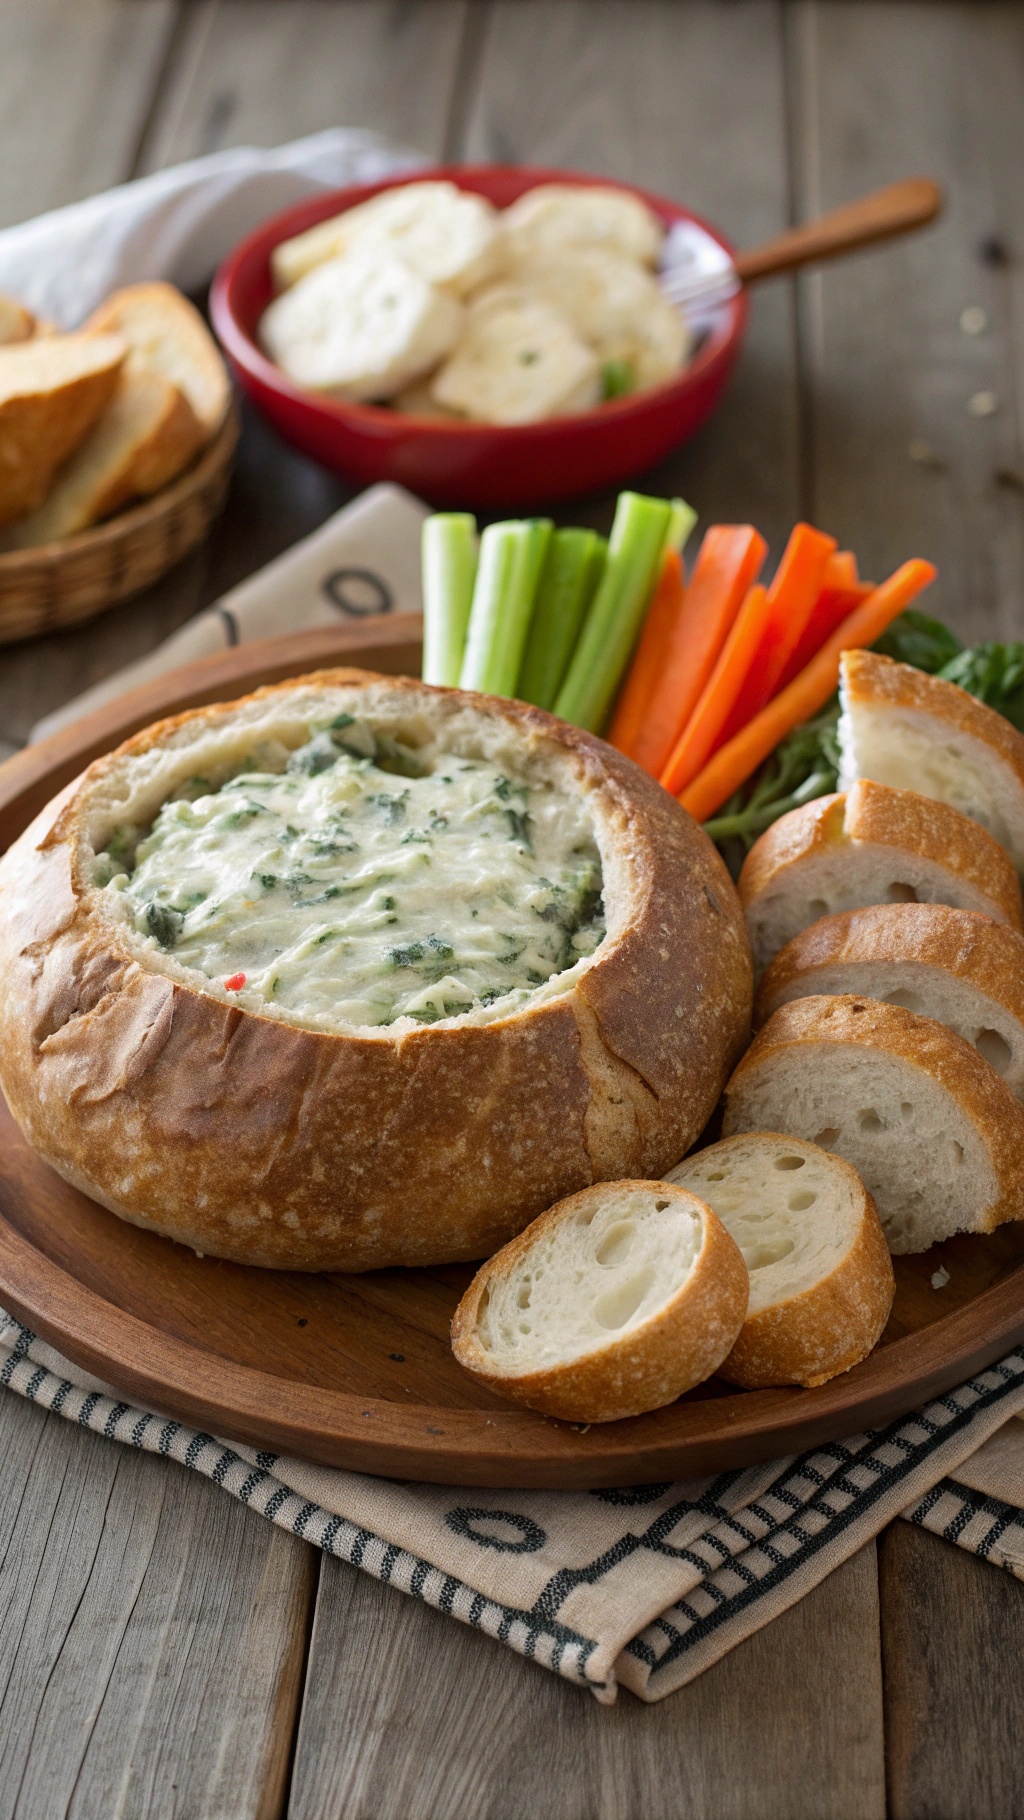
Spinach dip is a classic appetizer that never fails to impress. This version, served in a bread bowl, takes it to another level. The creamy texture and rich flavors make it a favorite at gatherings. Plus, the bread bowl adds a fun twist, allowing guests to scoop up the dip with ease.
In the image, you can see the warm, inviting bread bowl filled with a luscious spinach dip. Surrounding it are fresh veggies like celery and carrots, along with slices of crusty bread. This setup not only looks appealing but also offers a variety of dipping options for everyone to enjoy.
Making this dish ahead of time is a breeze. You can prepare the dip and store it in the fridge until you’re ready to serve. Just bake it in the bread bowl right before your guests arrive, and you’ll have a crowd-pleaser that’s ready to go!
Ingredients
- 1 cup frozen chopped spinach, thawed and drained
- 1 cup sour cream
- 1 cup cream cheese, softened
- 1 cup shredded mozzarella cheese
- 1/2 cup grated Parmesan cheese
- 1/2 teaspoon garlic powder
- 1/2 teaspoon onion powder
- 1 round sourdough bread loaf
- Fresh veggies for dipping (carrots, celery, bell peppers)
Instructions
- Preheat your oven to 350°F (175°C).
- In a mixing bowl, combine the spinach, sour cream, cream cheese, mozzarella, Parmesan, garlic powder, and onion powder. Mix until well blended.
- Cut the top off the sourdough loaf and scoop out the inside to create a bowl. Save the bread you remove for dipping.
- Fill the bread bowl with the spinach mixture and place it on a baking sheet.
- Bake for 25-30 minutes, or until the dip is hot and bubbly.
- Serve warm with the bread pieces and fresh veggies for dipping.
Flavor-Packed Antipasto Skewers
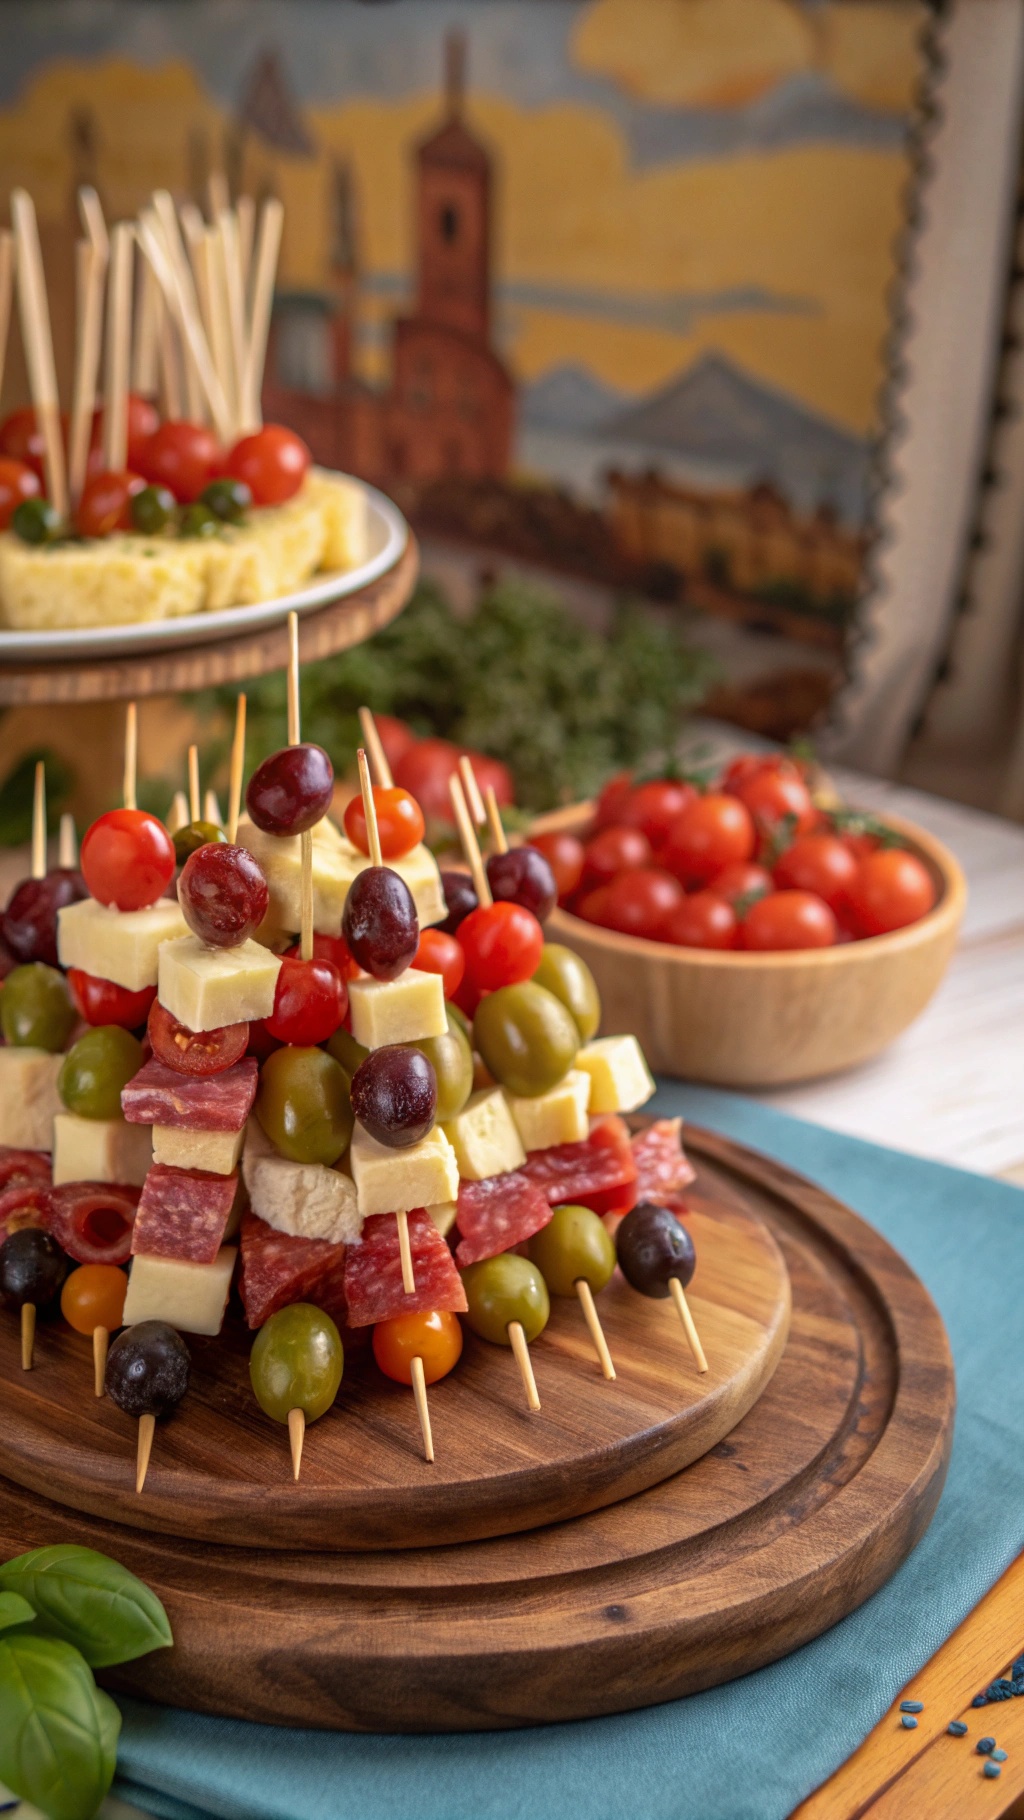
Antipasto skewers are a fun and colorful addition to any gathering. They are easy to prepare and offer a variety of flavors that everyone will enjoy. The image showcases a vibrant display of skewers stacked high with delicious ingredients like salami, cheese, olives, and cherry tomatoes. This not only makes for a tasty treat but also a beautiful centerpiece for your table.
These skewers are perfect for stress-free hosting. You can assemble them ahead of time and store them in the fridge until your guests arrive. This way, you can spend more time enjoying the company of your friends and family instead of being stuck in the kitchen.
Feel free to mix and match your favorite ingredients. The key is to use a balance of salty, savory, and fresh flavors. Pairing different textures, like creamy cheese with crunchy olives, adds to the overall experience. Plus, they are easy to grab and eat, making them a hit at any party!
Ingredients
- 1 cup cherry tomatoes
- 1 cup mozzarella cheese, cubed
- 1 cup salami, cut into strips
- 1 cup green olives
- 1 cup black olives
- 1 cup pepperoncini peppers
- Wooden skewers
Instructions
- Prepare the Ingredients: Wash the cherry tomatoes and olives. Cut the mozzarella and salami into bite-sized pieces.
- Assemble the Skewers: Take a wooden skewer and start layering your ingredients. Begin with a cherry tomato, followed by a piece of mozzarella, a strip of salami, and an olive. Repeat until the skewer is filled, leaving some space at the end for easy handling.
- Chill: Once all skewers are assembled, place them on a platter and refrigerate until ready to serve.
- Serve: Arrange the skewers on a serving platter and enjoy with your guests!


Comments
Post a Comment