10 Easy and Affordable Baking Recipes for Budget-Friendly Families
10 Easy and Affordable Baking Recipes for Budget-Friendly Families
Get ready to whip up some scrumptious treats without breaking the bank! This collection of cheap and easy baking recipes is perfect for families looking to have fun in the kitchen while keeping expenses low. From simple cakes to delightful cookies, you’ll find everything you need to satisfy those sweet cravings without fuss or financial strain.
Delight In A Classic Peach Cobbler Recipe
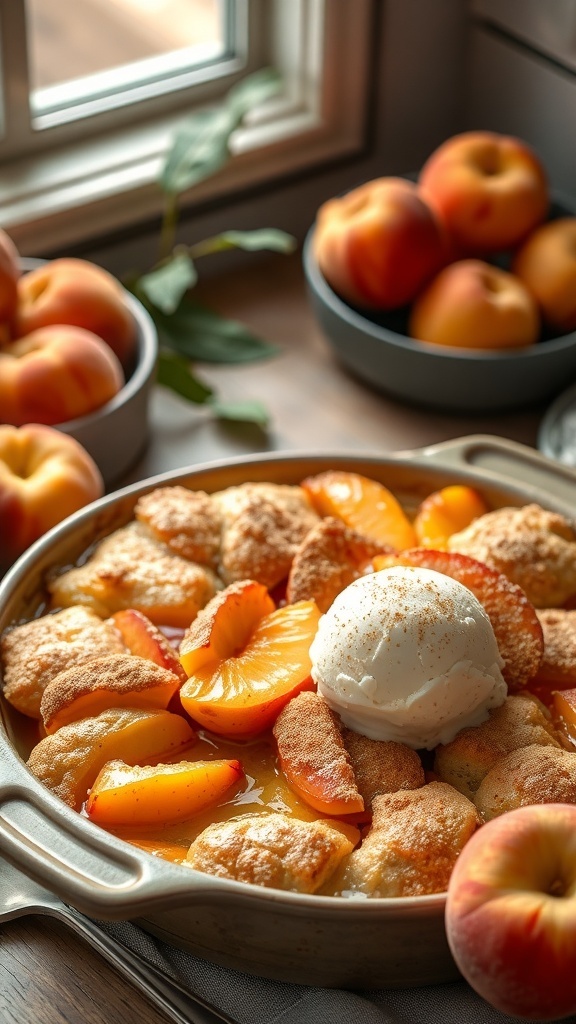
Peach cobbler is a timeless dessert that brings warmth and comfort to any family gathering. The image captures a beautifully baked peach cobbler, golden and bubbling with juicy peaches. A scoop of vanilla ice cream sits on top, ready to melt into the warm cobbler, creating a delightful treat. This dish is not just tasty; it’s also easy on the wallet, making it perfect for families on a budget.
Using fresh peaches, this recipe highlights the natural sweetness of the fruit. The simple dough on top creates a lovely contrast with the soft, warm peaches underneath. It’s a dish that everyone will love, and it’s quick to whip up, so you can spend more time enjoying it with your loved ones.
Ingredients
- 4 cups fresh peaches, sliced
- 1 cup granulated sugar
- 1 teaspoon cinnamon
- 1 tablespoon lemon juice
- 1 cup all-purpose flour
- 1 tablespoon baking powder
- 1/2 teaspoon salt
- 1 cup milk
- 1/4 cup unsalted butter, melted
- 1 teaspoon vanilla extract
Instructions
- Preheat your oven to 350°F (175°C).
- In a bowl, combine sliced peaches, 1/2 cup sugar, cinnamon, and lemon juice. Pour this mixture into a greased baking dish.
- In another bowl, mix flour, baking powder, salt, and the remaining sugar. Stir in milk, melted butter, and vanilla until smooth.
- Pour the batter over the peach mixture. Do not stir; it will create a topping as it bakes.
- Bake for 30-35 minutes, or until the top is golden brown and a toothpick comes out clean.
- Let it cool slightly before serving. Top with a scoop of vanilla ice cream for an extra treat!
Quick And Easy Chocolate Chip Cookies For The Family

Chocolate chip cookies are a classic treat that everyone loves. They are simple to make and perfect for families on a budget. The image shows freshly baked cookies cooling on a rack, with bowls of chocolate chips nearby. This setup highlights how easy it is to whip up a batch of cookies with just a few ingredients.
These cookies are soft, chewy, and packed with chocolatey goodness. They make for a great snack or dessert, and kids can even help with the mixing and measuring. Baking together can create wonderful family memories.
Let’s get started on making these delicious cookies!
Ingredients
- 1 cup unsalted butter, softened
- 3/4 cup granulated sugar
- 3/4 cup brown sugar, packed
- 1 teaspoon vanilla extract
- 2 large eggs
- 2 1/4 cups all-purpose flour
- 1 teaspoon baking soda
- 1/2 teaspoon salt
- 2 cups chocolate chips
Instructions
- Preheat the oven to 350°F (175°C). Line a baking sheet with parchment paper.
- In a large bowl, cream together the softened butter, granulated sugar, and brown sugar until smooth.
- Add in the vanilla extract and eggs, mixing well until fully combined.
- In another bowl, whisk together the flour, baking soda, and salt. Gradually add this dry mixture to the wet ingredients, stirring until just combined.
- Fold in the chocolate chips.
- Drop spoonfuls of dough onto the prepared baking sheet, spacing them about 2 inches apart.
- Bake for 10-12 minutes, or until the edges are lightly golden. Let them cool on the baking sheet for a few minutes before transferring to a wire rack.
Savor The Sweetness Of Easy Cinnamon Rolls

Cinnamon rolls are a delightful treat that can brighten any morning. The warm, sweet aroma of cinnamon and sugar fills the kitchen, making it a cozy place to be. These rolls are soft, fluffy, and topped with a creamy frosting that melts in your mouth. They are perfect for a family breakfast or a sweet snack any time of the day.
Making cinnamon rolls at home doesn’t have to be complicated. With just a few simple ingredients, you can whip up a batch that everyone will love. The best part? You can enjoy them fresh out of the oven without breaking the bank.
Picture this: a plate of freshly baked cinnamon rolls, drizzled with icing, sitting next to a warm cup of coffee. It’s a simple pleasure that brings joy to the table. Gather your family and enjoy the process of baking together. It’s a fun way to create memories while enjoying delicious treats.
Ingredients
- 4 cups all-purpose flour
- 1/4 cup granulated sugar
- 2 1/4 teaspoons active dry yeast
- 1 teaspoon salt
- 1/4 cup unsalted butter, melted
- 1 cup milk, warmed
- 2 large eggs
- 1/2 cup brown sugar, packed
- 2 tablespoons ground cinnamon
- 1/4 cup unsalted butter, softened
- 1 cup cream cheese, softened
- 2 cups powdered sugar
- 1 teaspoon vanilla extract
Instructions
- Prepare the Dough: In a large bowl, combine warmed milk, sugar, and yeast. Let it sit for about 5 minutes until foamy. Stir in melted butter, eggs, and salt. Gradually add flour, mixing until a soft dough forms.
- Knead the Dough: Turn the dough onto a floured surface and knead for about 5-7 minutes until smooth and elastic. Place in a greased bowl, cover, and let rise in a warm place until doubled in size, about 1 hour.
- Make the Filling: In a small bowl, mix brown sugar and cinnamon. Roll out the dough into a rectangle, spread softened butter over the surface, and sprinkle the cinnamon mixture evenly. Roll tightly and slice into individual rolls.
- Bake the Rolls: Place the rolls in a greased baking dish and let rise for another 30 minutes. Preheat the oven to 350°F (175°C). Bake for 25-30 minutes until golden brown.
- Prepare the Frosting: While the rolls are baking, beat together cream cheese, powdered sugar, and vanilla until smooth. Spread the frosting over warm rolls before serving.
Delicious No-Bake Cheesecake For Quick Treats

No-bake cheesecake is a fantastic treat that’s both simple and satisfying. This dessert is perfect for families on a budget, as it requires minimal ingredients and no oven time. The image showcases a beautiful cheesecake topped with fresh berries, making it look as delightful as it tastes.
The creamy filling and buttery crust create a wonderful balance of flavors. Plus, you can customize it with your favorite toppings, whether it’s fruit, chocolate, or a drizzle of caramel. This dessert is sure to please everyone at the table!
Here’s how to whip up this easy no-bake cheesecake:
Ingredients
- 1 ½ cups graham cracker crumbs
- ½ cup unsalted butter, melted
- 2 cups cream cheese, softened
- 1 cup powdered sugar
- 1 teaspoon vanilla extract
- 1 cup heavy whipping cream
- Fresh berries for topping
Instructions
- Prepare the Crust: In a bowl, mix graham cracker crumbs and melted butter until combined. Press the mixture into the bottom of a 9-inch springform pan to form an even layer.
- Make the Filling: In a large bowl, beat the softened cream cheese until smooth. Gradually add powdered sugar and vanilla extract, mixing until well combined.
- Whip the Cream: In another bowl, whip the heavy cream until stiff peaks form. Gently fold the whipped cream into the cream cheese mixture until fully incorporated.
- Combine: Pour the filling over the prepared crust and smooth the top with a spatula. Cover and refrigerate for at least 4 hours, or until set.
- Serve: Once set, remove the cheesecake from the springform pan. Top with fresh berries before slicing and serving.
Try Your Hand At Easy Peanut Butter Cookies
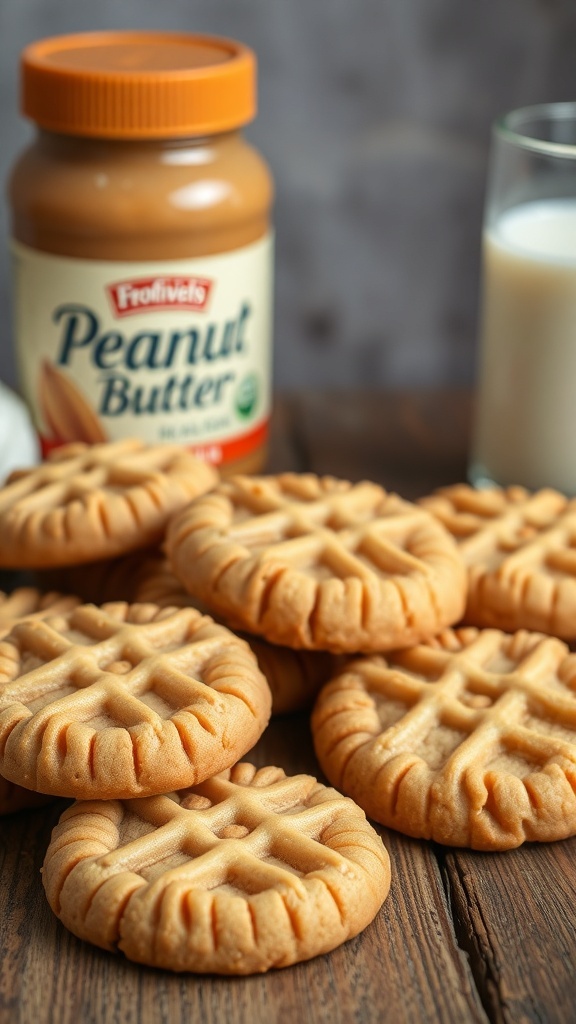
Peanut butter cookies are a classic treat that everyone loves. They are simple to make and require just a few ingredients. The image shows a delicious batch of peanut butter cookies, perfectly baked and ready to enjoy. The warm, golden-brown cookies are sitting next to a jar of peanut butter and a glass of milk, making it clear that these cookies are perfect for snacking.
This recipe is not only budget-friendly but also a great way to get the kids involved in baking. Mixing, rolling, and pressing the cookies can be a fun activity for the whole family. Plus, the smell of cookies baking will fill your home with warmth and comfort.
Let’s get started on making these easy peanut butter cookies!
Ingredients
- 1 cup peanut butter
- 1 cup granulated sugar
- 1 large egg
- 1 teaspoon baking soda
- 1/2 teaspoon vanilla extract
Instructions
- Preheat the oven to 350°F (175°C).
- In a large bowl, mix together the peanut butter, sugar, egg, baking soda, and vanilla extract until well combined.
- Using a spoon or your hands, form small balls of dough and place them on a baking sheet lined with parchment paper.
- Flatten each ball with a fork, creating a crisscross pattern on top.
- Bake for 10-12 minutes, or until the edges are lightly golden.
- Let the cookies cool on the baking sheet for a few minutes before transferring them to a wire rack to cool completely.
Create A Delightful Strawberry Shortcake For Family Gatherings

Strawberry shortcake is a classic dessert that brings joy to any family gathering. This delightful treat features layers of fluffy cake, creamy whipped topping, and fresh strawberries. It’s not just tasty; it’s also visually appealing, making it a perfect centerpiece for your table.
The image shows a beautifully stacked strawberry shortcake, topped with vibrant red strawberries. The layers of cake are generously filled with whipped cream, creating a mouthwatering sight. This dessert is simple to make and can be enjoyed by everyone, young and old.
Making strawberry shortcake is a fun activity for the whole family. Kids can help wash the strawberries and layer the cake. It’s a great way to bond while creating something delicious together. Plus, it’s budget-friendly, using ingredients that are easy to find.
Ingredients
- 2 cups all-purpose flour
- 1/4 cup granulated sugar
- 1 tablespoon baking powder
- 1/2 teaspoon salt
- 1/2 cup unsalted butter, softened
- 1 cup milk
- 1 teaspoon vanilla extract
- 2 cups fresh strawberries, sliced
- 1 cup heavy cream
- 2 tablespoons powdered sugar
Instructions
- Preheat your oven to 350°F (175°C). Grease and flour two 9-inch round cake pans.
- In a bowl, mix flour, sugar, baking powder, and salt. Add softened butter, milk, and vanilla. Beat until smooth.
- Divide the batter evenly between the prepared pans. Bake for 25-30 minutes or until a toothpick comes out clean.
- Let the cakes cool in the pans for 10 minutes, then transfer to wire racks to cool completely.
- While the cakes cool, whip the heavy cream with powdered sugar until soft peaks form.
- Once the cakes are cool, slice each cake in half horizontally. Layer one half of a cake on a serving plate, spread whipped cream, and add sliced strawberries. Repeat with the other layers.
- Top with the final layer of cake and decorate with more whipped cream and strawberries.
- Slice and serve this delightful strawberry shortcake to your family!
Bake Up Some Simple Lemon Bars For A Tangy Treat
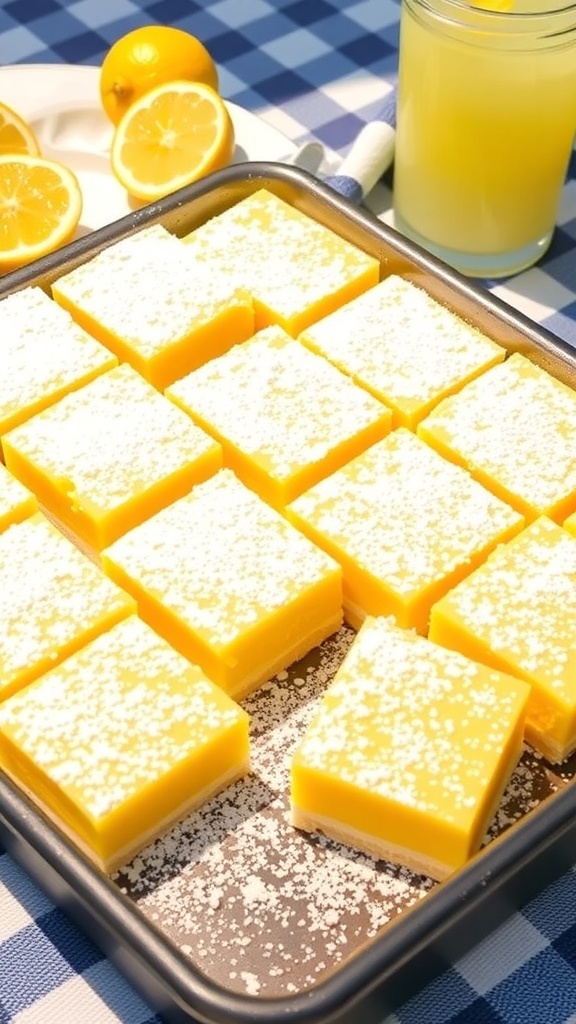
Lemon bars are a fantastic way to bring a burst of sunshine into your kitchen. These delightful treats are not only easy to make, but they also offer a perfect balance of sweet and tangy flavors. Imagine a buttery crust topped with a smooth, zesty lemon filling, all dusted with a sprinkle of powdered sugar. They’re a hit with kids and adults alike!
The image shows a tray of beautifully cut lemon bars, each piece glistening with a bright yellow hue. The light dusting of powdered sugar adds a charming touch, making them look even more inviting. A few fresh lemons sit nearby, hinting at the vibrant flavor that awaits. These bars are perfect for family gatherings, picnics, or just a sweet treat at home.
Making lemon bars is simple and requires just a few ingredients. You can whip them up quickly, making them a great option for busy families on a budget. Plus, they store well, so you can enjoy them over a few days.
Ingredients
- 1 cup all-purpose flour
- 1/2 cup unsalted butter, softened
- 1/4 cup granulated sugar
- 1/4 teaspoon salt
- 2 large eggs
- 1 cup granulated sugar (for filling)
- 1/4 cup fresh lemon juice
- 1 tablespoon lemon zest
- 1/4 cup all-purpose flour (for filling)
- Powdered sugar for dusting
Instructions
- Preheat your oven to 350°F (175°C). Grease an 8x8 inch baking dish.
- Make the crust: In a bowl, mix 1 cup flour, 1/4 cup sugar, and salt. Add the softened butter and mix until crumbly. Press this mixture into the bottom of the prepared baking dish.
- Bake the crust for about 15 minutes, or until lightly golden.
- While the crust is baking, prepare the filling: In a separate bowl, whisk together the eggs, 1 cup sugar, lemon juice, lemon zest, and 1/4 cup flour until smooth.
- Pour the filling over the baked crust and return to the oven. Bake for an additional 20-25 minutes, or until the filling is set.
- Let the lemon bars cool completely before cutting into squares. Dust with powdered sugar before serving.
Bake A Batch Of Easy Oatmeal Cookies For Healthy Snacking
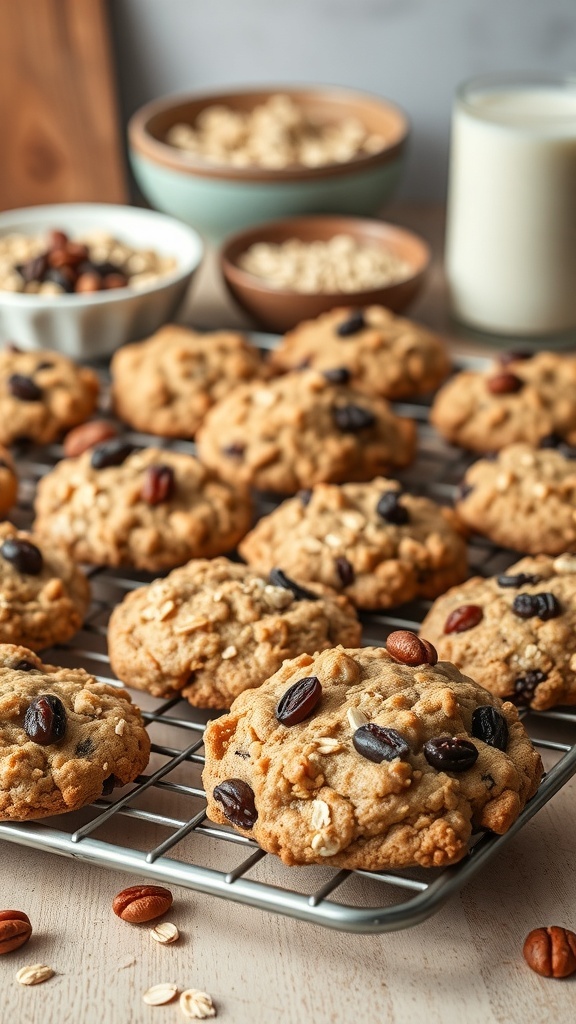
Oatmeal cookies are a fantastic choice for families looking for healthy snacks. They are simple to make and packed with wholesome ingredients. The image shows a delightful batch of oatmeal cookies cooling on a wire rack, surrounded by bowls of oats and nuts. This scene perfectly captures the essence of home baking, where love and nutrition come together.
These cookies are not only tasty but also versatile. You can add your favorite mix-ins like chocolate chips, dried fruits, or nuts. They make a great snack for kids after school or a quick treat for adults. Plus, they are budget-friendly, making them ideal for families.
Let’s get started on making these easy oatmeal cookies!
Ingredients
- 1 cup rolled oats
- 1/2 cup whole wheat flour
- 1/2 teaspoon baking soda
- 1/4 teaspoon salt
- 1/2 cup honey or maple syrup
- 1/4 cup coconut oil or unsalted butter, melted
- 1 teaspoon vanilla extract
- 1/2 cup chopped nuts or seeds (optional)
- 1/2 cup chocolate chips or dried fruit (optional)
Instructions
- Preheat the Oven: Preheat your oven to 350°F (175°C) and line a baking sheet with parchment paper.
- Mix Dry Ingredients: In a bowl, combine the rolled oats, whole wheat flour, baking soda, and salt.
- Combine Wet Ingredients: In another bowl, whisk together the honey, melted coconut oil, and vanilla extract until smooth.
- Combine Mixtures: Pour the wet ingredients into the dry ingredients and mix until well combined. If using, fold in the nuts, seeds, chocolate chips, or dried fruit.
- Scoop the Dough: Using a tablespoon, scoop the dough onto the prepared baking sheet, spacing them about 2 inches apart.
- Bake: Bake in the preheated oven for 10-12 minutes, or until the edges are lightly golden. Allow the cookies to cool on the baking sheet for a few minutes before transferring them to a wire rack to cool completely.
Indulge In Simple Chocolate Pudding For Dessert

Chocolate pudding is a classic dessert that brings joy to both kids and adults. It's creamy, rich, and oh-so-delicious! The image captures a bowl of chocolate pudding topped with fluffy whipped cream and chocolate shavings, making it look irresistible. This dessert is perfect for family gatherings or a cozy night in.
Making chocolate pudding from scratch is easy and budget-friendly. You don’t need fancy ingredients or complicated steps. Just a few pantry staples will do the trick. Plus, it’s a fun activity to do with the kids, allowing them to get involved in the kitchen.
Let’s get started on this delightful treat!
Ingredients
- 2 cups milk
- 1/2 cup granulated sugar
- 1/3 cup unsweetened cocoa powder
- 1/4 cup cornstarch
- 1/4 teaspoon salt
- 1 teaspoon vanilla extract
- 2 tablespoons unsalted butter
Instructions
- Combine Ingredients: In a medium saucepan, whisk together the sugar, cocoa powder, cornstarch, and salt.
- Add Milk: Gradually stir in the milk until the mixture is smooth.
- Cook: Place the saucepan over medium heat. Stir constantly until the mixture thickens and starts to bubble, about 5-7 minutes.
- Remove from Heat: Once thickened, remove the saucepan from heat. Stir in the vanilla extract and butter until smooth.
- Chill: Pour the pudding into serving bowls or a large dish. Cover with plastic wrap and refrigerate for at least 2 hours before serving.
- Serve: Top with whipped cream and chocolate shavings before enjoying!
Bake A Cozy Pumpkin Bread For Fall Family Gatherings
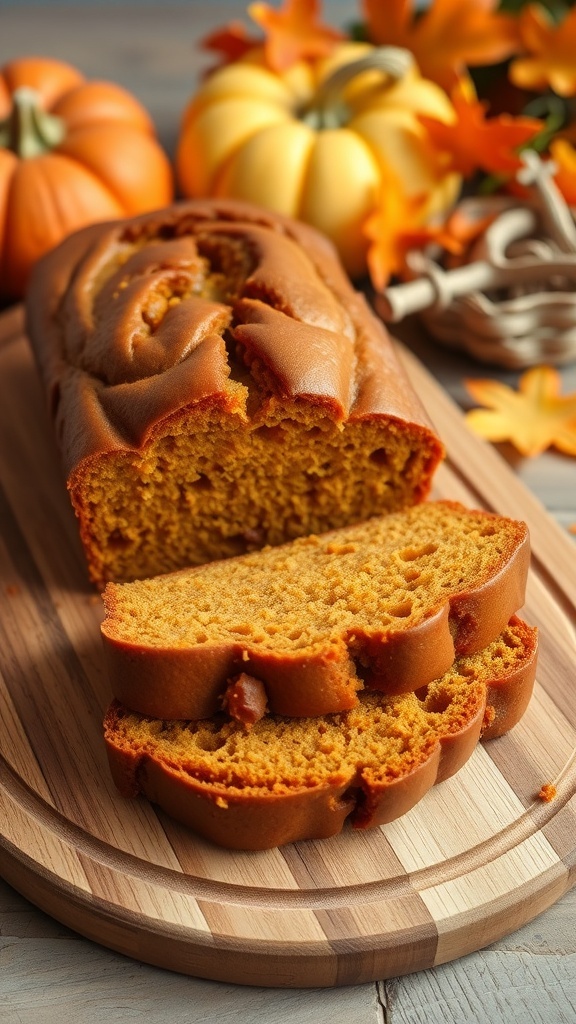
Fall is the perfect time to gather with family and friends, and what better way to celebrate than with a warm loaf of pumpkin bread? This delightful treat is not only easy to make but also budget-friendly. The image shows a beautifully baked pumpkin bread, golden and moist, with slices ready to be enjoyed. The rustic wooden board and autumn decorations around it create a cozy vibe that invites everyone to dig in.
Making pumpkin bread is a simple process. With just a few ingredients, you can whip up a delicious loaf that fills your home with the comforting scents of cinnamon and nutmeg. It’s perfect for breakfast, snacks, or dessert, making it a versatile addition to any fall gathering.
Ingredients
- 1 3/4 cups all-purpose flour
- 1 cup granulated sugar
- 1/2 cup brown sugar, packed
- 1 teaspoon baking soda
- 1/2 teaspoon baking powder
- 1 teaspoon ground cinnamon
- 1/2 teaspoon ground nutmeg
- 1/2 teaspoon salt
- 1/2 cup vegetable oil
- 1 cup canned pumpkin puree
- 2 large eggs
- 1 teaspoon vanilla extract
Instructions
- Preheat the oven to 350°F (175°C). Grease a 9x5 inch loaf pan.
- In a large bowl, mix together the flour, granulated sugar, brown sugar, baking soda, baking powder, cinnamon, nutmeg, and salt.
- In another bowl, whisk together the oil, pumpkin puree, eggs, and vanilla until smooth.
- Pour the wet ingredients into the dry ingredients and stir until just combined. Do not overmix.
- Pour the batter into the prepared loaf pan and smooth the top.
- Bake for 60-70 minutes, or until a toothpick inserted into the center comes out clean.
- Let the bread cool in the pan for 10 minutes before transferring it to a wire rack to cool completely.
This pumpkin bread is sure to be a hit at your fall gatherings. Enjoy it plain, or add a spread of butter for an extra treat!


Comments
Post a Comment