10 Easy No Bake Desserts Perfect for the Holidays
10 Easy No Bake Desserts Perfect for the Holidays
Get ready to satisfy your sweet tooth without the oven! This collection of easy no-bake desserts is perfect for celebrating holidays in a hassle-free way. From creamy treats to delightful bites, these recipes require minimal effort and maximum flavor, making them an ideal addition to any festive gathering.
Delightful Strawberry Shortcake Cups For A Fruity Treat
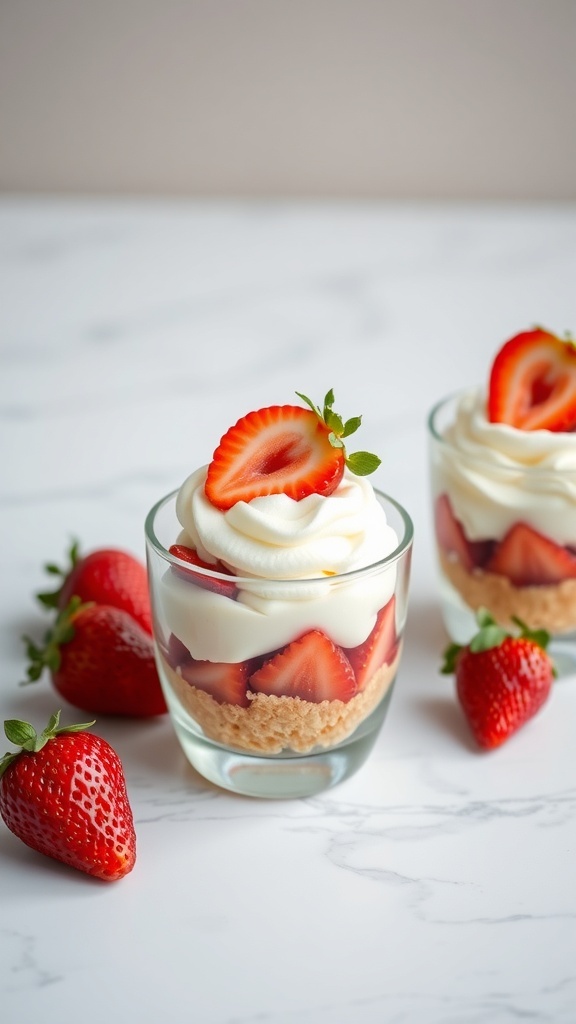
Strawberry shortcake cups are a fun and easy dessert that brings a burst of flavor to any holiday gathering. These little treats are perfect for showcasing fresh strawberries, layered with creamy goodness and a crunchy base. The vibrant red strawberries pop against the creamy white layers, making them as pleasing to the eye as they are to the palate.
These cups are not only simple to make, but they also require no baking, which is a huge plus when you're busy preparing for holiday festivities. Just layer crushed cookies or cake at the bottom, add sliced strawberries, and top with whipped cream. It’s a delightful way to enjoy a classic dessert in a new form!
Ingredients
- 2 cups fresh strawberries, hulled and sliced
- 1 cup heavy whipping cream
- 1/4 cup powdered sugar
- 1 teaspoon vanilla extract
- 1 cup crushed shortbread cookies or sponge cake
- Mint leaves for garnish (optional)
Instructions
- Prepare the Strawberries: In a bowl, mix the sliced strawberries with a tablespoon of sugar if you like them sweeter. Let them sit for about 10 minutes to release their juices.
- Make the Whipped Cream: In another bowl, whip the heavy cream, powdered sugar, and vanilla extract until soft peaks form.
- Layer the Cups: In serving cups, add a layer of crushed cookies or cake at the bottom. Then, add a layer of strawberries followed by a generous dollop of whipped cream. Repeat the layers until the cups are filled.
- Garnish and Serve: Top with a slice of strawberry and a mint leaf for a fresh touch. Serve immediately or chill for a bit before serving.
Creamy No-Bake Cheesecake With A Berry Topping
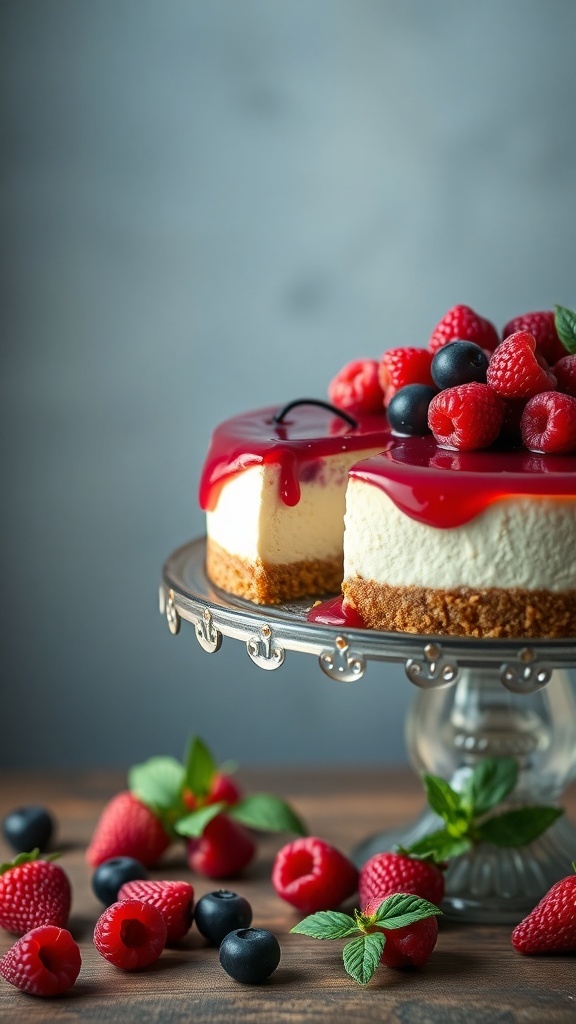
This creamy no-bake cheesecake is a showstopper for any holiday gathering. The smooth, rich filling sits atop a buttery graham cracker crust, making it a delightful treat. Topped with fresh berries, it adds a splash of color and flavor that everyone will love.
The image captures the cheesecake beautifully, showcasing its creamy texture and vibrant berry topping. The combination of raspberries and blueberries not only looks stunning but also brings a refreshing taste that balances the richness of the cheesecake.
Making this dessert is simple and requires no baking, perfect for those busy holiday days. Just mix, chill, and serve!
Ingredients
- 1 ½ cups graham cracker crumbs
- ½ cup unsalted butter, melted
- 2 cups cream cheese, softened
- 1 cup powdered sugar
- 1 teaspoon vanilla extract
- 1 cup heavy whipping cream
- 1 cup mixed berries (raspberries and blueberries)
- ¼ cup berry sauce (optional)
Instructions
- Prepare the Crust: In a bowl, combine graham cracker crumbs and melted butter. Press the mixture into the bottom of a 9-inch springform pan to form an even layer.
- Make the Filling: In another bowl, beat the cream cheese until smooth. Gradually add powdered sugar and vanilla, mixing until combined. In a separate bowl, whip the heavy cream until stiff peaks form. Gently fold the whipped cream into the cream cheese mixture.
- Combine: Pour the filling over the crust in the springform pan. Smooth the top with a spatula. Cover and refrigerate for at least 4 hours or until set.
- Add Toppings: Once set, remove the cheesecake from the pan. Top with fresh berries and drizzle with berry sauce if desired.
- Serve: Slice and enjoy your delicious no-bake cheesecake!
Refreshing No-Bake Lemonade Pie For A Zesty Finish
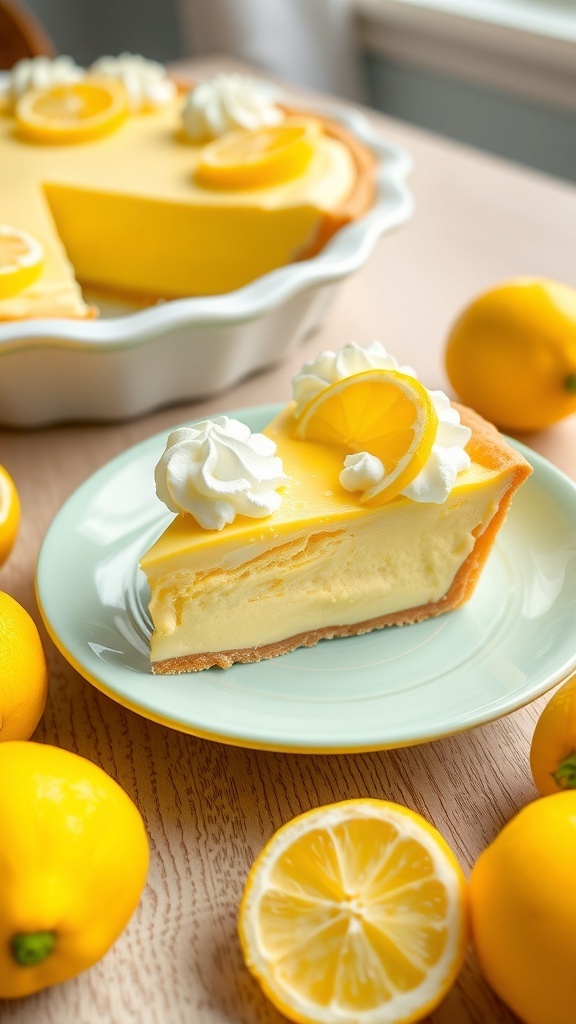
This no-bake lemonade pie is a delightful treat that brings a burst of citrus flavor to your holiday table. The bright yellow color and creamy texture make it a refreshing dessert choice. Topped with whipped cream and lemon slices, it’s as pleasing to the eye as it is to the palate.
The pie features a smooth filling made with lemonade, cream cheese, and whipped topping, all nestled in a graham cracker crust. It’s simple to make and requires no baking, making it perfect for busy holiday preparations. Just mix, pour, and chill!
Gather your ingredients and get ready to impress your family and friends with this easy and zesty dessert. It’s a fantastic way to end any meal, especially during warm weather celebrations.
Ingredients
- 1 pre-made graham cracker crust
- 1 cup lemonade (freshly squeezed or store-bought)
- 8 oz cream cheese, softened
- 1 cup whipped topping
- 1/2 cup powdered sugar
- 1 tablespoon lemon zest
- Whipped cream and lemon slices for garnish
Instructions
- In a mixing bowl, beat the softened cream cheese until smooth.
- Add the powdered sugar, lemonade, and lemon zest. Mix until well combined.
- Gently fold in the whipped topping until the mixture is smooth and fluffy.
- Pour the filling into the graham cracker crust and spread evenly.
- Cover and refrigerate for at least 4 hours or until set.
- Before serving, garnish with whipped cream and lemon slices.
Indulgent No-Bake Oreo Truffles For Chocolate Lovers
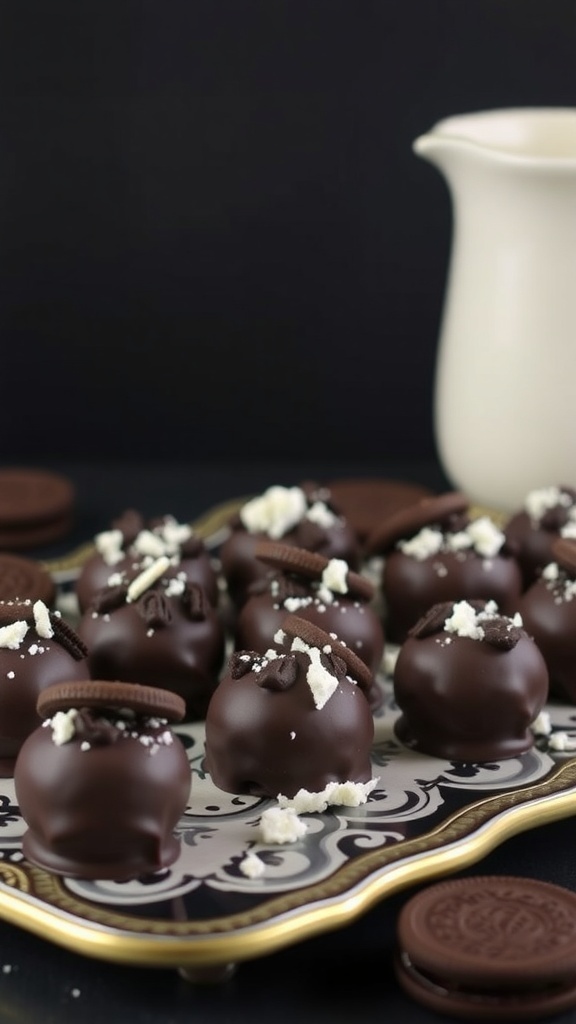
Oreo truffles are a delightful treat that combines the rich flavor of chocolate with the classic taste of Oreos. These little bites of joy are perfect for any holiday gathering. They are easy to make and require no baking, making them a go-to dessert for those busy days leading up to the holidays.
The image showcases a beautiful platter filled with these truffles, each one coated in smooth chocolate and topped with crushed Oreos. The contrast of the dark chocolate against the white plate makes them look even more tempting. You can see a small pitcher nearby, hinting at a delicious dipping sauce or perhaps some milk to wash them down.
These truffles are not just visually appealing; they are also incredibly simple to whip up. With just a few ingredients, you can create a dessert that will impress your family and friends. They are rich and satisfying, perfect for chocolate lovers looking for a sweet fix.
Ingredients
- 1 package (15.35 oz) Oreo cookies
- 8 oz cream cheese, softened
- 2 cups semi-sweet chocolate chips
- 1 tablespoon vegetable oil (optional)
- Extra crushed Oreos for topping
Instructions
- Crush the Oreos: In a food processor, crush the Oreo cookies into fine crumbs. Transfer to a mixing bowl.
- Mix with Cream Cheese: Add the softened cream cheese to the Oreo crumbs. Mix until fully combined and a dough forms.
- Shape the Truffles: Scoop out small portions of the mixture and roll them into balls, about 1 inch in diameter. Place them on a baking sheet lined with parchment paper.
- Chill: Refrigerate the truffles for about 30 minutes to firm up.
- Melt the Chocolate: In a microwave-safe bowl, melt the chocolate chips with the vegetable oil (if using) in 30-second intervals, stirring in between until smooth.
- Coat the Truffles: Dip each chilled truffle into the melted chocolate, ensuring they are fully coated. Place them back on the parchment paper.
- Add Toppings: While the chocolate is still wet, sprinkle crushed Oreos on top of each truffle.
- Let Set: Allow the chocolate to harden at room temperature or refrigerate for quicker setting.
- Enjoy: Serve these delicious treats at your next holiday gathering or enjoy them all to yourself!
Festive No-Bake Pumpkin Pie For Autumn Celebrations
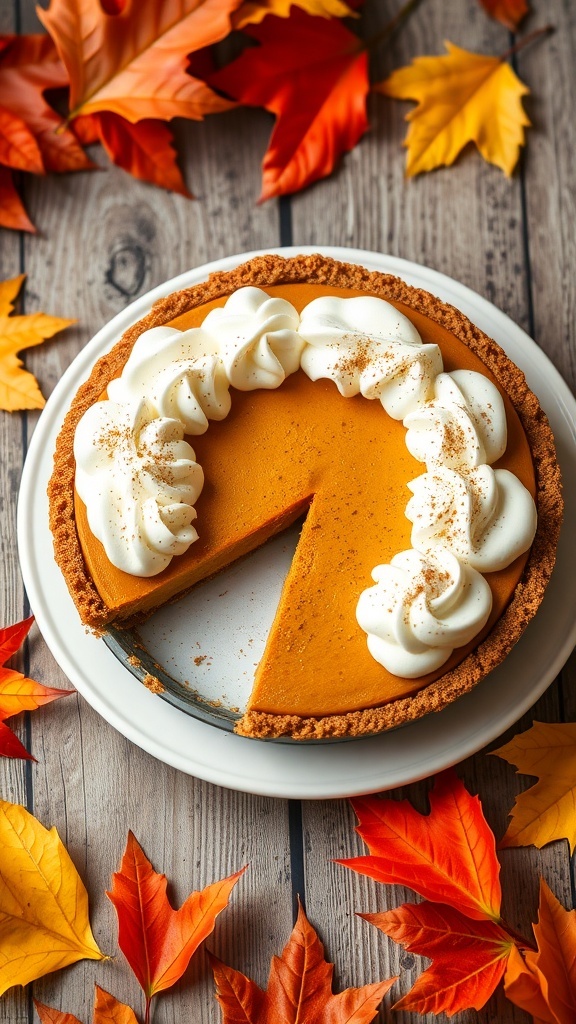
As the leaves turn vibrant shades of orange and red, it’s the perfect time to whip up a delightful no-bake pumpkin pie. This dessert captures the essence of autumn with its creamy pumpkin filling and a crunchy graham cracker crust. Topped with fluffy whipped cream and a sprinkle of cinnamon, it’s a treat everyone will love.
This pie is not only easy to make, but it also saves you from turning on the oven. Perfect for family gatherings or holiday parties, it brings a festive touch to any table. The rich flavors of pumpkin and spices create a warm, inviting dessert that pairs beautifully with a cup of coffee or tea.
Gather your ingredients and let’s get started on this simple recipe that will impress your guests and satisfy your sweet tooth!
Ingredients
- 1 ½ cups graham cracker crumbs
- ½ cup unsalted butter, melted
- 1 cup pumpkin puree
- 1 cup cream cheese, softened
- ¾ cup powdered sugar
- 1 teaspoon vanilla extract
- 1 teaspoon pumpkin pie spice
- 1 cup heavy whipping cream
- Extra whipped cream and cinnamon for topping
Instructions
- Make the Crust: In a bowl, mix graham cracker crumbs with melted butter until well combined. Press the mixture into the bottom and sides of a 9-inch pie dish. Chill in the refrigerator for 10 minutes.
- Prepare the Filling: In a large bowl, beat the softened cream cheese until smooth. Add pumpkin puree, powdered sugar, vanilla extract, and pumpkin pie spice. Mix until fully combined and creamy.
- Whip the Cream: In another bowl, whip the heavy cream until stiff peaks form. Gently fold the whipped cream into the pumpkin mixture until well blended.
- Combine: Pour the pumpkin filling into the chilled crust, smoothing the top with a spatula. Refrigerate for at least 4 hours or until set.
- Serve: Before serving, top with extra whipped cream and a sprinkle of cinnamon. Slice and enjoy!
Delicious No-Bake Peanut Butter Pie For A Creamy Delight
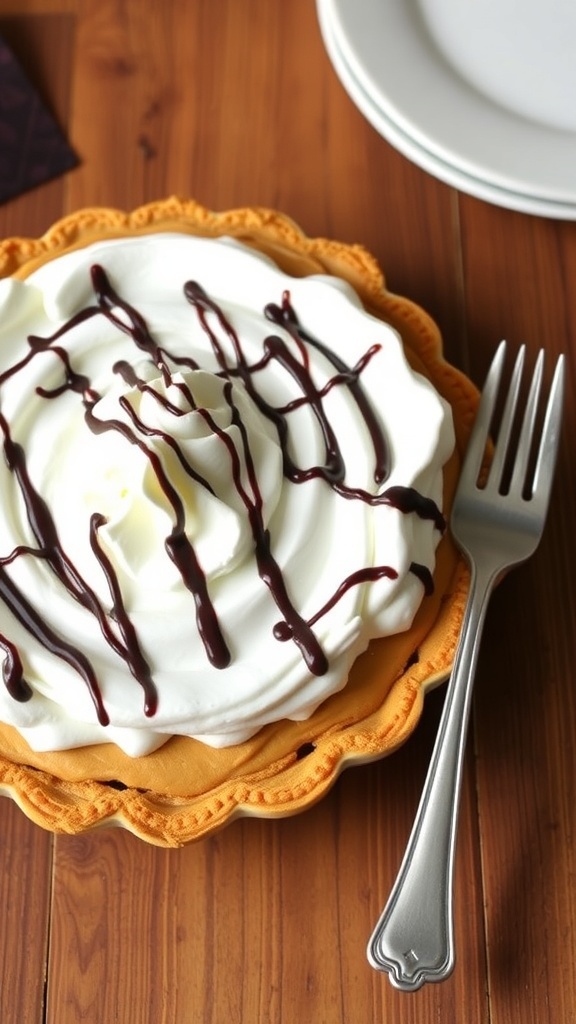
No-bake desserts are a lifesaver during the holidays, and this peanut butter pie is no exception. It’s creamy, rich, and oh-so-delicious. The image shows a beautifully crafted pie topped with fluffy whipped cream and a drizzle of chocolate sauce, making it look irresistible. The golden crust adds a nice touch, inviting everyone to dig in.
This pie is perfect for gatherings, as it requires no baking and can be made ahead of time. Simply whip up the filling, pour it into the crust, and let it chill. You’ll have a delightful dessert ready to impress your guests!
Ingredients
- 1 pre-made graham cracker crust
- 1 cup creamy peanut butter
- 1 cup powdered sugar
- 1 cup heavy whipping cream
- 1 teaspoon vanilla extract
- Chocolate sauce for drizzling
Instructions
- In a mixing bowl, combine the peanut butter and powdered sugar. Mix until smooth.
- In another bowl, whip the heavy cream and vanilla extract until soft peaks form.
- Gently fold the whipped cream into the peanut butter mixture until fully combined.
- Pour the filling into the graham cracker crust and smooth the top.
- Chill in the refrigerator for at least 4 hours or until set.
- Before serving, top with additional whipped cream and drizzle with chocolate sauce.
Mouthwatering No-Bake Chocolate Pretzel Bars For A Sweet-Salty Treat
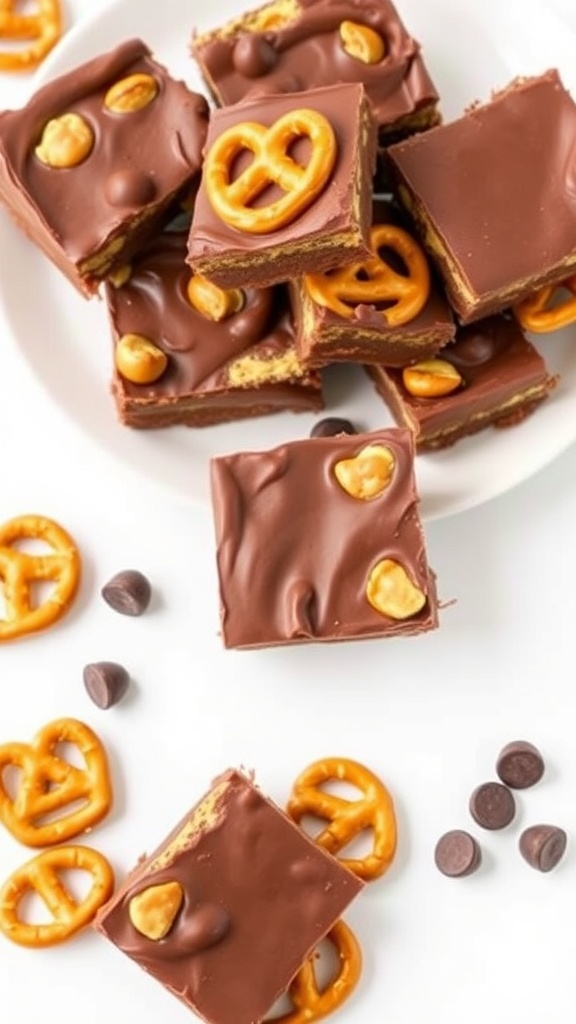
These no-bake chocolate pretzel bars are a delightful combination of sweet and salty flavors. The image showcases a tempting stack of chocolate-covered bars, topped with crunchy pretzels. Each piece is rich and satisfying, making it a perfect treat for any holiday gathering.
Creating these bars is simple and fun. You’ll love how quickly they come together, and they’re sure to impress your friends and family. The combination of creamy chocolate and the crunch of pretzels makes for a delicious snack that everyone will enjoy.
Ingredients
- 2 cups crushed pretzels
- 1/2 cup unsalted butter, melted
- 1/2 cup brown sugar, packed
- 1 cup creamy peanut butter
- 2 cups milk chocolate chips
- 1/4 cup mini pretzels for topping
Instructions
- Prepare the Base: In a large bowl, mix the crushed pretzels, melted butter, and brown sugar until well combined. Press this mixture firmly into the bottom of a greased 9x9 inch pan.
- Make the Peanut Butter Layer: In another bowl, combine the peanut butter with powdered sugar until smooth. Spread this mixture evenly over the pretzel base.
- Melt the Chocolate: In a microwave-safe bowl, melt the chocolate chips in 30-second intervals, stirring in between until smooth. Pour the melted chocolate over the peanut butter layer and spread evenly.
- Add Toppings: Place mini pretzels on top of the melted chocolate for decoration and extra crunch.
- Chill: Refrigerate the bars for at least 2 hours or until set. Once firm, cut into squares and serve.
Unique No-Bake S'Mores Cheesecake For Campfire Flavor
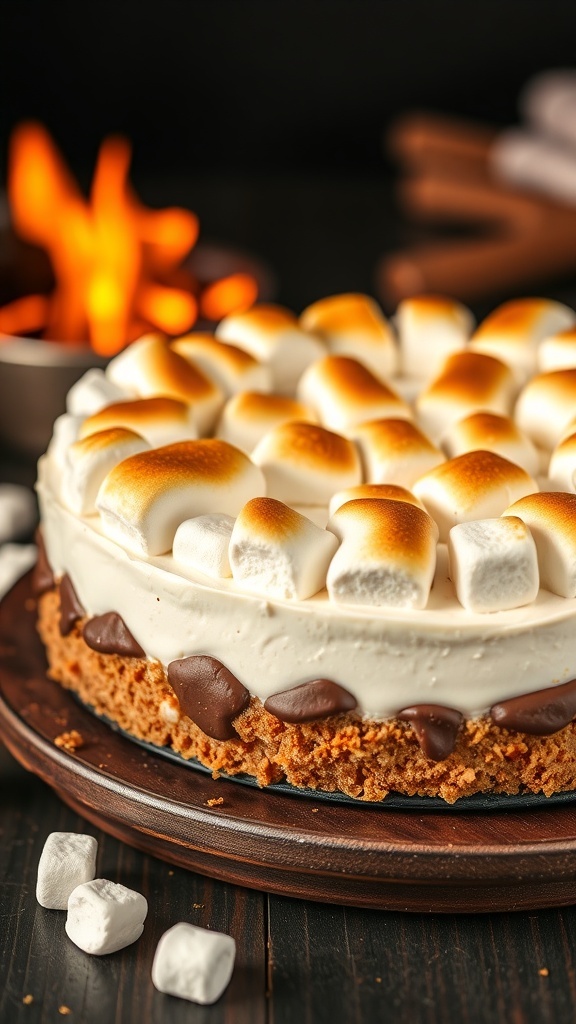
Imagine the taste of a classic campfire treat, but in a creamy cheesecake form. This no-bake s'mores cheesecake brings together the flavors of graham crackers, chocolate, and toasted marshmallows. It’s perfect for those who love the outdoors but want to enjoy dessert without the hassle of baking.
The base of the cheesecake is made from crushed graham crackers mixed with melted butter, giving it that familiar crunch. The filling is a smooth blend of cream cheese, whipped cream, and chocolate, creating a rich and satisfying texture. Topping it off are mini marshmallows that can be toasted for that authentic s'mores experience.
This dessert is not only delicious but also easy to prepare. You can whip it up in no time and let it chill while you enjoy your holiday festivities. It’s a crowd-pleaser that will remind everyone of cozy campfire nights.
Ingredients
- 1 ½ cups graham cracker crumbs
- ½ cup unsalted butter, melted
- 2 cups cream cheese, softened
- 1 cup powdered sugar
- 1 teaspoon vanilla extract
- 1 cup heavy whipping cream
- 1 cup chocolate chips
- 2 cups mini marshmallows
Instructions
- Prepare the Crust: In a bowl, mix the graham cracker crumbs with melted butter until combined. Press the mixture into the bottom of a 9-inch springform pan to form a crust.
- Make the Filling: In a large bowl, beat the cream cheese until smooth. Gradually add the powdered sugar and vanilla extract, mixing until combined. In another bowl, whip the heavy cream until stiff peaks form, then fold it into the cream cheese mixture.
- Add Chocolate: Melt the chocolate chips in the microwave or over a double boiler. Let it cool slightly, then fold it into the cheesecake filling until well combined.
- Assemble: Pour the filling over the crust in the springform pan. Smooth the top and refrigerate for at least 4 hours or until set.
- Toast the Marshmallows: Just before serving, top the cheesecake with mini marshmallows. Use a kitchen torch to toast them lightly, or place under a broiler for a few seconds until golden brown.
- Serve: Slice and enjoy your no-bake s'mores cheesecake, bringing the campfire flavor to your holiday gatherings!
Comforting No-Bake Apple Cream Cheese Dessert For Cozy Evenings
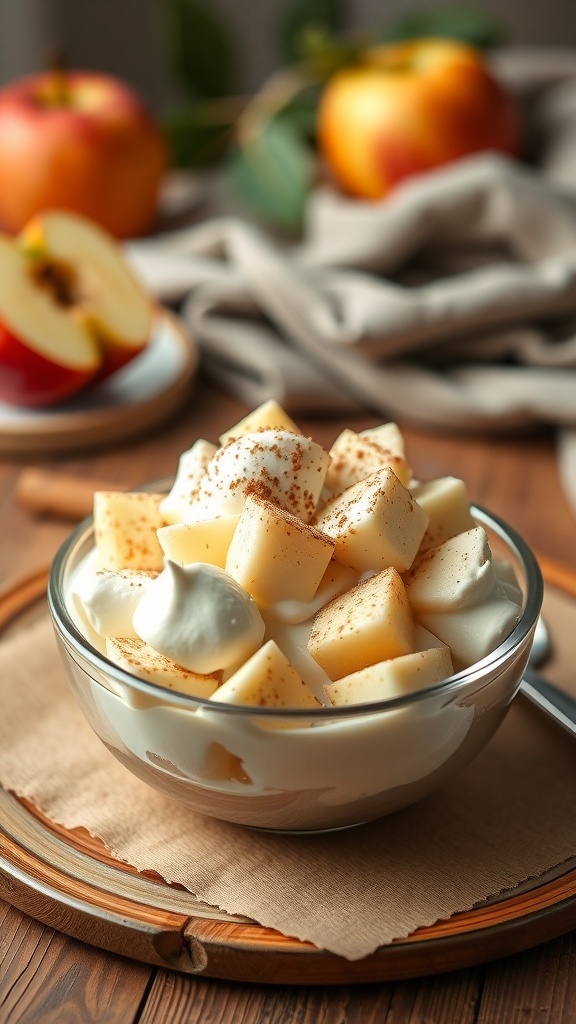
This no-bake apple cream cheese dessert is perfect for cozy evenings. It combines the sweetness of apples with the creamy goodness of cream cheese, making it a delightful treat. The image showcases a bowl filled with diced apples, layered with a smooth cream cheese mixture, and topped with a sprinkle of cinnamon. In the background, you can see whole apples, adding a fresh touch to the scene.
This dessert is not only simple to prepare but also brings warmth and comfort, making it ideal for holiday gatherings or a quiet night in. The layers of flavors and textures create a satisfying experience that everyone will love.
Ingredients
- 2 cups diced apples
- 1 cup cream cheese, softened
- 1/2 cup powdered sugar
- 1 teaspoon vanilla extract
- 1 cup whipped cream
- 1 teaspoon ground cinnamon
- 1 tablespoon lemon juice
Instructions
- Prepare the Apples: In a bowl, toss the diced apples with lemon juice to prevent browning.
- Make the Cream Cheese Mixture: In another bowl, beat the softened cream cheese with powdered sugar and vanilla extract until smooth.
- Fold in the Whipped Cream: Gently fold the whipped cream into the cream cheese mixture until well combined.
- Layer the Dessert: In serving bowls, layer the diced apples and cream cheese mixture. Start with a layer of apples, then add a layer of cream cheese, and repeat until the bowls are filled.
- Finish with Cinnamon: Sprinkle ground cinnamon on top of each dessert for added flavor.
- Chill and Serve: Refrigerate for at least 30 minutes before serving to let the flavors meld together.
Whimsical No-Bake Chocolate Mint Brownies For Festive Occasions
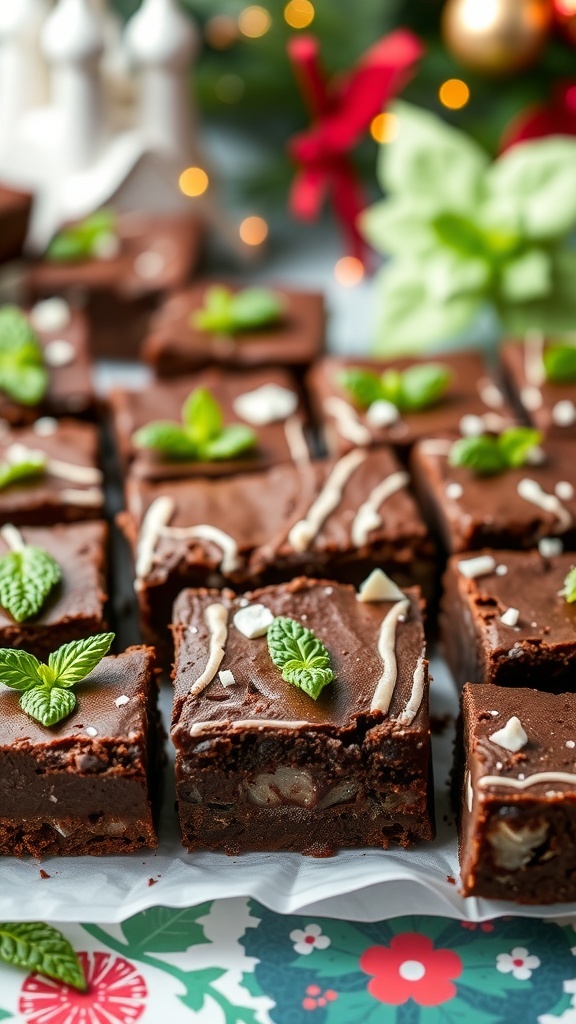
These No-Bake Chocolate Mint Brownies are a delightful treat for any holiday gathering. With their rich chocolate flavor and refreshing minty twist, they are sure to impress your guests. The brownies are topped with a smooth layer of chocolate and garnished with fresh mint leaves, making them visually appealing and delicious.
To make these brownies, you’ll need a few simple ingredients. The combination of chocolate and mint creates a festive vibe that pairs perfectly with the holiday spirit. Plus, the no-bake aspect means you can whip them up quickly without turning on the oven!
Ingredients
- 1 cup graham cracker crumbs
- 1/2 cup unsweetened cocoa powder
- 1/2 cup powdered sugar
- 1/2 cup unsalted butter, melted
- 1 teaspoon peppermint extract
- 1 cup semi-sweet chocolate chips
- 1/4 cup heavy cream
- Fresh mint leaves for garnish
Instructions
- Prepare the Base: In a mixing bowl, combine graham cracker crumbs, cocoa powder, powdered sugar, melted butter, and peppermint extract. Mix until well combined.
- Press into Pan: Line an 8x8 inch baking dish with parchment paper. Press the mixture firmly into the bottom of the dish to create an even layer.
- Make the Topping: In a small saucepan, heat the heavy cream over medium heat until it begins to simmer. Remove from heat and add chocolate chips. Stir until smooth and fully melted.
- Spread the Topping: Pour the chocolate mixture over the graham cracker base, spreading it evenly. Let it cool at room temperature for about 30 minutes.
- Chill: Once cooled, place the brownies in the refrigerator for at least 2 hours to set.
- Serve: Cut into squares and garnish with fresh mint leaves before serving.


Comments
Post a Comment