14 Delicious Nut-Free Baking Recipes You'll Love
14 Delicious Nut-Free Baking Recipes You'll Love
Nut-Free Baking Recipes are here to make your sweet tooth happy without the worry of allergens. Whether you're dealing with nut allergies or just looking to try something different, these delicious recipes offer a variety of options that even the pickiest eaters will love. Grab your mixing bowl and let’s whip up some tasty treats!
Delightful Chocolate Chip Cookies Without Nuts
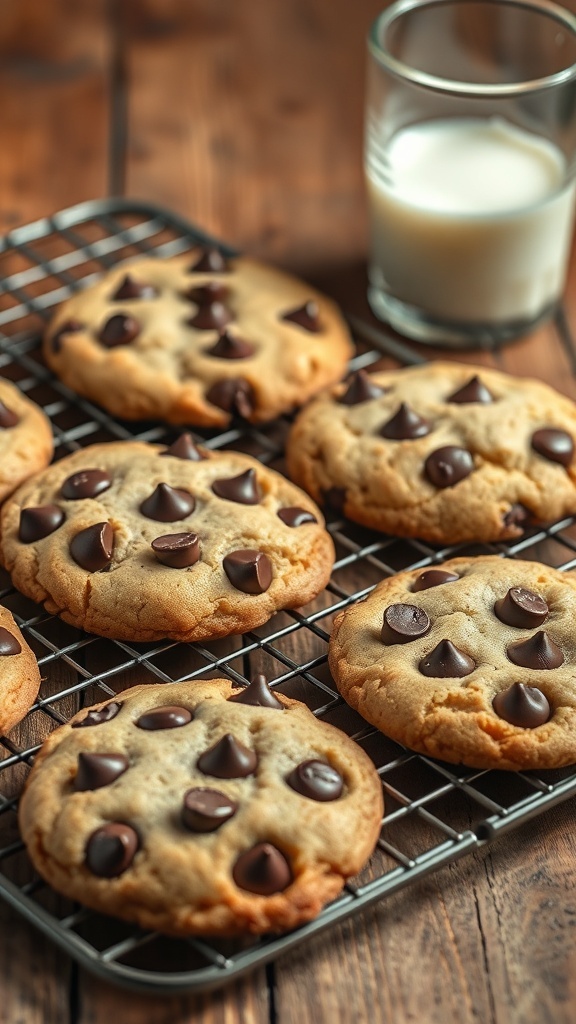
Chocolate chip cookies are a classic treat loved by many. These delightful cookies are made without nuts, making them perfect for those with allergies or simply those who prefer a nut-free option. The image showcases freshly baked cookies, golden brown and studded with rich chocolate chips, resting on a cooling rack. A glass of milk sits nearby, ready to complement these sweet delights.
Making these cookies is straightforward and fun. You’ll enjoy the warm, gooey chocolate melting in your mouth, paired with a soft, chewy texture. They are perfect for sharing or enjoying all by yourself!
Ingredients
- 2 1/4 cups all-purpose flour
- 1/2 teaspoon baking soda
- 1/2 teaspoon salt
- 3/4 cup unsalted butter, softened
- 1 cup brown sugar, packed
- 1/2 cup granulated sugar
- 1 teaspoon vanilla extract
- 2 large eggs
- 2 cups semi-sweet chocolate chips
Instructions
- Preheat the oven to 350°F (175°C). Line a baking sheet with parchment paper.
- In a bowl, whisk together the flour, baking soda, and salt. Set aside.
- In a large mixing bowl, cream the softened butter, brown sugar, and granulated sugar until smooth. Add the vanilla extract and eggs, mixing well.
- Gradually add the dry ingredients to the wet mixture, stirring until combined. Fold in the chocolate chips.
- Drop rounded tablespoons of dough onto the prepared baking sheet, spacing them about 2 inches apart.
- Bake for 10-12 minutes or until the edges are golden brown. Let them cool on the baking sheet for a few minutes before transferring to a wire rack.
Lusciously Moist Banana Bread For All
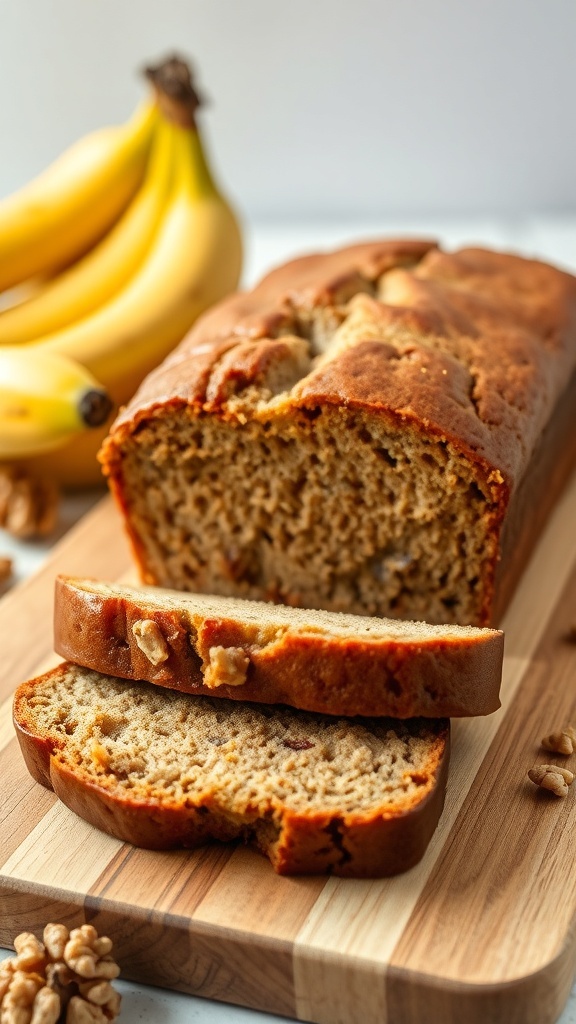
Banana bread is a classic favorite that brings warmth and comfort to any kitchen. This nut-free version is perfect for those who want to enjoy a moist, sweet loaf without the worry of allergens. The golden crust and soft interior make it a delightful treat for breakfast or a snack.
In the image, you can see a beautifully baked loaf of banana bread, sliced to reveal its tender crumb. The bananas in the background hint at the fresh ingredients used in this recipe. This bread is not just delicious; it’s also easy to make!
Gather your ingredients and get ready to whip up a batch that everyone will love.
Ingredients
- 3 ripe bananas, mashed
- 1/3 cup melted butter
- 1 teaspoon baking soda
- Pinch of salt
- 3/4 cup sugar
- 1 large egg, beaten
- 1 teaspoon vanilla extract
- 1 cup all-purpose flour
Instructions
- Preheat your oven to 350°F (175°C). Grease a 4x8 inch loaf pan.
- In a mixing bowl, mash the ripe bananas with a fork until smooth. Stir in the melted butter.
- Add baking soda and salt to the banana mixture. Mix in the sugar, beaten egg, and vanilla extract.
- Finally, stir in the flour until just combined. Do not overmix.
- Pour the batter into the prepared loaf pan and smooth the top.
- Bake for 60-65 minutes, or until a toothpick inserted into the center comes out clean.
- Let it cool in the pan for about 10 minutes, then transfer to a wire rack to cool completely before slicing.
Flavorful Apple Crisp Made Nut-Free
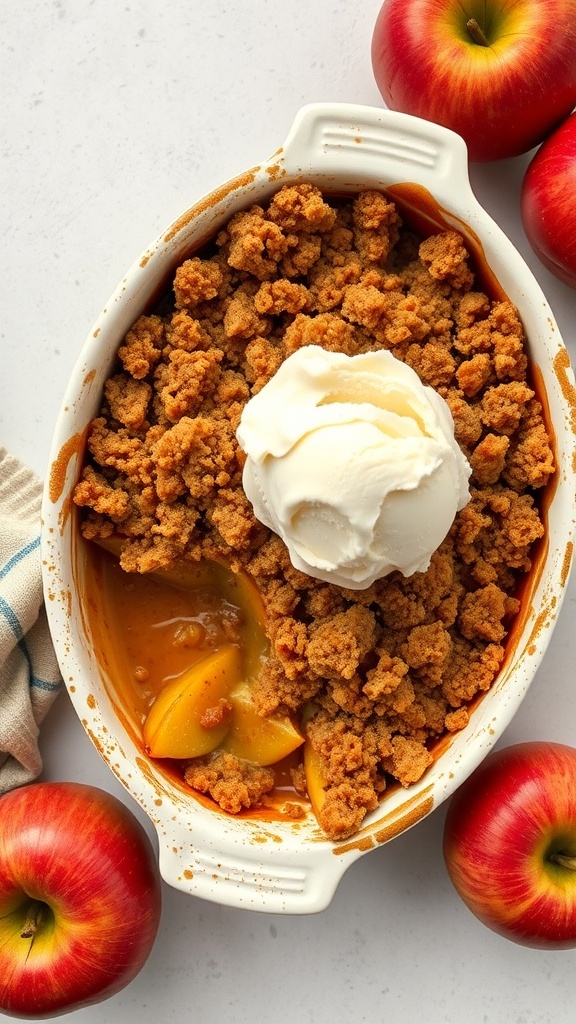
Apple crisp is a classic dessert that warms the heart and satisfies the sweet tooth. This nut-free version is perfect for anyone with nut allergies or those looking for a simple, delicious treat. The image shows a golden-brown crisp topped with a scoop of creamy vanilla ice cream, making it even more inviting.
To make this apple crisp, you’ll need fresh apples, oats, and a few pantry staples. The combination of sweet and tart apples creates a delightful filling, while the crumbly topping adds a satisfying crunch. It’s a great dessert for gatherings or a cozy night in.
Let’s get started on this easy recipe!
Ingredients
- 6 cups sliced apples (about 6 medium apples)
- 1 tablespoon lemon juice
- 1/2 cup granulated sugar
- 1 teaspoon ground cinnamon
- 1 cup rolled oats
- 1 cup all-purpose flour
- 1/2 cup brown sugar, packed
- 1/2 teaspoon salt
- 1/2 cup unsalted butter, melted
Instructions
- Preheat the oven to 350°F (175°C).
- In a large bowl, toss the sliced apples with lemon juice, granulated sugar, and cinnamon. Spread the apple mixture evenly in a greased baking dish.
- In another bowl, combine oats, flour, brown sugar, and salt. Pour in the melted butter and mix until crumbly.
- Sprinkle the oat mixture over the apples, covering them completely.
- Bake for 35-40 minutes, or until the topping is golden brown and the apples are bubbly.
- Let it cool slightly before serving. Enjoy warm with a scoop of vanilla ice cream!
Classic Vanilla Cupcakes For Every Occasion

Vanilla cupcakes are a timeless treat that fits perfectly into any celebration. Their soft, fluffy texture and sweet vanilla flavor make them a favorite among many. The image showcases a delightful array of vanilla cupcakes topped with creamy frosting and colorful sprinkles, making them visually appealing and inviting.
These cupcakes are not just pretty; they are also nut-free, making them suitable for those with nut allergies. Whether it's a birthday party, a family gathering, or just a sweet craving, these cupcakes are sure to bring smiles all around.
Making vanilla cupcakes is simple and fun. You can involve kids in the process, letting them help with mixing and decorating. The best part? You can customize them with different toppings or fillings to suit your taste.
Ingredients
- 1 1/2 cups all-purpose flour
- 1 cup granulated sugar
- 1/2 cup unsalted butter, softened
- 2 large eggs
- 1/2 cup milk
- 2 teaspoons vanilla extract
- 1 1/2 teaspoons baking powder
- 1/4 teaspoon salt
Instructions
- Preheat the oven to 350°F (175°C) and line a cupcake pan with liners.
- In a large bowl, cream together the softened butter and sugar until light and fluffy.
- Add the eggs one at a time, mixing well after each addition. Stir in the vanilla extract.
- In another bowl, whisk together the flour, baking powder, and salt.
- Gradually add the dry ingredients to the wet mixture, alternating with the milk. Mix until just combined.
- Fill each cupcake liner about two-thirds full with batter.
- Bake for 18-20 minutes or until a toothpick inserted into the center comes out clean.
- Let the cupcakes cool completely before frosting.
- Top with your favorite frosting and sprinkles before serving.
Decadent Chocolate Lava Cake Perfect For Chocolate Lovers
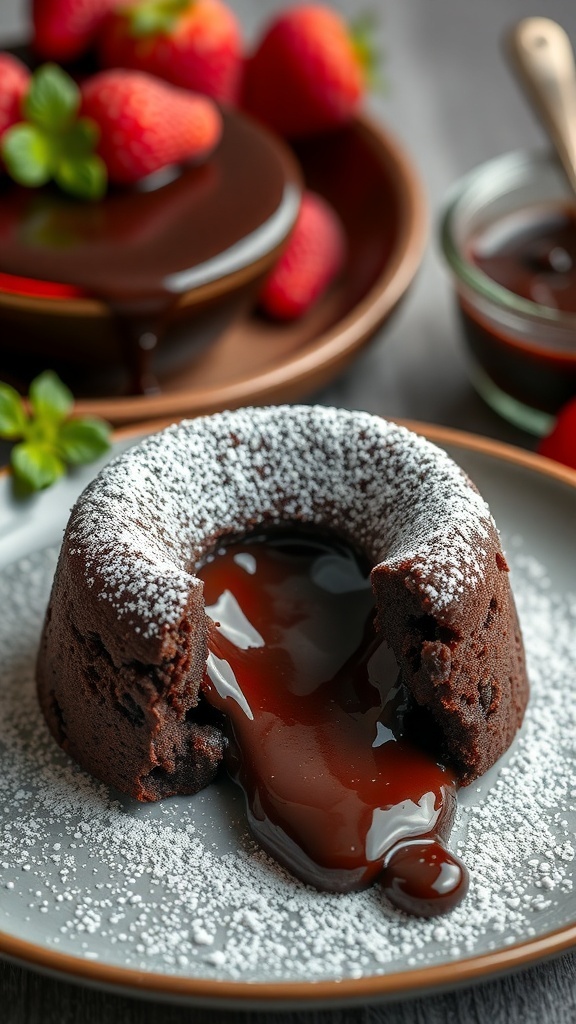
Chocolate lovers, rejoice! This chocolate lava cake is a dream come true. Imagine a warm, gooey center that flows out as you take your first bite. Topped with a dusting of powdered sugar and paired with fresh strawberries, it’s a treat that’s hard to resist.
The rich chocolate flavor is complemented by the sweetness of the strawberries and the smooth chocolate sauce on the side. This dessert is perfect for any occasion, whether it’s a cozy night in or a special celebration.
Making this lava cake is simpler than you might think. With just a few ingredients, you can whip up a dessert that looks and tastes like it came from a fancy restaurant. Let’s get to the recipe!
Ingredients
- 1/2 cup unsalted butter
- 1 cup semi-sweet chocolate chips
- 2 large eggs
- 2 large egg yolks
- 1/4 cup granulated sugar
- 2 tablespoons all-purpose flour
- 1/4 teaspoon salt
- Powdered sugar for dusting
- Fresh strawberries for garnish
Instructions
- Preheat the oven to 425°F (220°C). Grease four ramekins with butter and dust with flour.
- In a microwave-safe bowl, melt the butter and chocolate chips together. Stir until smooth.
- In another bowl, whisk together the eggs, egg yolks, and sugar until light and fluffy.
- Combine the melted chocolate mixture with the egg mixture. Gently fold in the flour and salt until just combined.
- Divide the batter evenly among the prepared ramekins. Place them on a baking sheet.
- Bake for 12-14 minutes until the edges are firm but the center is soft.
- Let them cool for 1 minute, then invert onto plates. Dust with powdered sugar and serve with fresh strawberries and chocolate sauce.
Rich And Creamy Cheesecake Without Nuts
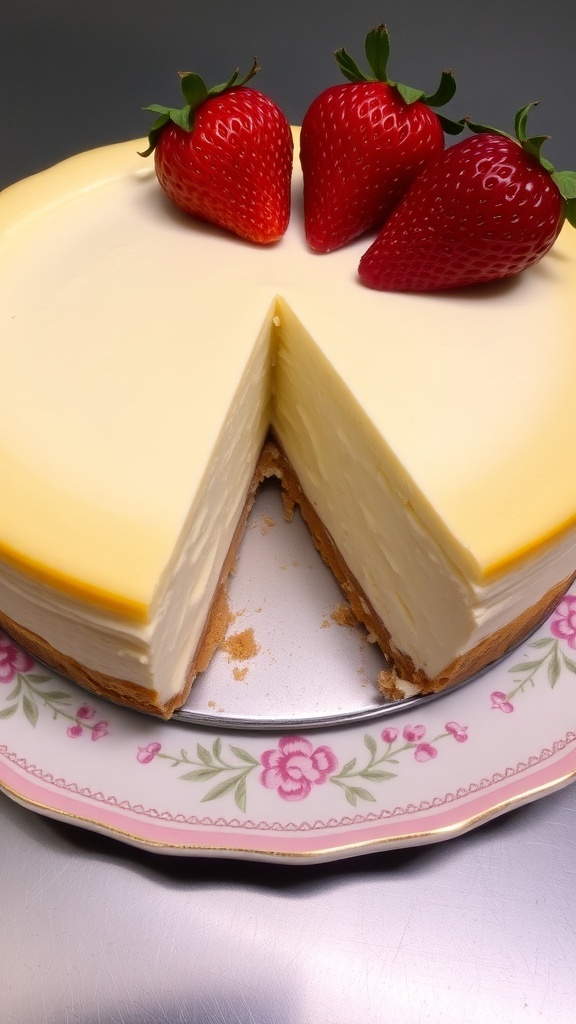
This rich and creamy cheesecake is a delightful treat that everyone can enjoy, especially those with nut allergies. The image shows a beautifully crafted cheesecake topped with fresh strawberries, making it look as inviting as it tastes. The smooth, creamy texture is perfect for satisfying any sweet tooth.
Making a nut-free cheesecake is simple and requires minimal ingredients. The buttery graham cracker crust pairs perfectly with the creamy filling, creating a balanced dessert that’s hard to resist. Whether it's for a family gathering or a cozy night in, this cheesecake will surely impress.
Ingredients
- 1 ½ cups graham cracker crumbs
- 1/4 cup granulated sugar
- 1/2 cup unsalted butter, melted
- 4 (8 oz) packages cream cheese, softened
- 1 cup granulated sugar
- 1 teaspoon vanilla extract
- 4 large eggs
- 1 cup sour cream
- 1/4 cup all-purpose flour
Instructions
- Preheat the oven to 325°F (160°C). Grease a 9-inch springform pan.
- Make the crust: In a bowl, mix graham cracker crumbs, sugar, and melted butter until combined. Press the mixture into the bottom of the prepared pan.
- In a large bowl, beat the cream cheese until smooth. Gradually add sugar and vanilla, mixing well.
- Add eggs one at a time, mixing on low speed until just combined. Be careful not to overmix.
- Stir in sour cream and flour until smooth. Pour the filling over the crust.
- Bake for 55-60 minutes, or until the center is set but slightly jiggly. Turn off the oven and leave the cheesecake inside for an hour.
- Remove from the oven and let it cool completely. Refrigerate for at least 4 hours before serving.
- Top with fresh strawberries before slicing and serving.
Fruity Berry Muffins For A Healthy Start
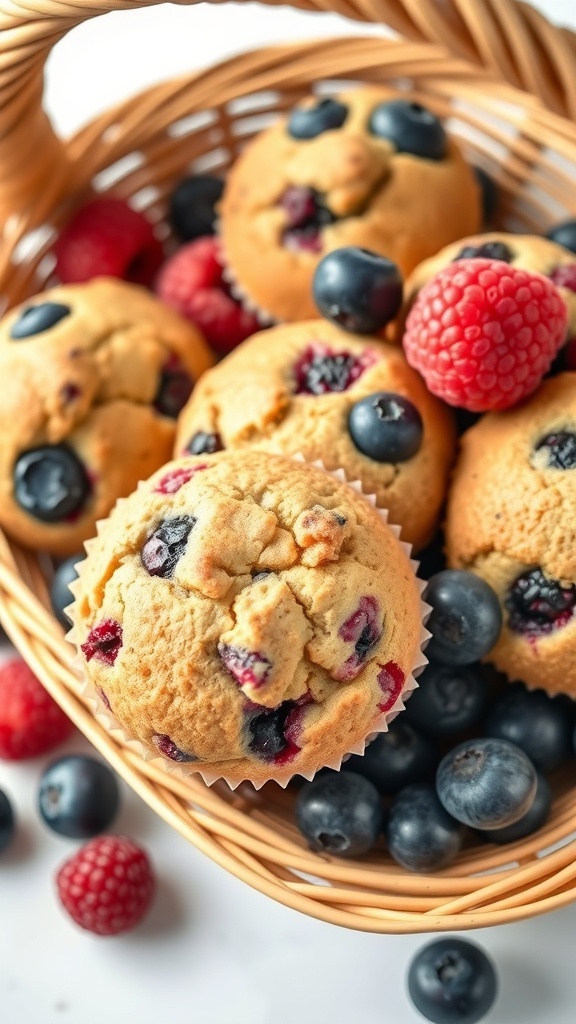
These fruity berry muffins are a delightful way to kick off your day. Bursting with fresh blueberries and raspberries, they offer a sweet and tangy flavor that’s hard to resist. The image shows a basket filled with golden-brown muffins, each dotted with vibrant berries. The muffins look fluffy and inviting, making them perfect for breakfast or a snack.
Nut-free and packed with fruity goodness, these muffins are a great option for anyone with nut allergies. They are easy to make and can be enjoyed by everyone. Whether you’re rushing out the door or taking a moment to relax, these muffins fit right in.
Ingredients
- 1 ½ cups all-purpose flour
- ½ cup granulated sugar
- 2 teaspoons baking powder
- ½ teaspoon salt
- 1 large egg
- ½ cup milk
- ⅓ cup vegetable oil
- 1 teaspoon vanilla extract
- 1 cup fresh blueberries
- ½ cup fresh raspberries
Instructions
- Preheat the oven to 375°F (190°C) and line a muffin tin with paper liners.
- In a large bowl, mix together the flour, sugar, baking powder, and salt.
- In another bowl, whisk the egg, milk, vegetable oil, and vanilla extract until well combined.
- Pour the wet ingredients into the dry ingredients and stir until just combined. Be careful not to overmix.
- Gently fold in the blueberries and raspberries.
- Divide the batter evenly among the muffin cups, filling each about two-thirds full.
- Bake for 18-20 minutes, or until a toothpick inserted into the center comes out clean.
- Let the muffins cool in the pan for a few minutes before transferring them to a wire rack to cool completely.
Delicious Rice Crispy Treats For Any Celebration
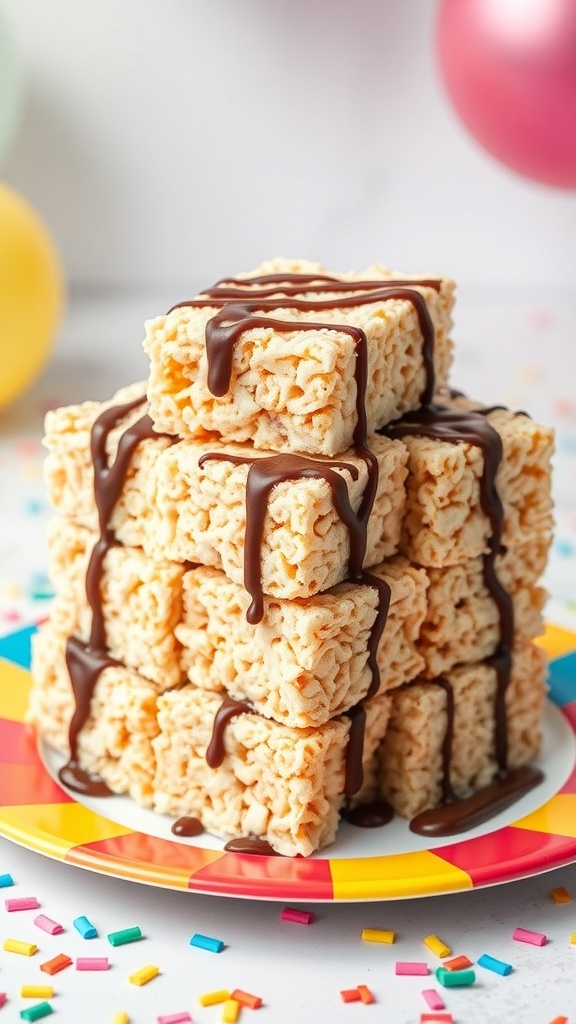
Rice crispy treats are a classic favorite that brings smiles to any occasion. These sweet, chewy squares are not only easy to make but also fun to customize. The image shows a delightful stack of these treats, drizzled with chocolate, making them even more tempting. Perfect for birthdays, holidays, or just a sweet snack, they are sure to please everyone.
Making rice crispy treats is simple and requires just a few ingredients. You can easily whip them up in no time, and they are nut-free, making them a safe option for gatherings where allergies might be a concern. Plus, the colorful sprinkles around the plate add a festive touch, making them suitable for any celebration.
Let’s get into the recipe so you can create your own delicious batch!
Ingredients
- 6 cups rice cereal
- 4 cups mini marshmallows
- 3 tablespoons unsalted butter
- 1/2 teaspoon vanilla extract
- 1/2 cup chocolate chips (for drizzling)
Instructions
- Melt the Butter: In a large saucepan, melt the butter over low heat. Once melted, add the mini marshmallows and stir until completely melted and smooth.
- Add Vanilla: Remove from heat and stir in the vanilla extract.
- Mix in Cereal: Gradually add the rice cereal to the marshmallow mixture. Stir until all the cereal is evenly coated.
- Press into Pan: Lightly grease a 9x13-inch baking dish. Pour the mixture into the dish and press it down firmly with a spatula or your hands.
- Cool and Cut: Allow the treats to cool for about 30 minutes. Once set, cut them into squares.
- Drizzle Chocolate: Melt the chocolate chips in the microwave or over a double boiler. Drizzle the melted chocolate over the cut squares for an extra treat.
Classic Gingerbread Cookies For Holiday Cheer

Gingerbread cookies are a holiday classic that brings warmth and joy to any gathering. These delightful treats are not only fun to make but also perfect for sharing with friends and family. The image shows a beautiful assortment of gingerbread cookies, decorated with icing and colorful candies. Each cookie has its own unique shape, from cheerful gingerbread men to festive stars and trees.
Making gingerbread cookies is a wonderful way to get into the holiday spirit. The aroma of spices like ginger, cinnamon, and nutmeg fills your kitchen, creating a cozy atmosphere. These cookies are nut-free, making them safe for those with nut allergies. They are great for decorating, and kids love to help with the icing!
Gather your ingredients and let’s get baking. You’ll be amazed at how easy it is to create these festive treats!
Ingredients
- 3 cups all-purpose flour
- 1 teaspoon baking soda
- 1 tablespoon ground ginger
- 1 tablespoon ground cinnamon
- 1/2 teaspoon ground cloves
- 1/2 teaspoon salt
- 1/2 cup unsalted butter, softened
- 3/4 cup brown sugar, packed
- 1 large egg
- 1/2 cup molasses
- 1 teaspoon vanilla extract
- Royal icing for decoration
- Colored candies for decoration
Instructions
- Mix Dry Ingredients: In a bowl, whisk together flour, baking soda, ginger, cinnamon, cloves, and salt.
- Cream Butter and Sugar: In a separate bowl, beat the softened butter and brown sugar until light and fluffy. Add the egg, molasses, and vanilla, mixing well.
- Combine Mixtures: Gradually add the dry ingredients to the wet mixture, stirring until a dough forms. Wrap the dough in plastic wrap and chill for at least 1 hour.
- Preheat Oven: Preheat your oven to 350°F (175°C). Line baking sheets with parchment paper.
- Roll and Cut: On a floured surface, roll out the chilled dough to about 1/4 inch thick. Use cookie cutters to cut out shapes and place them on the prepared baking sheets.
- Bake: Bake for 8-10 minutes, or until the edges are firm. Let them cool on a wire rack.
- Decorate: Once cooled, use royal icing and colored candies to decorate your cookies as desired.
Enjoy your homemade gingerbread cookies with a cup of hot cocoa or share them with loved ones. Happy baking!
Incredible Coconut Macaroons To Satisfy Your Sweet Tooth
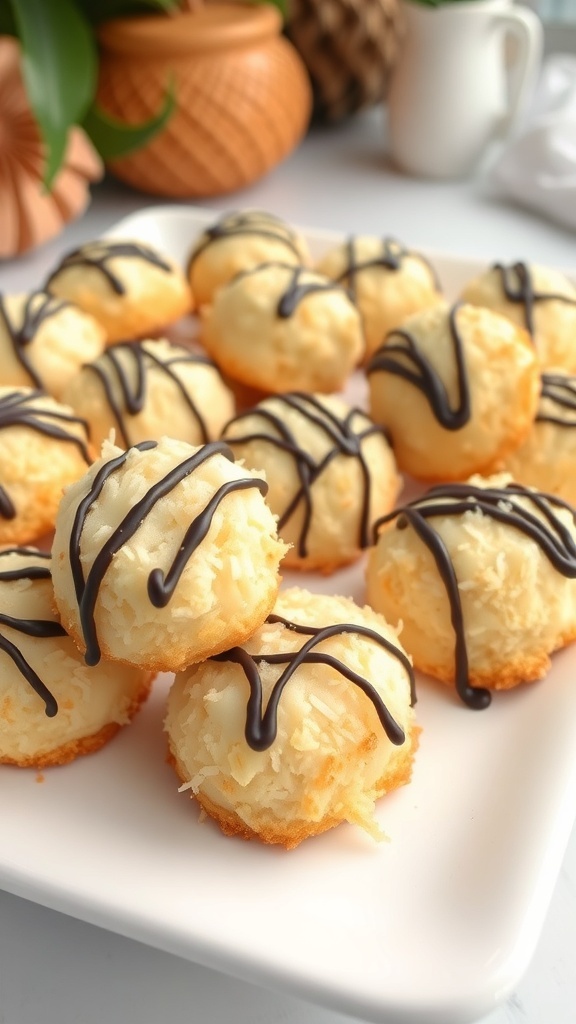
Coconut macaroons are a delightful treat that brings a taste of the tropics right to your kitchen. These little bites are golden on the outside, soft and chewy on the inside, and topped with a drizzle of chocolate that makes them even more irresistible. Perfect for satisfying your sweet cravings, they are also nut-free, making them a great option for those with allergies.
Making coconut macaroons is simple and fun. You only need a few ingredients, and the process is quick. Whether you’re baking for a special occasion or just want a sweet snack, these macaroons are sure to please.
Ingredients
- 3 cups sweetened shredded coconut
- 1/2 cup granulated sugar
- 1/4 cup all-purpose flour
- 1/4 teaspoon salt
- 4 large egg whites
- 1 teaspoon vanilla extract
- 1/2 cup semi-sweet chocolate chips (for drizzling)
Instructions
- Preheat the oven to 325°F (160°C) and line a baking sheet with parchment paper.
- In a large bowl, mix together the shredded coconut, sugar, flour, and salt until well combined.
- In another bowl, whisk the egg whites and vanilla extract until frothy. Then, fold the egg whites into the coconut mixture until everything is evenly mixed.
- Using a small cookie scoop or your hands, form the mixture into small mounds and place them on the prepared baking sheet.
- Bake for 20-25 minutes, or until the macaroons are golden brown. Remove from the oven and let them cool completely.
- While the macaroons are cooling, melt the chocolate chips in a microwave-safe bowl in 30-second intervals, stirring in between until smooth.
- Drizzle the melted chocolate over the cooled macaroons using a fork or a piping bag. Let the chocolate set before serving.
Enjoy these coconut macaroons with a cup of tea or coffee, or simply on their own. They’re a sweet little treat that everyone will love!
Tasty Chocolate Brownies That Everyone Will Adore
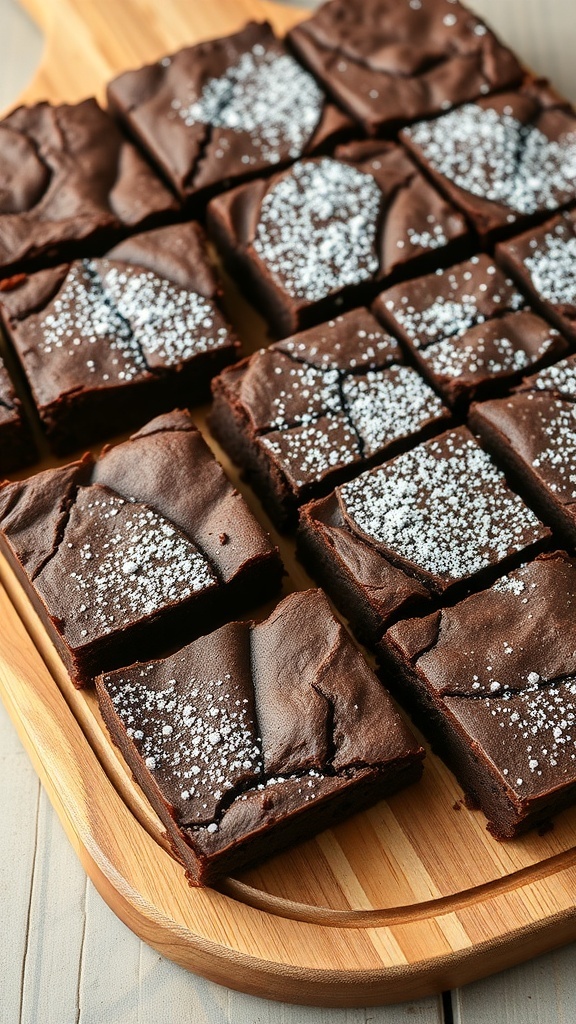
These chocolate brownies are a delightful treat that everyone can enjoy, especially those with nut allergies. They are rich, fudgy, and topped with a sprinkle of powdered sugar for that extra touch. The image shows perfectly cut squares of brownies, each one looking inviting and delicious. The glossy top and soft texture promise a melt-in-your-mouth experience.
Baking these brownies is simple and fun. You only need a few basic ingredients, and the process is quick. Whether you're making them for a party, a family gathering, or just for yourself, these brownies will surely be a hit.
Ingredients
- 1 cup unsalted butter
- 2 cups granulated sugar
- 4 large eggs
- 1 teaspoon vanilla extract
- 1 cup all-purpose flour
- 1 cup unsweetened cocoa powder
- 1/2 teaspoon salt
- 1/2 teaspoon baking powder
- Powdered sugar for dusting
Instructions
- Preheat your oven to 350°F (175°C). Grease a 9x13 inch baking pan.
- In a saucepan, melt the butter over low heat. Once melted, remove from heat and stir in the sugar, eggs, and vanilla.
- In a separate bowl, mix the flour, cocoa powder, salt, and baking powder. Gradually add this dry mixture to the wet ingredients, stirring until just combined.
- Pour the batter into the prepared pan and spread it evenly.
- Bake for 20-25 minutes or until a toothpick inserted comes out with a few moist crumbs.
- Let the brownies cool in the pan before cutting them into squares. Dust with powdered sugar before serving.
Refreshing Lemon Bars For A Tangy Treat
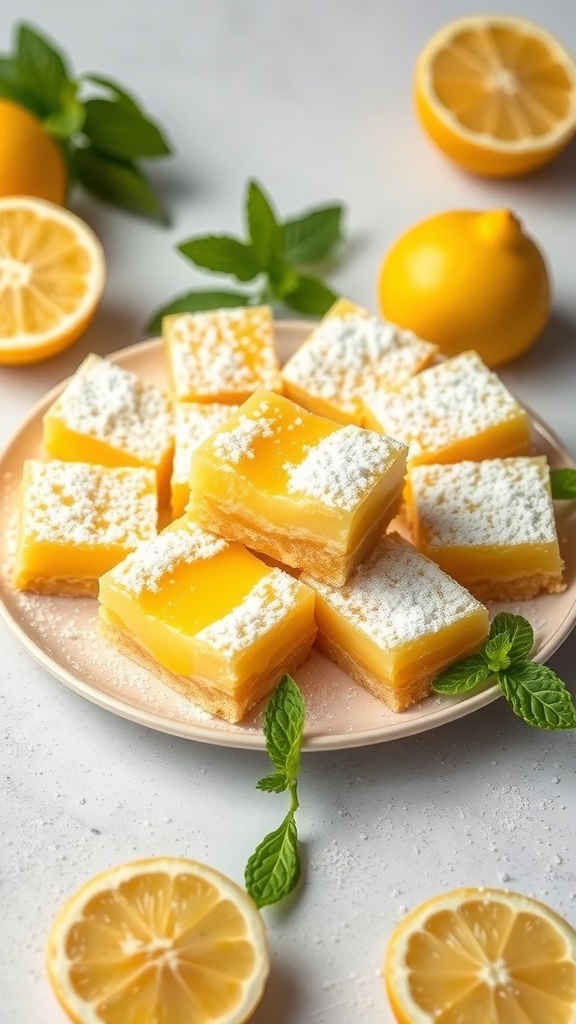
Lemon bars are a delightful treat that brings a burst of citrus flavor to your dessert table. The image shows a beautiful plate of lemon bars, perfectly cut into squares and dusted with powdered sugar. Surrounding the bars are fresh lemons and mint leaves, adding a vibrant touch to the scene.
These bars are not just visually appealing; they offer a perfect balance of sweetness and tanginess. The buttery crust pairs wonderfully with the zesty lemon filling, making each bite refreshing and satisfying. They are a great option for those who are looking for nut-free baking recipes.
Let’s get started on making these delicious lemon bars!
Ingredients
- 1 cup all-purpose flour
- 1/4 cup powdered sugar
- 1/2 cup unsalted butter, softened
- 2 large eggs
- 1 cup granulated sugar
- 1/4 cup fresh lemon juice
- 1 tablespoon lemon zest
- 1/2 teaspoon baking powder
- 1/4 teaspoon salt
- Powdered sugar for dusting
Instructions
- Preheat the oven to 350°F (175°C). Grease an 8-inch square baking dish.
- Make the Crust: In a bowl, mix flour and powdered sugar. Add softened butter and blend until crumbly. Press the mixture into the bottom of the prepared dish.
- Bake the Crust: Bake for 15 minutes or until lightly golden.
- Prepare the Filling: In another bowl, whisk together eggs, granulated sugar, lemon juice, lemon zest, baking powder, and salt until smooth.
- Combine: Pour the filling over the baked crust and return to the oven.
- Bake Again: Bake for an additional 20-25 minutes, or until the filling is set and slightly golden.
- Cool: Let the bars cool completely in the pan before cutting into squares.
- Serve: Dust with powdered sugar before serving for a sweet finish!
Enjoy these lemon bars as a refreshing dessert for any occasion!
Soft Pretzels Perfect For Snacking
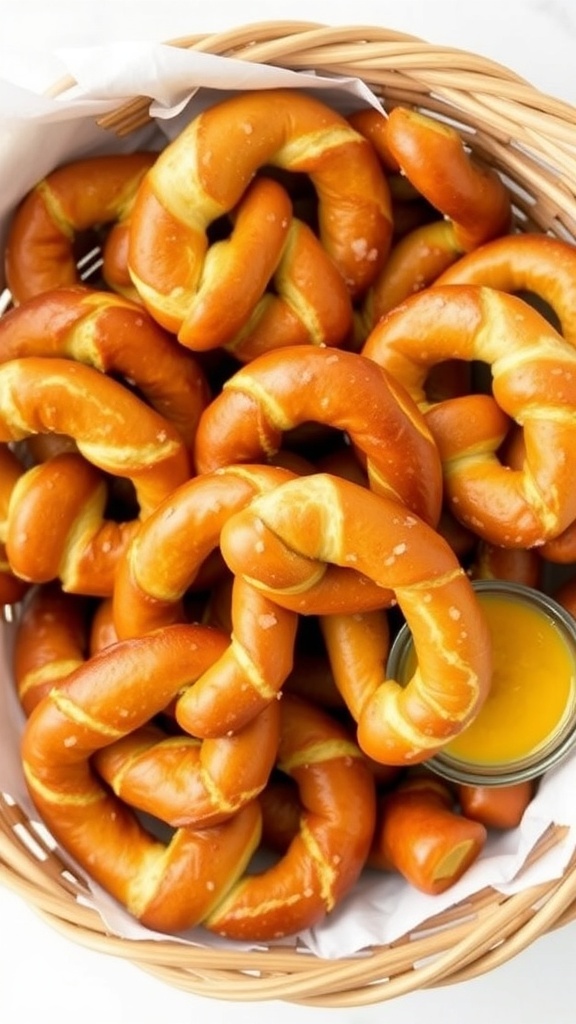
Soft pretzels are a delightful snack that everyone loves. They are warm, chewy, and have a beautiful golden-brown color. The image shows a basket filled with these delicious treats, each twisted into a perfect shape. They look inviting and are perfect for sharing with friends or family.
These pretzels are not just tasty; they are also nut-free, making them a great option for those with allergies. Pair them with your favorite dipping sauce, like mustard or cheese, for an extra kick. Making soft pretzels at home is easier than you might think!
Ingredients
- 4 cups all-purpose flour
- 1 packet (2 1/4 teaspoons) active dry yeast
- 1 1/2 cups warm water (110°F)
- 1 tablespoon granulated sugar
- 1 teaspoon salt
- 1/4 cup baking soda
- 1 egg (for egg wash)
- Coarse sea salt (for topping)
Instructions
- Prepare the Dough: In a large bowl, combine warm water, sugar, and yeast. Let it sit for about 5 minutes until it becomes frothy. Stir in the salt and gradually add the flour, mixing until a dough forms.
- Knead the Dough: Turn the dough onto a floured surface and knead for about 5-7 minutes until smooth. Place it in a greased bowl, cover, and let rise for 1 hour or until doubled in size.
- Shape the Pretzels: Preheat the oven to 450°F (230°C). Divide the dough into 12 equal pieces. Roll each piece into a long rope and twist it into a pretzel shape.
- Boil the Pretzels: In a large pot, bring 10 cups of water to a boil. Add the baking soda. Carefully drop each pretzel into the boiling water for about 30 seconds, then remove and place on a baking sheet lined with parchment paper.
- Brush and Bake: Beat the egg and brush it over each pretzel. Sprinkle with coarse sea salt. Bake for 12-15 minutes until golden brown.
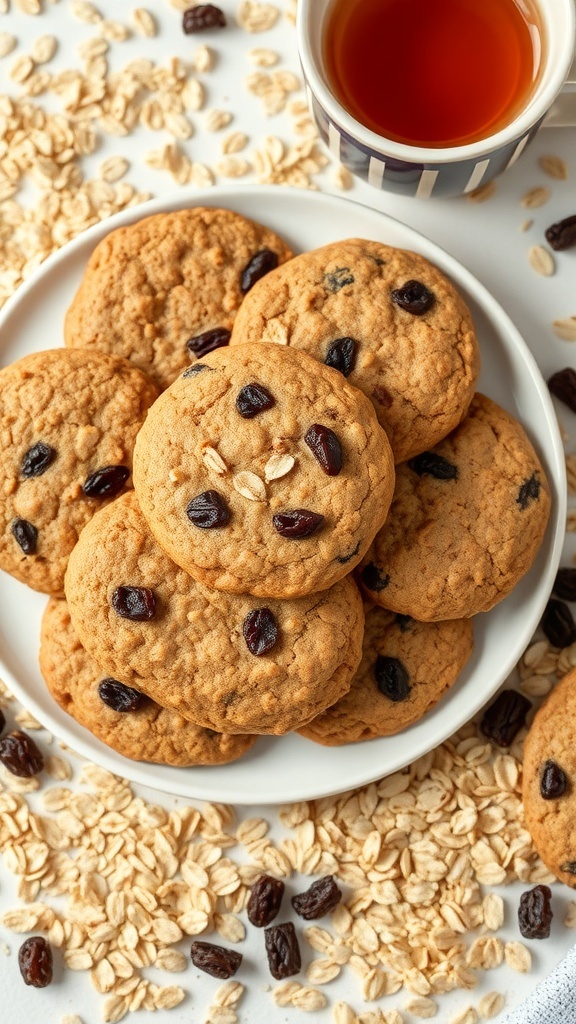
Mouthwatering Oatmeal Cookies For A Healthy Snack
Oatmeal cookies are a fantastic choice for a healthy snack. They are chewy, delicious, and packed with wholesome ingredients. These cookies are perfect for satisfying your sweet tooth without the guilt. The combination of oats and raisins gives them a delightful texture and flavor.
In the image, you can see a plate piled high with freshly baked oatmeal cookies. They are golden brown and dotted with plump raisins, making them look irresistible. A cup of tea sits nearby, suggesting that these cookies are perfect for an afternoon treat or a cozy evening snack.
Making oatmeal cookies is simple and fun. You can enjoy them as a quick breakfast or a snack on the go. Plus, they are nut-free, making them a safe option for those with nut allergies.
Ingredients
- 1 cup rolled oats
- 1 cup all-purpose flour
- 1/2 cup brown sugar, packed
- 1/2 cup granulated sugar
- 1/2 cup unsalted butter, softened
- 1/2 teaspoon baking soda
- 1/2 teaspoon salt
- 1 teaspoon vanilla extract
- 1 large egg
- 1 cup raisins
Instructions
- Preheat your oven to 350°F (175°C) and line a baking sheet with parchment paper.
- In a large bowl, cream together the softened butter, brown sugar, and granulated sugar until smooth.
- Add the egg and vanilla extract, mixing until well combined.
- In another bowl, whisk together the flour, baking soda, and salt. Gradually add this to the wet mixture, stirring until just combined.
- Fold in the rolled oats and raisins until evenly distributed.
- Drop spoonfuls of dough onto the prepared baking sheet, spacing them about 2 inches apart.
- Bake for 10-12 minutes, or until the edges are lightly golden. Let them cool on the baking sheet for a few minutes before transferring to a wire rack.


Comments
Post a Comment