15 No-Bake Desserts That Are Also Healthy Snacks
15 No-Bake Desserts That Are Also Healthy Snacks
Craving something sweet that won't derail your healthy habits? These 15 no-bake desserts are perfect for satisfying your sweet tooth while doubling as nutritious snacks. Easy to whip up and packed with wholesome ingredients, they make for delightful treats that you can feel good about enjoying anytime. Get ready to indulge without the guilt!
Refreshing Coconut Chia Seed Pudding For A Tropical Twist
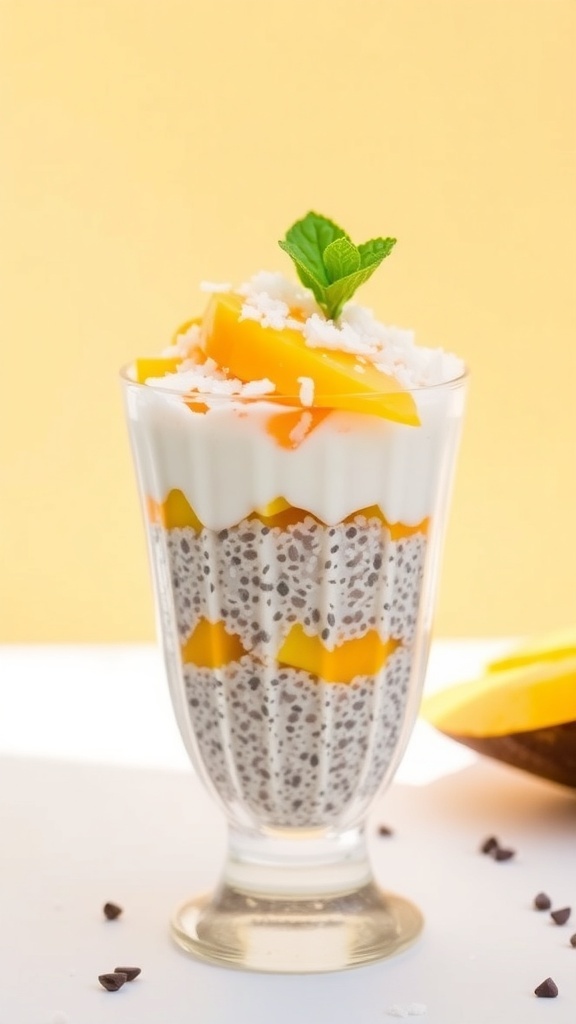
This Coconut Chia Seed Pudding is a delightful treat that brings a taste of the tropics right to your kitchen. The creamy texture of coconut milk pairs perfectly with the tiny, nutrient-packed chia seeds. Topped with fresh mango and a sprinkle of coconut flakes, it’s not just a dessert; it’s a healthy snack that satisfies your sweet tooth.
The pudding is layered beautifully in a glass, showcasing the contrasting colors of the ingredients. The bright yellow mango slices stand out against the white coconut cream and the speckled chia seeds, making it as pleasing to the eye as it is to the palate. A sprig of mint on top adds a fresh touch, making this dish even more inviting.
Making this pudding is simple and requires no baking. Just mix the chia seeds with coconut milk, let it sit to thicken, and then layer it with your favorite fruits. It’s a great option for breakfast or a midday snack, keeping you energized and satisfied.
Ingredients
- 1 cup coconut milk
- 1/4 cup chia seeds
- 2 tablespoons honey or maple syrup
- 1 ripe mango, diced
- 1/4 cup shredded coconut
- Fresh mint leaves for garnish
Instructions
- In a bowl, mix the coconut milk, chia seeds, and honey or maple syrup. Stir well to combine.
- Cover the bowl and refrigerate for at least 4 hours, or overnight, until the mixture thickens.
- Once thickened, layer the chia pudding in a glass with diced mango and shredded coconut.
- Top with additional mango slices and a sprig of mint for garnish.
- Serve chilled and enjoy your tropical treat!
Nutty Peanut Butter Energy Bites For A Protein Punch
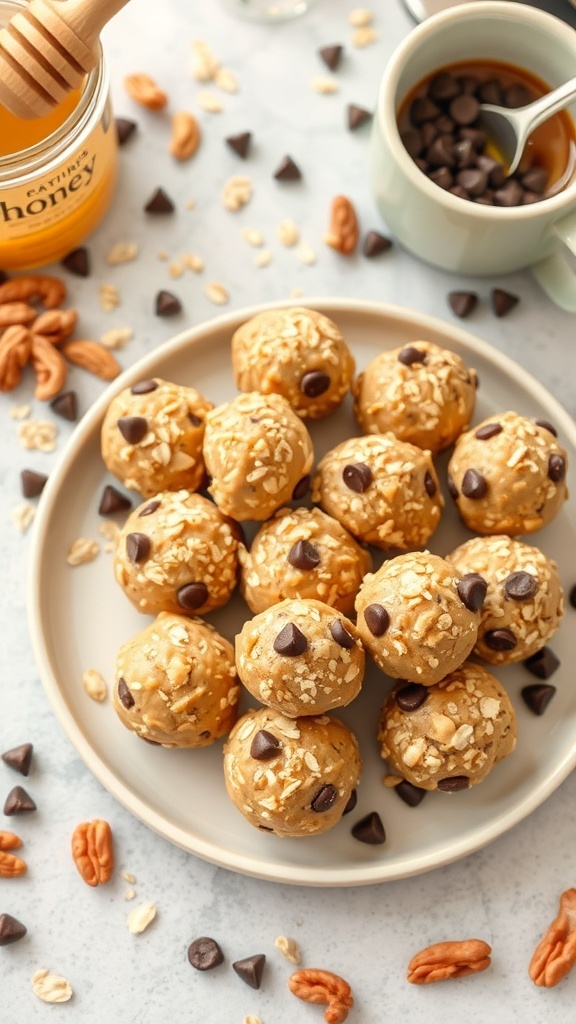
These Nutty Peanut Butter Energy Bites are a fantastic way to enjoy a tasty snack while packing in some protein. They’re perfect for a quick pick-me-up or a post-workout treat. The image shows a delightful plate filled with round energy bites, each coated with oats and dotted with chocolate chips. Surrounding the plate are ingredients like honey, chocolate chips, and pecans, hinting at the delicious flavors within.
Making these bites is super simple. You just mix together peanut butter, oats, honey, and a few other ingredients, roll them into balls, and you’re done! They’re great for meal prep and can be stored in the fridge for a quick grab-and-go snack.
Ingredients
- 1 cup peanut butter
- 1/2 cup honey
- 1 cup rolled oats
- 1/2 cup chocolate chips
- 1/4 cup chopped pecans
- 1/4 cup ground flaxseed (optional)
Instructions
- In a large bowl, combine peanut butter and honey. Mix until smooth.
- Add rolled oats, chocolate chips, chopped pecans, and ground flaxseed (if using). Stir until well combined.
- Using your hands, roll the mixture into small balls, about 1 inch in diameter.
- Place the energy bites on a baking sheet lined with parchment paper.
- Refrigerate for at least 30 minutes to firm up. Store in an airtight container in the fridge.
Easy No-Bake Granola Bars For On-The-Go Snacking
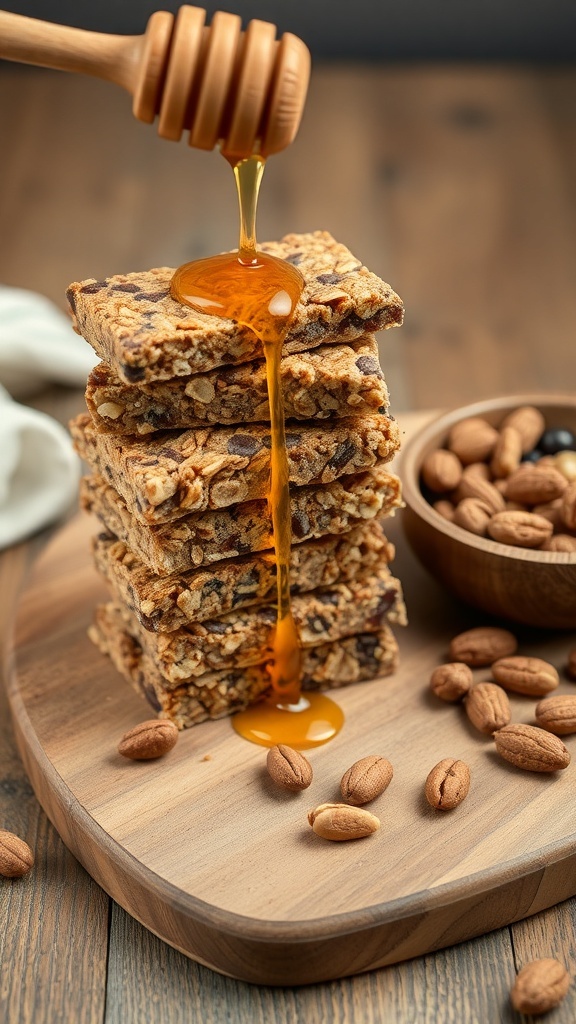
No-bake granola bars are a fantastic option for those busy days when you need a quick snack. They are easy to make and packed with wholesome ingredients. The image shows a stack of delicious granola bars drizzled with honey, highlighting their chewy texture and nutty flavor.
These bars are perfect for breakfast on the go or a midday pick-me-up. You can customize them with your favorite nuts, seeds, or dried fruits. Plus, they are a healthier alternative to store-bought snacks, giving you energy without the added sugars.
Making these bars is simple. Start by mixing oats, nuts, and any other ingredients you love. Then, bind everything together with honey or nut butter. Press the mixture into a pan, let it set, and you’re ready to enjoy!
Ingredients
- 2 cups rolled oats
- 1 cup almond butter
- 1/2 cup honey
- 1/2 cup chopped nuts (like almonds or walnuts)
- 1/2 cup mini chocolate chips (optional)
- 1/4 cup dried fruit (like cranberries or raisins)
- 1 teaspoon vanilla extract
Instructions
- In a large bowl, combine rolled oats, chopped nuts, and dried fruit.
- In a small saucepan over low heat, melt almond butter and honey together until smooth. Stir in vanilla extract.
- Pour the almond butter mixture over the dry ingredients and mix until everything is well coated.
- Press the mixture firmly into a lined 8x8 inch baking pan.
- Refrigerate for at least 2 hours until set. Cut into bars and enjoy!
Fruity Yogurt Parfaits For A Colorful Breakfast Treat
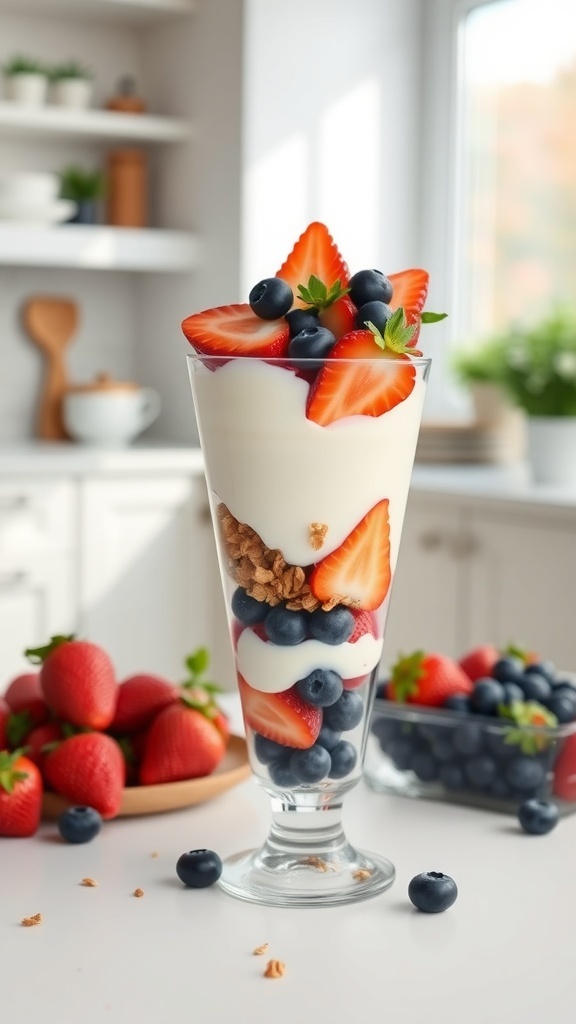
Fruity yogurt parfaits are a delightful way to start your day. They combine creamy yogurt, fresh fruits, and crunchy granola for a tasty breakfast or snack. The vibrant colors of strawberries and blueberries make them visually appealing, too!
This treat is not only pretty but also packed with nutrients. Yogurt provides protein and probiotics, while fruits add vitamins and antioxidants. Granola gives a satisfying crunch, making each bite enjoyable.
Creating these parfaits is super easy. Just layer your ingredients in a glass, and you’re good to go! You can customize them with your favorite fruits or even add a drizzle of honey for extra sweetness.
Ingredients
- 2 cups yogurt (plain or flavored)
- 1 cup granola
- 1 cup strawberries, sliced
- 1 cup blueberries
- Honey (optional)
Instructions
- Start by adding a layer of yogurt to the bottom of a glass or bowl.
- Next, add a layer of granola on top of the yogurt.
- Then, add a layer of sliced strawberries and blueberries.
- Repeat the layers until you reach the top of the glass.
- Drizzle honey on top if desired.
- Serve immediately and enjoy your colorful breakfast treat!
Rich And Creamy No-Bake Cheesecake Bites For Sweet Cravings

These no-bake cheesecake bites are a delightful treat that satisfies your sweet tooth without the fuss of baking. They are creamy, rich, and topped with a vibrant fruit sauce that adds a burst of flavor. Perfect for any occasion, these bites are easy to make and even easier to enjoy!
The base is made from crushed graham crackers mixed with a bit of butter, giving it a crunchy texture that pairs perfectly with the smooth cheesecake filling. Each bite is a mini indulgence, making them a great choice for parties or a sweet snack at home.
To make these cheesecake bites, gather your ingredients and follow the steps below. You’ll be amazed at how simple it is to whip up these delicious treats!
Ingredients
- 1 cup graham cracker crumbs
- 4 tablespoons unsalted butter, melted
- 2 cups cream cheese, softened
- 1/2 cup powdered sugar
- 1 teaspoon vanilla extract
- 1 cup heavy cream
- Fresh raspberries for topping
- Fruit sauce (strawberry or raspberry) for drizzling
Instructions
- Prepare the Crust: In a bowl, mix the graham cracker crumbs and melted butter until well combined. Press this mixture firmly into the bottom of mini muffin tins to form the crust.
- Make the Filling: In another bowl, beat the cream cheese until smooth. Gradually add the powdered sugar and vanilla extract, mixing until creamy. In a separate bowl, whip the heavy cream until stiff peaks form, then gently fold it into the cream cheese mixture.
- Fill the Tins: Spoon the cheesecake filling over the crusts in the muffin tins, smoothing the tops. Refrigerate for at least 4 hours or until set.
- Serve: Once set, carefully remove the cheesecake bites from the tins. Top each with fresh raspberries and drizzle with fruit sauce before serving.
Zesty Lemon Coconut Balls For A Bright Flavor Burst
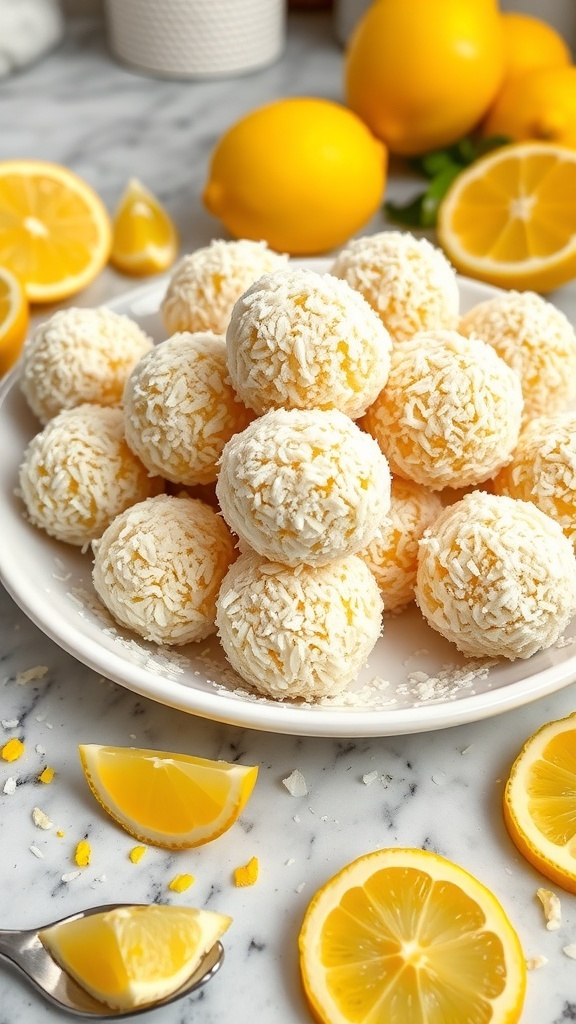
These Zesty Lemon Coconut Balls are a delightful treat that brings a refreshing burst of flavor. They are perfect for those moments when you crave something sweet yet healthy. The combination of zesty lemon and creamy coconut creates a snack that feels indulgent without the guilt.
Each bite offers a bright, citrusy flavor that pairs beautifully with the rich texture of coconut. These little balls are not just tasty; they are also easy to make. You can whip them up in no time, making them a great option for a quick snack or a dessert to share with friends.
Plus, they are no-bake, which means you can enjoy them without turning on the oven. Just mix, roll, and chill! These treats are also a hit with kids, making them a fun addition to lunchboxes or after-school snacks.
Ingredients
- 1 cup shredded coconut
- 1/2 cup almond flour
- 1/4 cup honey or maple syrup
- 1/4 cup lemon juice
- 1 tablespoon lemon zest
- 1/2 teaspoon vanilla extract
- Pinch of salt
- Extra shredded coconut for rolling
Instructions
- In a mixing bowl, combine shredded coconut, almond flour, honey (or maple syrup), lemon juice, lemon zest, vanilla extract, and a pinch of salt.
- Mix well until all ingredients are combined and the mixture is sticky.
- Using your hands, roll the mixture into small balls, about 1 inch in diameter.
- Roll each ball in extra shredded coconut to coat.
- Place the balls on a plate and refrigerate for at least 30 minutes to firm up.
- Enjoy your Zesty Lemon Coconut Balls as a refreshing snack or dessert!
Decadent No-Bake Chocolate Peanut Butter Bars For Sweet Satisfaction
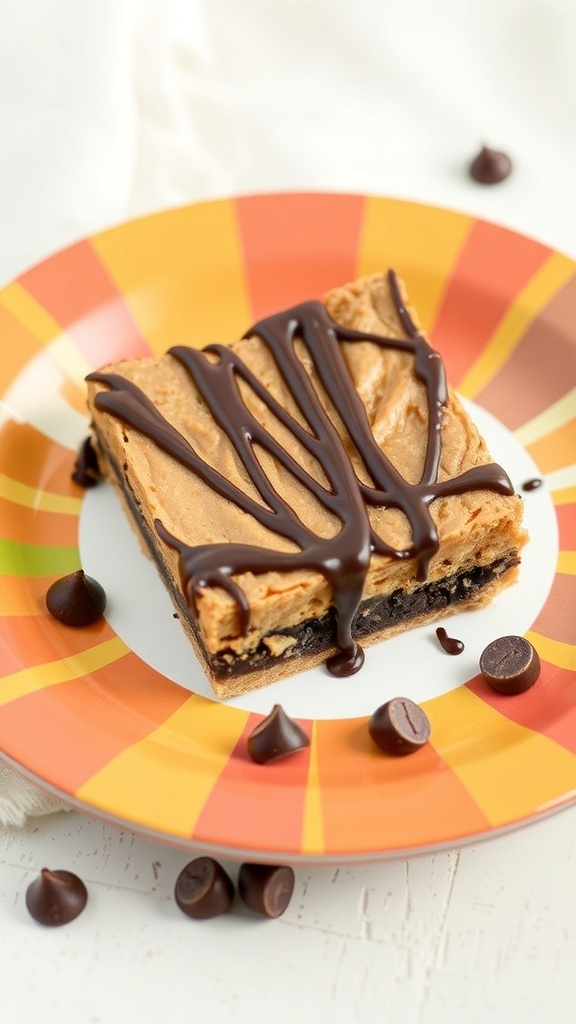
These no-bake chocolate peanut butter bars are a delightful treat that satisfies your sweet tooth without the hassle of baking. The image shows a rich, creamy bar topped with a glossy layer of chocolate drizzle, sitting on a colorful plate. The combination of chocolate and peanut butter creates a flavor that’s hard to resist.
Perfect for a quick snack or a dessert, these bars are easy to make and require minimal ingredients. They offer a great balance of sweetness and creaminess, making them a favorite for both kids and adults. Plus, they’re packed with protein, thanks to the peanut butter, making them a healthier option compared to traditional desserts.
Let’s get into how you can whip up these delicious bars in your own kitchen!
Ingredients
- 1 cup graham cracker crumbs
- 1/2 cup unsweetened cocoa powder
- 1 cup peanut butter
- 1/2 cup honey or maple syrup
- 1/2 cup powdered sugar
- 1/2 cup chocolate chips
- 1 tablespoon coconut oil
Instructions
- Prepare the Base: In a mixing bowl, combine graham cracker crumbs and cocoa powder. Stir in peanut butter and honey until well mixed.
- Form the Bars: Press the mixture into a lined 8x8 inch baking dish, spreading it evenly across the bottom.
- Melt the Topping: In a small saucepan, melt chocolate chips and coconut oil over low heat, stirring until smooth.
- Top the Bars: Pour the melted chocolate over the peanut butter layer and spread it evenly. Refrigerate for at least 1 hour to set.
- Slice and Serve: Once set, remove from the dish and cut into bars. Enjoy your sweet and satisfying treat!
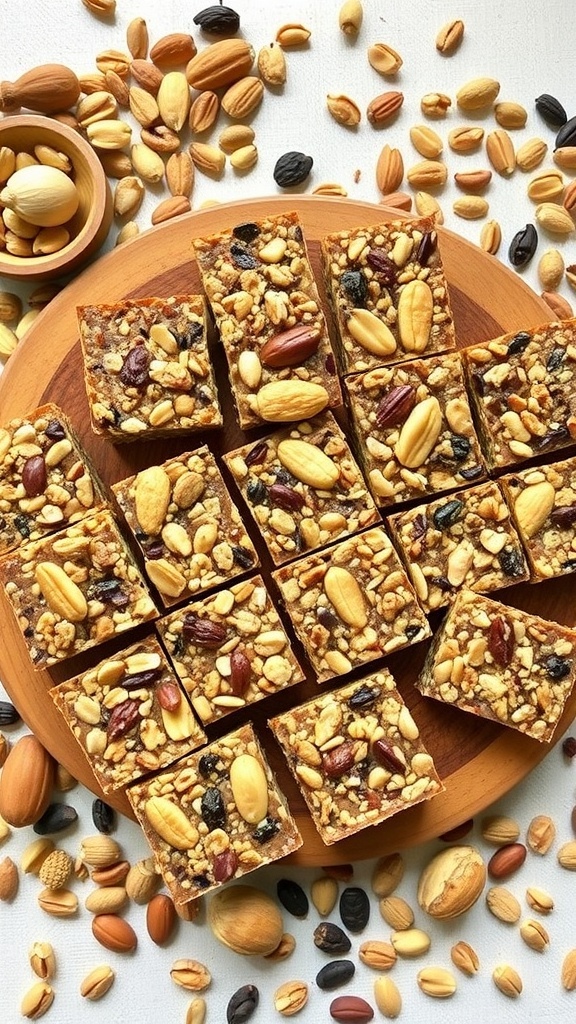
Satisfying No-Bake Fruit And Nut Bars For A Healthy Crunch
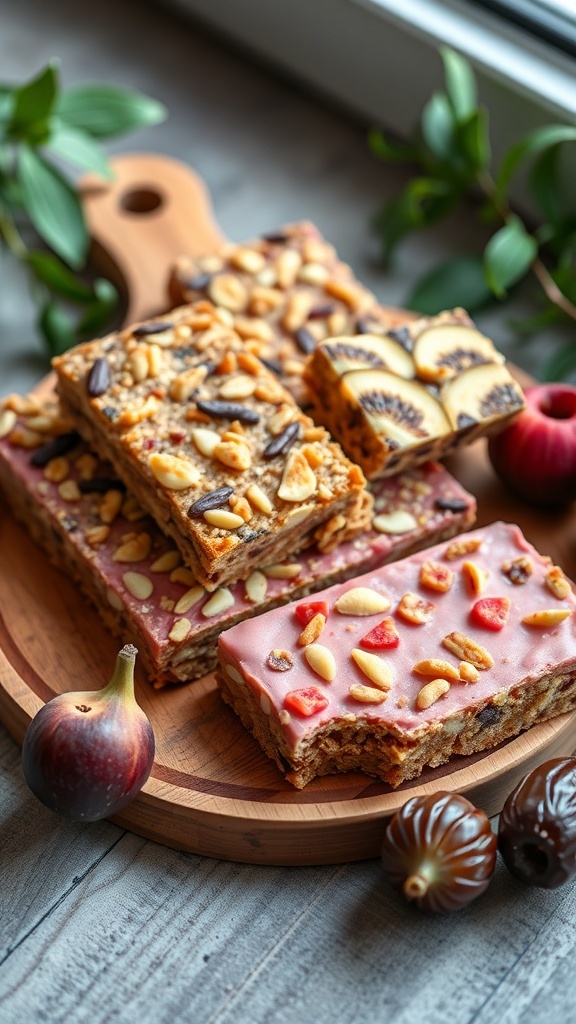
No-bake fruit and nut bars are a fantastic way to enjoy a healthy snack without the fuss of baking. These bars are not only easy to make, but they also pack a satisfying crunch that will keep you coming back for more. The image shows a delightful assortment of colorful bars, each topped with nuts and fruits, making them as appealing to the eyes as they are to the taste buds.
These bars are perfect for a quick snack on the go or a tasty treat after a workout. The combination of nuts and dried fruits provides a great source of energy, while the natural sweetness keeps cravings at bay. Plus, you can customize the ingredients to suit your taste!
Let’s get into how you can whip up your own batch of these delicious no-bake fruit and nut bars!
Ingredients
- 2 cups rolled oats
- 1 cup mixed nuts (almonds, walnuts, cashews)
- 1 cup dried fruit (raisins, cranberries, apricots)
- 1/2 cup nut butter (peanut, almond, or cashew)
- 1/4 cup honey or maple syrup
- 1 teaspoon vanilla extract
- 1/4 teaspoon salt
Instructions
- Prepare the Base: In a large bowl, combine the rolled oats, mixed nuts, and dried fruit. Stir until evenly mixed.
- Mix Wet Ingredients: In a separate bowl, mix the nut butter, honey or maple syrup, vanilla extract, and salt until smooth.
- Combine: Pour the wet mixture over the dry ingredients. Stir well until everything is coated.
- Press into a Pan: Line an 8x8 inch pan with parchment paper. Pour the mixture into the pan and press down firmly to create an even layer.
- Chill: Place the pan in the refrigerator for at least 2 hours to set.
- Cut and Serve: Once set, remove from the pan and cut into bars. Enjoy your healthy snacks!
Creamy Raspberry Coconut Popsicles For A Refreshing Treat
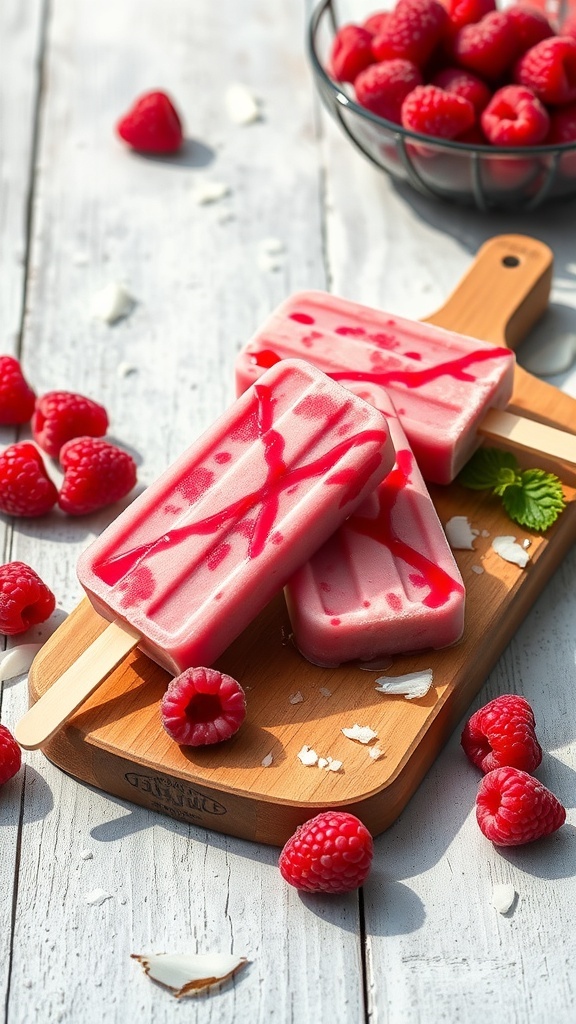
These creamy raspberry coconut popsicles are a delightful way to cool off on a warm day. The vibrant pink color comes from fresh raspberries, while the coconut adds a rich, tropical flavor. They are not just tasty but also a healthier option for a sweet treat.
Making these popsicles is super easy. You simply blend together coconut milk, fresh raspberries, and a bit of honey for sweetness. Pour the mixture into popsicle molds, add some extra raspberry swirls for a fun look, and freeze. In just a few hours, you’ll have a refreshing snack that’s perfect for any time of day.
These popsicles are great for kids and adults alike. They are a fun way to enjoy fruit while staying cool. Plus, they are free from artificial ingredients, making them a guilt-free indulgence. Serve them at a summer gathering or just enjoy them on your own!
Ingredients
- 2 cups fresh raspberries
- 1 cup coconut milk (canned or carton)
- 1/4 cup honey or maple syrup (adjust to taste)
- 1 teaspoon vanilla extract
- Pinch of salt
Instructions
- Blend the Ingredients: In a blender, combine the raspberries, coconut milk, honey or maple syrup, vanilla extract, and a pinch of salt. Blend until smooth.
- Pour into Molds: Carefully pour the mixture into popsicle molds, leaving a little space at the top for expansion as they freeze.
- Insert Sticks: Place popsicle sticks into the molds and freeze for at least 4-6 hours, or until solid.
- Remove from Molds: To release the popsicles, run warm water over the outside of the molds for a few seconds, then gently pull the popsicles out.
- Serve: Enjoy the popsicles immediately or store them in a freezer-safe bag for later.
Tasty Apple Cinnamon Oatmeal Cups For A Wholesome Snack
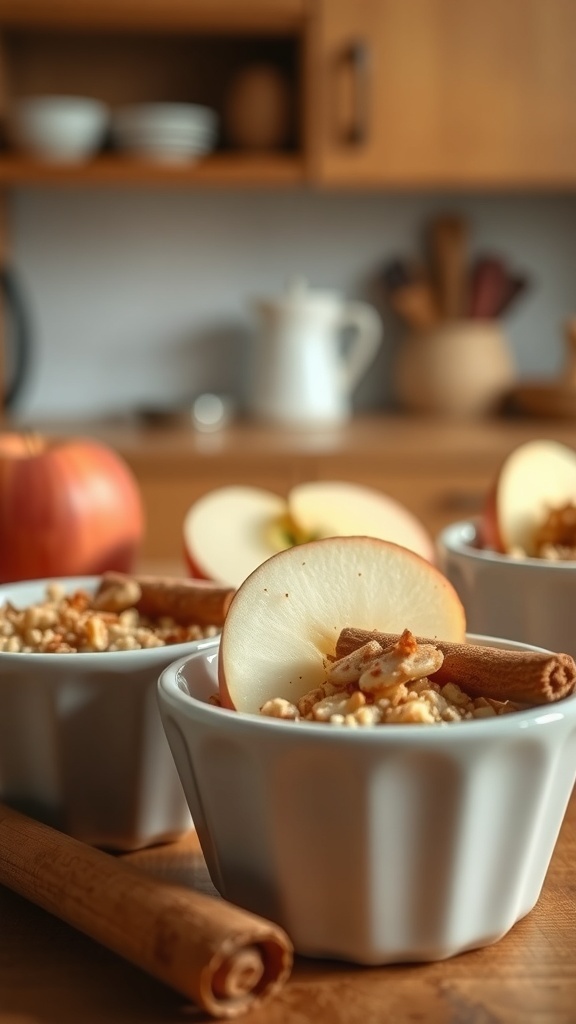
These Apple Cinnamon Oatmeal Cups are a delightful treat that combines the comforting flavors of apple and cinnamon. Perfect for a quick snack or a healthy dessert, they are easy to make and packed with goodness. The image showcases these charming cups, topped with fresh apple slices and a sprinkle of cinnamon, making them visually appealing and inviting.
To create these tasty cups, you’ll need simple ingredients like rolled oats, apples, and cinnamon. They are not only delicious but also nutritious, making them a great option for kids and adults alike. You can prepare them in advance and store them in the fridge for a quick grab-and-go snack.
Ingredients
- 2 cups rolled oats
- 1 1/2 cups milk (or almond milk)
- 1 large apple, diced
- 1/2 cup honey or maple syrup
- 1 teaspoon ground cinnamon
- 1/2 teaspoon vanilla extract
- 1/4 teaspoon salt
- Optional toppings: sliced apples, nuts, or yogurt
Instructions
- Preheat your oven to 350°F (175°C) and grease a muffin tin.
- In a large bowl, combine rolled oats, milk, diced apple, honey, cinnamon, vanilla, and salt. Mix well until everything is combined.
- Spoon the mixture evenly into the muffin tin, filling each cup about 3/4 full.
- Bake for 20-25 minutes, or until the tops are golden brown.
- Let them cool for a few minutes before removing from the tin. Serve warm or store in the fridge for later.
Decadent No-Bake Brownie Bites For Chocolate Lovers

If you’re a chocolate lover, these no-bake brownie bites are a dream come true. They’re rich, fudgy, and packed with flavor, making them the perfect treat for any time of day. The image showcases these delightful bites, coated in cocoa powder and topped with chocolate chips. They look so inviting, don’t they?
These brownie bites are not just delicious; they’re also easy to make. With no baking required, you can whip them up in no time. Just mix the ingredients, roll them into balls, and chill. It’s that simple! Plus, they double as a healthy snack, so you can enjoy them guilt-free.
Perfect for parties or a quick snack, these bites will satisfy your chocolate cravings without the fuss of traditional baking. Pair them with a glass of milk for an extra treat!
Ingredients
- 1 cup pitted dates
- 1 cup walnuts
- 1/2 cup cocoa powder
- 1/4 cup almond butter
- 1/4 cup chocolate chips
- 1 teaspoon vanilla extract
- Pinch of salt
Instructions
- Blend the Dates: In a food processor, combine the pitted dates and walnuts. Pulse until they form a sticky mixture.
- Add Cocoa and Almond Butter: Add cocoa powder, almond butter, chocolate chips, vanilla extract, and salt. Blend until well combined.
- Form the Bites: Scoop out small portions of the mixture and roll them into balls. Place them on a baking sheet lined with parchment paper.
- Chill: Refrigerate the brownie bites for at least 30 minutes to firm up.
- Serve: Enjoy your no-bake brownie bites chilled or at room temperature!
Nutritious Banana Oat Cookies For A Sweet Snack
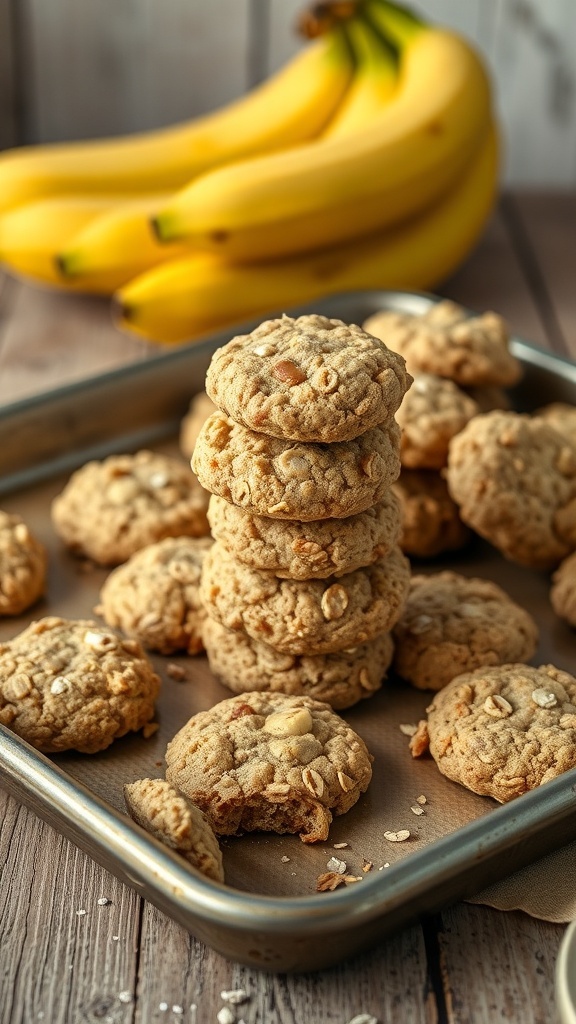
These banana oat cookies are a delightful treat that also serve as a healthy snack. With ripe bananas and oats as the main ingredients, they pack a nutritious punch while satisfying your sweet tooth. The image shows a stack of golden-brown cookies, perfectly baked and ready to enjoy. Bananas in the background hint at the fresh, fruity flavor that makes these cookies so special.
Making these cookies is simple and fun. You can whip them up in no time, making them perfect for a quick snack or dessert. Plus, they are great for kids and adults alike!
Ingredients
- 2 ripe bananas, mashed
- 1 cup rolled oats
- 1/2 cup peanut butter or almond butter
- 1/4 cup honey or maple syrup
- 1/2 teaspoon vanilla extract
- 1/2 teaspoon baking soda
- 1/4 teaspoon salt
- 1/2 cup chocolate chips or nuts (optional)
Instructions
- Preheat your oven to 350°F (175°C) and line a baking sheet with parchment paper.
- In a large bowl, mix the mashed bananas, peanut butter, honey, and vanilla extract until smooth.
- Add the rolled oats, baking soda, and salt. Stir until well combined. If using, fold in chocolate chips or nuts.
- Drop spoonfuls of the mixture onto the prepared baking sheet, spacing them about 2 inches apart.
- Bake for 10-12 minutes or until the edges are golden brown.
- Let the cookies cool on the baking sheet for a few minutes before transferring them to a wire rack to cool completely.
Enjoy these nutritious banana oat cookies as a sweet snack anytime!
Wholesome Rice Krispie Treats With A Healthy Twist
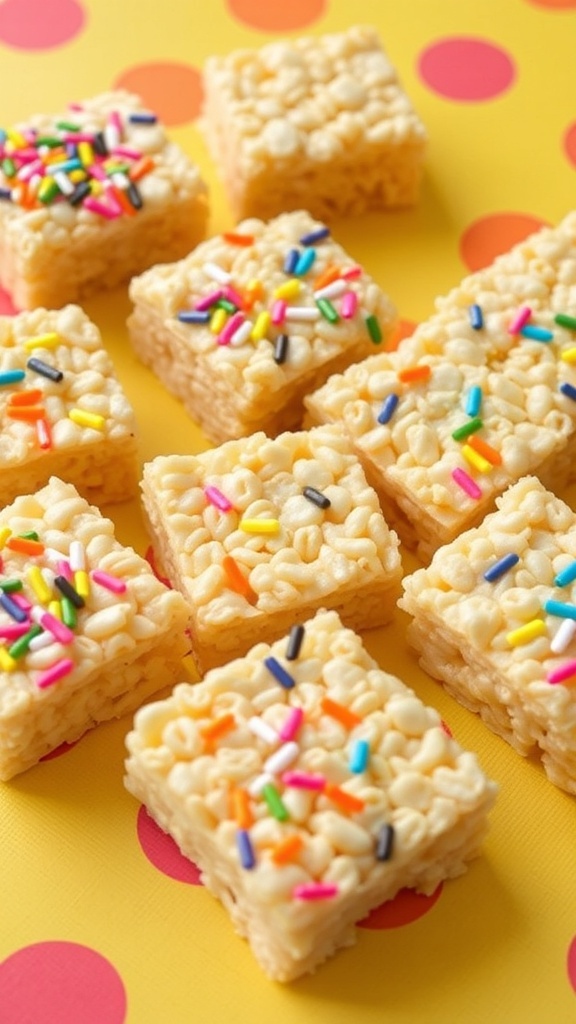
Rice Krispie treats are a classic favorite, but they can be made healthier without losing any fun. These wholesome treats are not just for kids; they can be a delightful snack for everyone. The image shows a colorful assortment of Rice Krispie squares topped with heart-shaped pink treats and sprinkles, making them visually appealing and perfect for any occasion.
Using natural sweeteners and adding nutritious ingredients can transform this beloved dessert into a guilt-free snack. You can incorporate nut butter, honey, or even some protein powder for an extra boost. The vibrant colors and playful shapes make these treats a hit at parties or as a fun after-school snack.
Let’s get into the recipe so you can whip up these wholesome Rice Krispie treats at home!
Ingredients
- 4 cups Rice Krispies cereal
- 1/4 cup almond butter or peanut butter
- 1/4 cup honey or maple syrup
- 1 teaspoon vanilla extract
- 1/2 cup mini chocolate chips or sprinkles (optional)
- 1/2 cup freeze-dried fruit powder (like strawberries or raspberries)
Instructions
- Prepare the Base: In a large saucepan, melt the almond butter and honey over low heat. Stir until smooth and combined.
- Add Flavor: Remove from heat and mix in the vanilla extract and freeze-dried fruit powder for a fruity twist.
- Combine: Add the Rice Krispies cereal to the mixture and stir until all the cereal is coated evenly.
- Press and Set: Transfer the mixture into a greased 9x9 inch baking dish. Press it down firmly to create an even layer.
- Chill: Let the treats cool at room temperature for about 30 minutes. You can also refrigerate them for quicker setting.
- Cut and Enjoy: Once set, cut into squares or fun shapes. Top with mini chocolate chips or sprinkles if desired.
Satisfying Nut And Seed Bars For Crunchy Energy
These nut and seed bars are a fantastic way to satisfy your cravings while keeping your energy levels up. Packed with a variety of nuts and seeds, they provide a crunchy texture that makes for a delightful snack. The bars are not only tasty but also nutritious, making them perfect for a quick pick-me-up during the day.
Imagine biting into a bar filled with roasted peanuts, almonds, and sunflower seeds, all held together with a touch of honey or maple syrup. The combination of flavors and textures is simply irresistible. Plus, they are super easy to make and require no baking!
Here’s how to whip up your own batch of these delicious energy bars:
Ingredients
- 1 cup rolled oats
- 1/2 cup mixed nuts (like almonds, peanuts, and walnuts)
- 1/4 cup sunflower seeds
- 1/4 cup honey or maple syrup
- 1/4 cup nut butter (like almond or peanut butter)
- 1/4 cup dried fruit (like cranberries or raisins)
- 1/2 teaspoon vanilla extract
- 1/4 teaspoon salt
Instructions
- Mix Dry Ingredients: In a large bowl, combine rolled oats, mixed nuts, sunflower seeds, dried fruit, and salt.
- Combine Wet Ingredients: In a separate bowl, mix honey (or maple syrup), nut butter, and vanilla extract until smooth.
- Combine Mixtures: Pour the wet mixture over the dry ingredients and stir until everything is well coated.
- Press into Pan: Line an 8x8 inch baking dish with parchment paper. Press the mixture firmly into the dish to create an even layer.
- Chill: Refrigerate for at least 2 hours to set. Once firm, cut into bars and enjoy!
Creamy Chocolate Hummus For A Unique Dip
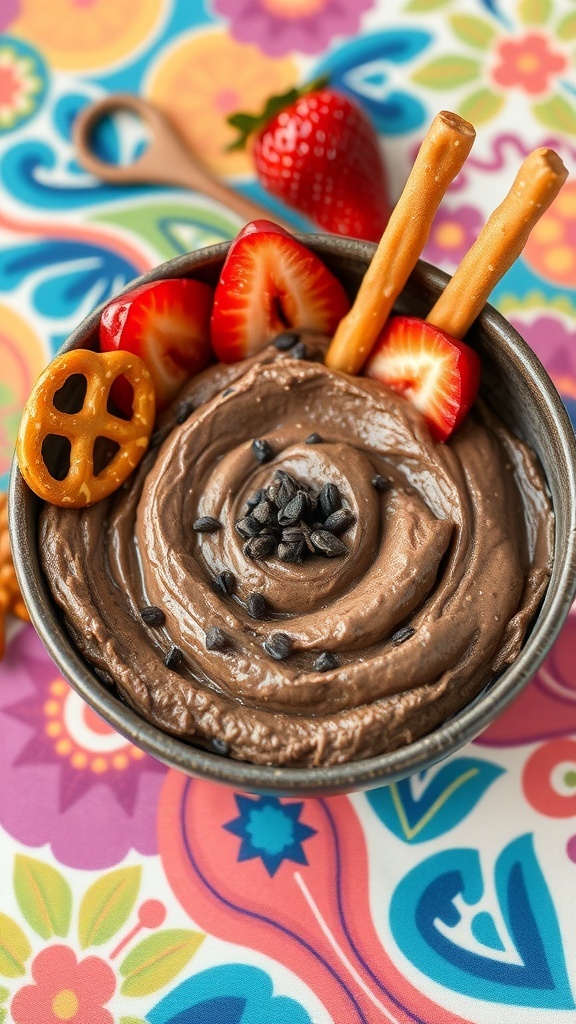
Chocolate hummus is a fun twist on the classic dip. It combines the creamy texture of traditional hummus with rich chocolate flavor. This dip is perfect for satisfying sweet cravings while keeping things healthy. You can enjoy it with fresh fruits, pretzels, or even graham crackers. The vibrant colors in the image show off the delightful presentation, making it an inviting snack for any occasion.
To make this creamy chocolate hummus, you’ll need some simple ingredients that you might already have at home. It’s quick to whip up and can be stored in the fridge for later snacking.
Ingredients
- 1 can (15 oz) chickpeas, drained and rinsed
- 1/4 cup cocoa powder
- 1/4 cup maple syrup or honey
- 1/4 cup almond butter or peanut butter
- 1 teaspoon vanilla extract
- 1/4 cup milk (dairy or plant-based)
- Pinch of salt
Instructions
- Blend the Ingredients: In a food processor, combine the chickpeas, cocoa powder, maple syrup, almond butter, vanilla extract, milk, and salt.
- Process Until Smooth: Blend until the mixture is creamy and smooth. If it’s too thick, add a little more milk until you reach your desired consistency.
- Taste and Adjust: Taste the hummus and adjust sweetness if needed by adding more maple syrup or honey.
- Serve: Transfer the hummus to a bowl and serve with your choice of dippers like strawberries, pretzels, or apple slices.
- Store: Keep any leftovers in an airtight container in the fridge for up to a week.


Comments
Post a Comment