14 Irresistible No Bake Desserts with 5 Ingredients or Less
14 Irresistible No Bake Desserts with 5 Ingredients or Less
Ready to whip up something sweet without turning on the oven? "No Bake Desserts With 5 Ingredients or Less" is your go-to guide for quick and easy treats that satisfy your cravings without the fuss. With a handful of ingredients, you'll create delicious desserts in no time, perfect for any occasion or just a cozy night in!
Refreshing No-Bake Fruit Tart
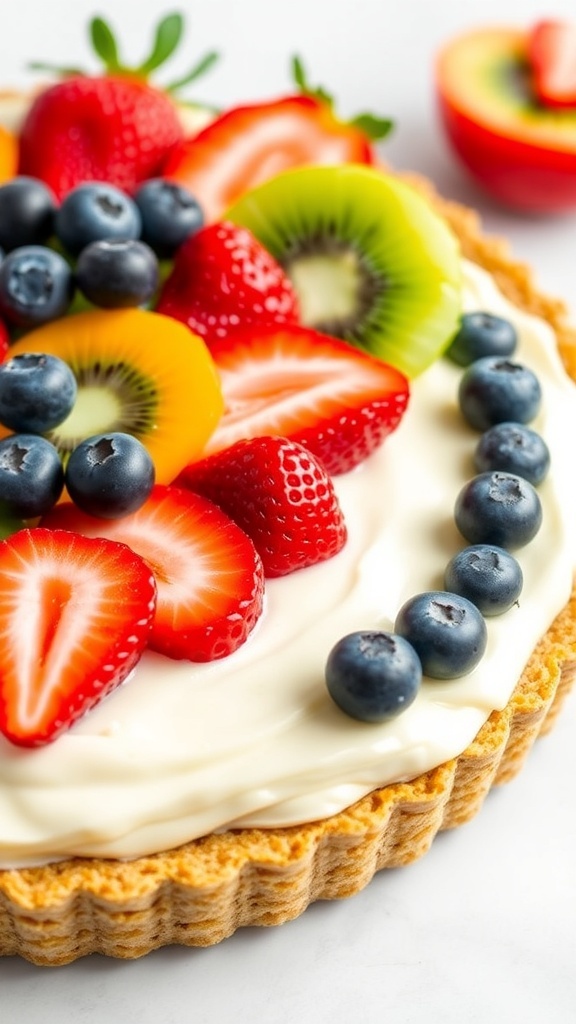
This no-bake fruit tart is a delightful treat that’s perfect for warm days. With a crisp crust and a creamy filling, it’s topped with a vibrant array of fresh fruits. The colors pop, making it not just tasty but also visually appealing. Imagine biting into a slice and enjoying the sweet and tangy flavors of strawberries, blueberries, and kiwi. It’s a refreshing dessert that everyone will love!
Making this tart is super simple. You only need five ingredients, and there’s no baking involved! It’s a great way to use seasonal fruits and impress your friends at gatherings. Plus, it’s a fun recipe to make with kids, allowing them to help with the fruit topping.
Ingredients
- 1 pre-made graham cracker crust
- 1 cup cream cheese, softened
- 1/4 cup powdered sugar
- 1 teaspoon vanilla extract
- Assorted fresh fruits (strawberries, blueberries, kiwi, etc.)
Instructions
- In a bowl, mix the softened cream cheese, powdered sugar, and vanilla extract until smooth.
- Spread the cream cheese mixture evenly into the graham cracker crust.
- Slice the fresh fruits and arrange them beautifully on top of the cream cheese layer.
- Chill the tart in the refrigerator for at least one hour before serving.
- Slice and enjoy your refreshing fruit tart!
Creamy Peanut Butter And Banana Bites

If you're looking for a quick and tasty treat, these creamy peanut butter and banana bites are perfect. They are simple to make and require only a few ingredients. The combination of peanut butter and banana is a classic that never disappoints.
In the image, you can see a delightful spread of mini bites, each topped with banana slices and a drizzle of caramel. The wooden platter adds a warm touch, making these treats look even more inviting. They are not just delicious but also visually appealing, perfect for sharing at gatherings or enjoying as a snack at home.
These bites are a fantastic way to satisfy your sweet tooth without a lot of fuss. Plus, they are made with wholesome ingredients, making them a guilt-free indulgence!
Ingredients
- 1 cup peanut butter
- 2 ripe bananas
- 1/4 cup honey or maple syrup
- 1 cup crushed graham crackers
- 1/4 cup chopped nuts (optional)
Instructions
- Prepare the Base: In a bowl, mix the crushed graham crackers with a bit of melted butter or coconut oil until it resembles wet sand. Press this mixture into the bottom of mini muffin tins to create a crust.
- Make the Filling: In another bowl, combine peanut butter and honey (or maple syrup) until smooth. Spoon this mixture over the graham cracker crust in each muffin tin.
- Add Banana: Slice the bananas and place a slice on top of the peanut butter filling in each bite.
- Chill: Place the muffin tin in the refrigerator for about 30 minutes to set.
- Serve: Once set, pop the bites out of the tin, drizzle with extra honey or caramel, and sprinkle with chopped nuts if desired. Enjoy your creamy peanut butter and banana bites!
Decadent No-Bake Cheesecake Cups

No-bake cheesecake cups are a delightful treat that anyone can whip up in no time. These little desserts are perfect for satisfying your sweet tooth without the hassle of baking. The image shows creamy cheesecake layered in small cups, topped with fresh raspberries and blueberries. The vibrant colors of the berries pop against the smooth white cheesecake, making it as pleasing to the eyes as it is to the taste buds.
With just five ingredients, you can create a delicious dessert that feels indulgent but is super easy to make. The graham cracker crust adds a nice crunch, while the creamy filling is rich and smooth. Plus, the fresh fruit on top not only adds flavor but also a burst of freshness.
These cheesecake cups are great for parties, picnics, or just a sweet treat at home. They’re easy to prepare ahead of time, so you can enjoy them whenever the craving strikes!
Ingredients
- 1 cup graham cracker crumbs
- 4 tablespoons unsalted butter, melted
- 8 ounces cream cheese, softened
- 1/2 cup powdered sugar
- 1 teaspoon vanilla extract
- Fresh berries for topping
Instructions
- Make the Crust: In a bowl, mix the graham cracker crumbs and melted butter until combined. Press the mixture into the bottom of small cups or jars to form a crust.
- Prepare the Filling: In another bowl, beat the softened cream cheese until smooth. Gradually add the powdered sugar and vanilla extract, mixing until well combined.
- Assemble: Spoon the cream cheese mixture over the crust in each cup, smoothing the top with a spatula.
- Chill: Place the cups in the refrigerator for at least 2 hours to set.
- Serve: Before serving, top each cheesecake cup with fresh berries for a burst of flavor and color.
Quick And Easy Key Lime Pie
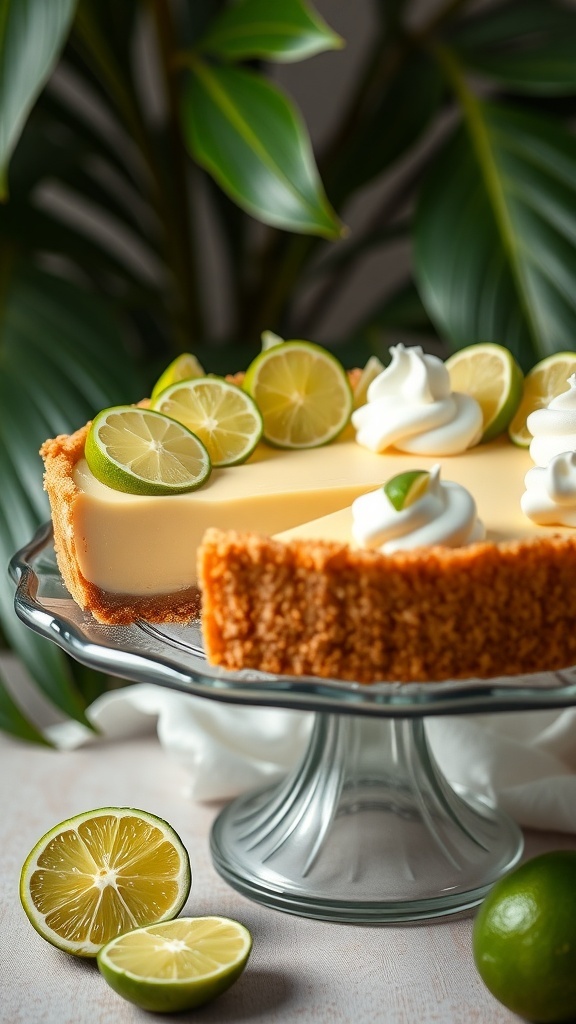
Key lime pie is a classic dessert that’s refreshing and simple to make. The image showcases a beautiful pie topped with lime slices and whipped cream, sitting elegantly on a glass stand. Its smooth, creamy filling and golden crust are inviting and perfect for any occasion.
This dessert is not only quick to prepare but also requires just a few ingredients. You can whip it up in no time, making it a go-to recipe for gatherings or a sweet treat at home. The zesty lime flavor pairs perfectly with the sweetness of the crust, creating a delightful balance.
Let’s get into the ingredients and steps to make this easy key lime pie!
Ingredients
- 1 cup key lime juice (fresh or bottled)
- 1 can (14 oz) sweetened condensed milk
- 1/2 cup sour cream
- 1 pre-made graham cracker crust
- Whipped cream for topping
Instructions
- Mix the Filling: In a bowl, combine the key lime juice, sweetened condensed milk, and sour cream. Stir until smooth.
- Fill the Crust: Pour the mixture into the pre-made graham cracker crust, spreading it evenly.
- Chill: Place the pie in the refrigerator for at least 2 hours to set.
- Serve: Once set, top with whipped cream and lime slices for garnish. Enjoy your delicious key lime pie!
Satisfying Chocolate Oat Bars

These chocolate oat bars are a delightful treat that’s easy to whip up. With just five ingredients, they are perfect for satisfying your sweet tooth without a lot of fuss. The image showcases a stack of rich, chocolatey bars drizzled with melted chocolate, making them look irresistible.
Each bar is packed with wholesome oats and a hint of sweetness, making them a great snack for any time of day. The combination of chocolate and oats creates a chewy texture that is both satisfying and delicious. Plus, they are no-bake, which means you can enjoy them without turning on the oven!
Whether you’re looking for a quick dessert or a snack to fuel your day, these bars are a fantastic choice. They are simple to make and even easier to enjoy. Let’s get started on making your own batch!
Ingredients
- 2 cups rolled oats
- 1 cup peanut butter
- 1/2 cup honey or maple syrup
- 1/2 cup chocolate chips
- 1/4 cup cocoa powder
Instructions
- Mix Ingredients: In a large bowl, combine rolled oats, peanut butter, honey or maple syrup, cocoa powder, and chocolate chips. Stir until everything is well combined.
- Press into Pan: Line an 8x8 inch baking dish with parchment paper. Pour the mixture into the dish and press it down firmly to create an even layer.
- Chill: Place the dish in the refrigerator for at least 1 hour to allow the bars to set.
- Slice and Serve: Once set, remove the bars from the dish using the parchment paper. Slice into squares and enjoy!
Classic No-Bake Chocolate Chip Cookie Dough

When you're craving something sweet but don't want to turn on the oven, classic no-bake chocolate chip cookie dough is the perfect treat. This dessert is creamy, rich, and loaded with chocolate chips. Plus, it only takes a few minutes to whip up!
The image shows a delightful bowl of cookie dough, dotted with chocolate chips, ready to be enjoyed. You can see the smooth texture and the tempting chocolate pieces peeking through. It’s a simple yet satisfying dessert that can be enjoyed straight from the bowl or rolled into bite-sized balls.
With just five ingredients, this recipe is quick and easy. You can make it for yourself or share it with friends. It's a fun way to enjoy the classic cookie flavor without any baking involved!
Ingredients
- 1 cup all-purpose flour
- 1/2 cup unsalted butter, softened
- 1/2 cup brown sugar, packed
- 1/4 cup granulated sugar
- 1 cup chocolate chips
Instructions
- Mix the Butter and Sugars: In a large bowl, beat the softened butter, brown sugar, and granulated sugar together until creamy.
- Add the Flour: Gradually mix in the all-purpose flour until fully combined.
- Fold in the Chocolate Chips: Gently fold in the chocolate chips, making sure they are evenly distributed throughout the dough.
- Chill (Optional): For a firmer texture, you can chill the dough in the refrigerator for about 30 minutes.
- Enjoy: Scoop out the dough with a spoon or roll it into balls and enjoy your delicious no-bake cookie dough!
Luscious Strawberry Shortcake Parfaits

Strawberry shortcake parfaits are a delightful treat that brings together fresh strawberries, creamy layers, and a hint of sweetness. The image showcases these beautiful parfaits, layered with vibrant strawberries, fluffy whipped cream, and a crumbly base. Each layer is a burst of flavor and texture, making it a perfect dessert for any occasion.
This no-bake dessert is not only easy to prepare but also requires just five ingredients. It’s a great way to enjoy the freshness of strawberries, especially during the warmer months. The parfaits are served in clear glasses, allowing the colorful layers to shine through, making them as pleasing to the eye as they are to the palate.
Gather your friends and family to enjoy these strawberry shortcake parfaits. They are sure to impress with their simplicity and deliciousness!
Ingredients
- 2 cups fresh strawberries, sliced
- 1 cup whipped cream
- 1 cup crushed graham crackers
- 1/4 cup sugar
- 1 teaspoon vanilla extract
Instructions
- Prepare the Strawberries: In a bowl, mix the sliced strawberries with sugar. Let them sit for about 10 minutes to release their juices.
- Mix the Cream: In another bowl, combine whipped cream and vanilla extract. Gently fold until well mixed.
- Layer the Parfaits: In clear glasses, start with a layer of crushed graham crackers, followed by a layer of the strawberry mixture, and then a layer of whipped cream. Repeat the layers until the glasses are full.
- Garnish: Top with a few extra strawberry slices and a dollop of whipped cream for a beautiful finish.
- Chill and Serve: Refrigerate for at least 30 minutes before serving to let the flavors meld together.
Tasty Nutty Energy Bites

These Tasty Nutty Energy Bites are a perfect snack for anyone looking to fuel up without the fuss. Made with just a handful of ingredients, they are simple to whip up and packed with flavor. The image shows a delightful assortment of round energy bites, some whole and some cut in half, revealing a crunchy, nut-filled interior. They sit beautifully on a wooden platter, surrounded by various nuts, making them look even more inviting.
These bites are not only tasty but also nutritious. They combine the goodness of nuts with a touch of sweetness, making them ideal for a quick pick-me-up. Whether you need an afternoon snack or a post-workout boost, these energy bites have got you covered!
Ingredients
- 1 cup mixed nuts (almonds, pecans, walnuts)
- 1/2 cup rolled oats
- 1/4 cup honey or maple syrup
- 1/4 cup nut butter (peanut or almond)
- 1/4 cup seeds (chia or flaxseed)
Instructions
- Blend the Nuts: In a food processor, pulse the mixed nuts until they are finely chopped but not a powder.
- Add Ingredients: Add the rolled oats, honey, nut butter, and seeds to the processor. Blend until the mixture is sticky and holds together.
- Form the Bites: Scoop out small portions of the mixture and roll them into balls using your hands.
- Chill: Place the energy bites on a baking sheet and refrigerate for at least 30 minutes to firm up.
- Enjoy: Once chilled, enjoy these bites as a quick snack or energy boost!
Simple No-Bake Chocolate Bark

No-bake chocolate bark is a fun and easy treat that anyone can whip up in no time. This delightful dessert combines rich chocolate with a variety of toppings, making it perfect for sharing or enjoying on your own. The image showcases a beautifully crafted chocolate bark topped with an assortment of nuts and dried fruits, creating a colorful and inviting presentation.
The great thing about chocolate bark is its versatility. You can mix and match your favorite toppings, whether it’s nuts, dried fruits, or even a sprinkle of sea salt for that extra kick. Plus, with just a few ingredients, you can create a delicious dessert without turning on the oven!
Making this chocolate bark is as simple as melting chocolate, spreading it out, and adding your toppings. Once it sets, you can break it into pieces and enjoy. It’s a fantastic option for last-minute gatherings or a sweet snack at home.
Ingredients
- 2 cups chocolate chips (dark, milk, or white)
- 1 cup mixed nuts (like almonds, pecans, and peanuts)
- 1/2 cup dried fruits (such as cranberries, apricots, or raisins)
- 1 tablespoon sea salt (optional)
- 1 teaspoon vanilla extract (optional)
Instructions
- Melt the Chocolate: In a microwave-safe bowl, melt the chocolate chips in 30-second intervals, stirring in between until smooth.
- Prepare the Base: Line a baking sheet with parchment paper. Pour the melted chocolate onto the sheet and spread it out evenly with a spatula.
- Add Toppings: Sprinkle the mixed nuts and dried fruits over the melted chocolate. If using, add a sprinkle of sea salt and drizzle with vanilla extract.
- Set the Bark: Place the baking sheet in the refrigerator for about 30 minutes, or until the chocolate is fully set.
- Break and Serve: Once set, break the chocolate bark into pieces and enjoy your delicious creation!
Quick Lemon Cream Pie

This Quick Lemon Cream Pie is a delightful treat that’s perfect for any occasion. With its smooth and creamy texture, it brings a burst of refreshing lemon flavor that’s sure to please your taste buds. The pie sits beautifully on a graham cracker crust, which adds a nice crunch to each bite.
In the image, you can see a slice of this luscious pie, topped with a swirl of whipped cream and a sprinkle of lemon zest. Fresh mint leaves add a pop of color and a hint of freshness. The bright yellow of the lemon filling contrasts nicely with the golden crust, making it visually appealing.
What’s great about this recipe is that it requires only five ingredients or less, making it super easy to whip up. Perfect for those last-minute dessert cravings!
Ingredients
- 1 pre-made graham cracker crust
- 1 cup heavy cream
- 1 cup sweetened condensed milk
- 1/2 cup fresh lemon juice
- Zest of 1 lemon
Instructions
- In a mixing bowl, whip the heavy cream until soft peaks form.
- In another bowl, combine sweetened condensed milk, lemon juice, and lemon zest. Mix until smooth.
- Gently fold the whipped cream into the lemon mixture until well combined.
- Pour the filling into the graham cracker crust and smooth the top.
- Chill in the refrigerator for at least 2 hours before serving. Enjoy your refreshing lemon cream pie!
Refreshing Yogurt And Berry Parfaits
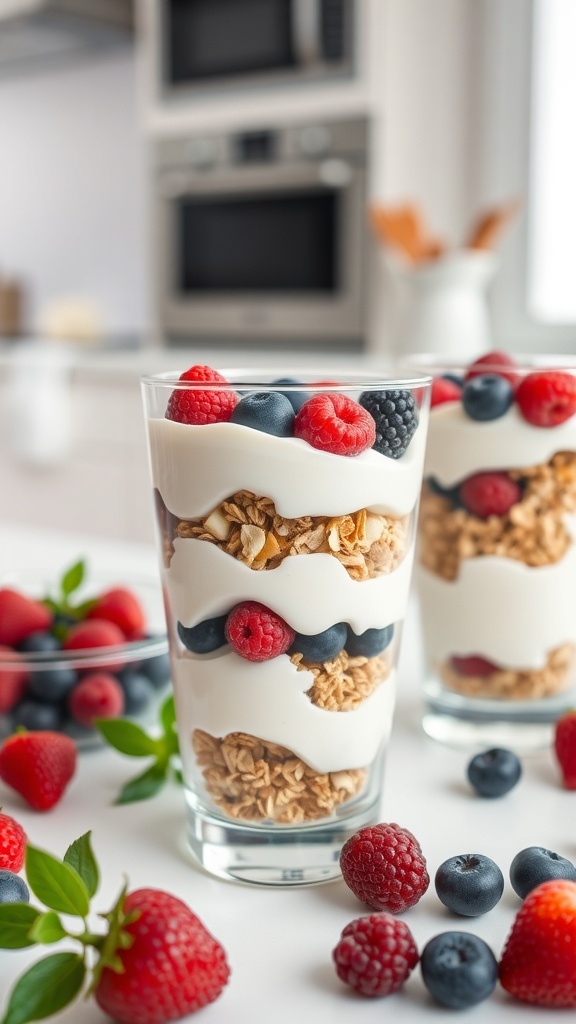
Yogurt and berry parfaits are a delightful treat that’s perfect for any time of day. They look beautiful layered in a glass, showcasing vibrant colors from the fresh berries. The creamy yogurt pairs perfectly with crunchy granola, making each bite a mix of textures and flavors.
This recipe is simple and quick, using just five ingredients or less. You can customize it with your favorite berries, whether it’s strawberries, blueberries, or raspberries. These parfaits are not only delicious but also healthy, making them a great choice for breakfast or a light dessert.
Let’s get into the recipe so you can whip up these tasty parfaits in no time!
Ingredients
- 2 cups yogurt (plain or flavored)
- 1 cup granola
- 1 cup mixed berries (strawberries, blueberries, raspberries)
- 1 tablespoon honey (optional)
- Fresh mint leaves for garnish (optional)
Instructions
- Layer the Yogurt: Start by adding a layer of yogurt to the bottom of your glass.
- Add Granola: Sprinkle a layer of granola over the yogurt.
- Add Berries: Place a layer of mixed berries on top of the granola.
- Repeat Layers: Continue layering yogurt, granola, and berries until the glass is full.
- Drizzle Honey: If you like, drizzle honey on top for added sweetness.
- Garnish: Finish with fresh mint leaves for a pop of color and flavor.
Simple No-Bake Almond Joy Bars

These Simple No-Bake Almond Joy Bars are a delightful treat that captures the flavors of the classic candy bar. With a combination of coconut, almonds, and a creamy base, they are both satisfying and easy to make. The bars are topped with a sprinkle of shredded coconut and whole almonds, making them look as good as they taste.
Perfect for a quick dessert or a snack, these bars require just a few ingredients and no baking. You can whip them up in no time, making them a great option for gatherings or a sweet indulgence at home. The tropical vibe from the coconut and the crunch from the almonds create a wonderful balance.
Ingredients
- 1 cup almond butter
- 1/4 cup honey or maple syrup
- 1 cup shredded coconut
- 1/2 cup chopped almonds
- 1/4 cup dark chocolate chips (optional)
Instructions
- Mix the almond butter and honey in a bowl until well combined.
- Add the shredded coconut and chopped almonds, stirring until everything is evenly mixed.
- Line an 8x8 inch baking dish with parchment paper. Press the mixture into the dish evenly.
- If using, melt the dark chocolate chips and drizzle over the top.
- Refrigerate for at least 1 hour to set. Cut into bars and enjoy!
Quick And Easy Chocolate Pudding Cups
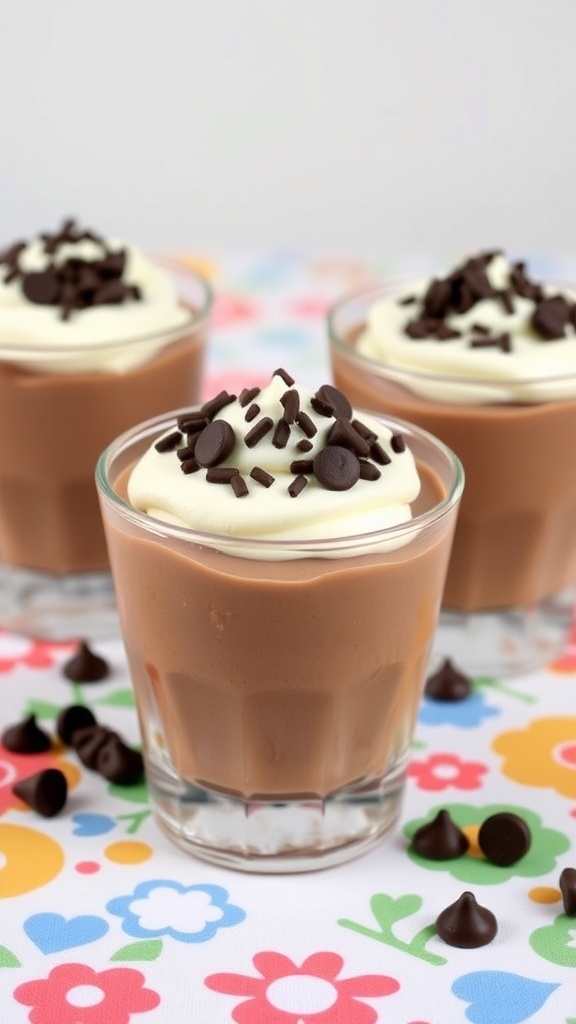
Chocolate pudding cups are a delightful treat that anyone can whip up in no time. These little cups are filled with creamy chocolate goodness, topped with whipped cream and chocolate sprinkles. Perfect for satisfying a sweet tooth, they are also a hit at parties or family gatherings.
Making these pudding cups is super simple. You only need a handful of ingredients, and the best part is that there’s no baking involved! Just mix, chill, and enjoy. They look so inviting in their clear cups, showcasing the rich chocolate color and the fluffy topping. Kids and adults alike will love digging into these tasty desserts.
Here’s how to make your own chocolate pudding cups:
Ingredients
- 2 cups milk
- 1/2 cup granulated sugar
- 1/3 cup unsweetened cocoa powder
- 1/4 cup cornstarch
- 1 teaspoon vanilla extract
Instructions
- In a medium saucepan, whisk together sugar, cocoa powder, and cornstarch.
- Gradually add milk while whisking to combine. Cook over medium heat, stirring constantly until the mixture thickens and starts to bubble.
- Remove from heat and stir in vanilla extract.
- Pour the pudding into cups and let it cool. Refrigerate for at least 2 hours.
- Before serving, top with whipped cream and chocolate sprinkles for a fun finish!
Easy No-Bake Peanut Butter Pie

This Easy No-Bake Peanut Butter Pie is a delightful treat that’s perfect for any occasion. The creamy filling, made with peanut butter, is rich and satisfying. Topped with whipped cream and crunchy peanuts, it’s a dessert that everyone will love. The best part? You only need five ingredients to whip this up!
The pie features a simple chocolate crust that pairs perfectly with the peanut butter filling. It’s a great choice for those warm days when you don’t want to turn on the oven. Just mix, pour, and chill!
Let’s get started on making this delicious dessert!
Ingredients
- 1 pre-made chocolate pie crust
- 1 cup creamy peanut butter
- 1 cup whipped cream (or whipped topping)
- 1/2 cup powdered sugar
- 1 teaspoon vanilla extract
Instructions
- In a large mixing bowl, combine the peanut butter, powdered sugar, and vanilla extract. Mix until smooth.
- Gently fold in the whipped cream until fully combined. Be careful not to deflate the whipped cream.
- Pour the mixture into the chocolate pie crust, spreading it evenly.
- Chill in the refrigerator for at least 4 hours, or until set.
- Before serving, top with additional whipped cream and sprinkle with chopped peanuts.


Comments
Post a Comment