14 Irresistible No-Bake Vegan Desserts You Need to Try
14 Irresistible No-Bake Vegan Desserts You Need to Try
No-bake vegan desserts are the perfect way to satisfy your sweet tooth without turning on the oven. They’re quick, easy, and made with wholesome ingredients that everyone can enjoy. Whether you’re craving something creamy, fruity, or chocolatey, these recipes will have you covered in no time!
Fruit-Filled Coconut Chia Pudding

This Fruit-Filled Coconut Chia Pudding is a delightful treat that is both healthy and satisfying. The creamy coconut base pairs perfectly with the crunchy chia seeds, creating a texture that is simply irresistible. Topped with an array of fresh fruits like mango, strawberries, and kiwi, this dessert is not just a feast for the taste buds but also for the eyes.
The vibrant colors of the fruits make this pudding visually appealing. Each spoonful offers a burst of flavor, making it a perfect choice for breakfast or a light dessert. Plus, it’s super easy to make and requires no baking!
To prepare this delicious pudding, you’ll need a few simple ingredients. Gather your coconut milk, chia seeds, and your favorite fruits. The best part? You can customize the toppings based on what you have on hand or what’s in season.
Ingredients
- 1 cup coconut milk
- 1/4 cup chia seeds
- 2 tablespoons maple syrup (optional)
- 1 teaspoon vanilla extract
- 1 ripe mango, diced
- 1/2 cup strawberries, sliced
- 1 kiwi, sliced
- 1/4 cup blackberries
- 1/4 cup shredded coconut (for topping)
- Fresh mint leaves (for garnish)
Instructions
- Mix the Base: In a bowl, combine coconut milk, chia seeds, maple syrup, and vanilla extract. Stir well to ensure the chia seeds are evenly distributed.
- Refrigerate: Cover the bowl and refrigerate for at least 4 hours or overnight. This allows the chia seeds to absorb the liquid and thicken the pudding.
- Prepare the Toppings: When ready to serve, take the pudding out of the fridge. Spoon it into serving bowls and top with diced mango, sliced strawberries, kiwi, and blackberries.
- Add Coconut and Mint: Sprinkle shredded coconut on top and garnish with fresh mint leaves for a refreshing touch.
- Serve and Enjoy: Your Fruit-Filled Coconut Chia Pudding is ready to enjoy! Dig in and savor the flavors.
Creamy Vegan Cheesecake Bites
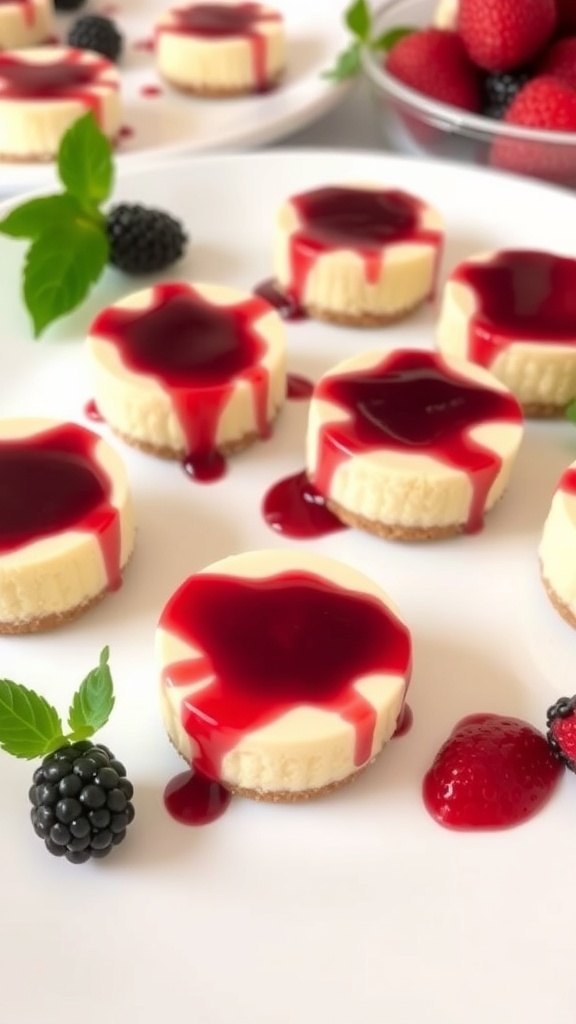
These creamy vegan cheesecake bites are a delightful treat that everyone will love. They are rich and smooth, making them perfect for any occasion. The vibrant colors from the raspberry sauce and edible flowers add a fun touch, making them not just tasty but also beautiful.
Each bite is a perfect balance of sweetness and creaminess, with a crunchy base that complements the filling. You can easily customize the toppings to suit your taste. Whether you’re hosting a party or just treating yourself, these cheesecake bites are sure to impress.
Ingredients
- 1 cup raw cashews (soaked for at least 4 hours)
- 1/4 cup coconut oil, melted
- 1/4 cup maple syrup
- 1/4 cup lemon juice
- 1 teaspoon vanilla extract
- 1 cup almond flour
- 2 tablespoons coconut sugar
- 1/4 cup raspberry sauce (store-bought or homemade)
- Fresh raspberries and edible flowers for garnish
Instructions
- Prepare the Base: In a bowl, mix almond flour and coconut sugar. Press this mixture into the bottom of a muffin tin lined with cupcake liners to form the base.
- Make the Filling: In a blender, combine soaked cashews, melted coconut oil, maple syrup, lemon juice, and vanilla extract. Blend until smooth and creamy.
- Assemble: Pour the cashew mixture over the prepared bases in the muffin tin. Smooth the tops with a spatula.
- Chill: Place the muffin tin in the freezer for at least 2 hours to set.
- Serve: Once set, remove the cheesecake bites from the muffin tin. Drizzle raspberry sauce on top and garnish with fresh raspberries and edible flowers before serving.
Easy No-Bake Peanut Butter Bars
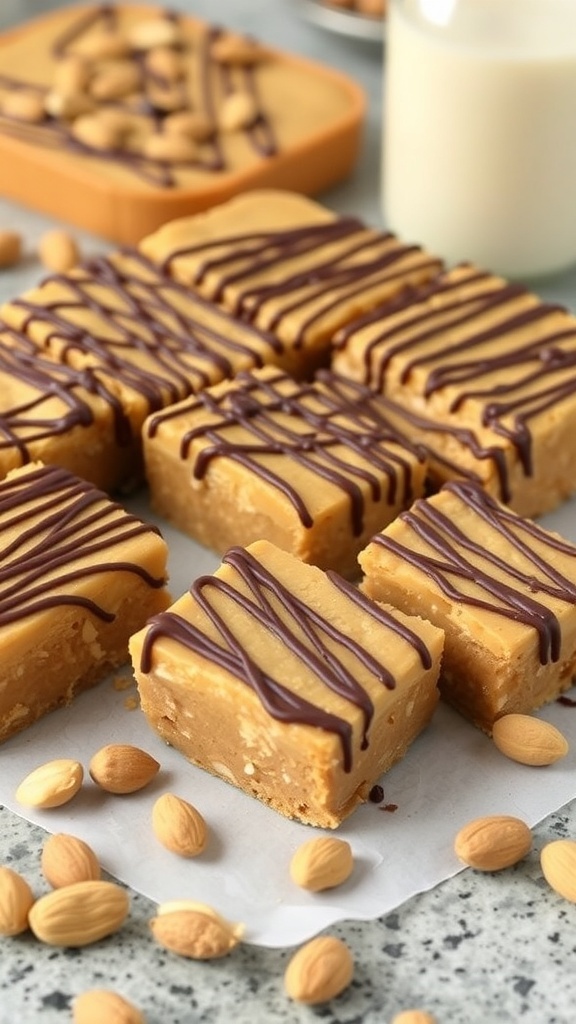
These Easy No-Bake Peanut Butter Bars are a treat you won't want to miss. The image shows perfectly cut squares of creamy peanut butter goodness, drizzled with rich chocolate. The bars are surrounded by scattered almonds, adding a nice touch of crunch and flavor. They look so inviting and are perfect for satisfying your sweet tooth without turning on the oven.
Making these bars is a breeze. You only need a few simple ingredients, and the best part? No baking required! Just mix, pour, and chill. They’re great for snacks, dessert, or even a quick energy boost during the day.
Ingredients
- 1 cup natural peanut butter
- 1/2 cup maple syrup
- 1 1/2 cups rolled oats
- 1/4 cup coconut flour
- 1/2 cup dark chocolate chips
- 1 tablespoon coconut oil
Instructions
- Mix the Base: In a large bowl, combine the peanut butter and maple syrup. Stir until smooth.
- Add Dry Ingredients: Gradually mix in the rolled oats and coconut flour until fully combined.
- Prepare the Pan: Line an 8x8 inch baking dish with parchment paper. Press the mixture evenly into the bottom of the dish.
- Melt the Chocolate: In a microwave-safe bowl, combine the chocolate chips and coconut oil. Heat in 30-second intervals, stirring until melted and smooth.
- Drizzle: Pour the melted chocolate over the peanut butter layer, spreading it evenly. You can use a fork to create a fun design.
- Chill: Place the dish in the fridge for at least 2 hours to set. Once firm, cut into squares and enjoy!
Chocolate-Dipped Banana Pops

Chocolate-dipped banana pops are a fun and tasty treat that everyone will love. These pops are not only easy to make, but they also look great on any dessert table. Imagine ripe bananas coated in rich chocolate and sprinkled with colorful toppings. They are perfect for parties, snacks, or just a sweet craving.
The bright colors in the background and the festive decorations add to the cheerful vibe of these treats. Each banana pop is on a stick, making them easy to hold and eat. You can customize them with different toppings like nuts, sprinkles, or coconut flakes. These pops are a hit with kids and adults alike!
Making chocolate-dipped banana pops is a breeze. Just gather your ingredients, and you’ll be ready to create a delightful dessert that’s both healthy and indulgent.
Ingredients
- 2 ripe bananas
- 1 cup dairy-free chocolate chips
- 1 tablespoon coconut oil
- 1/4 cup chopped nuts (like almonds or peanuts)
- 1/4 cup colorful sprinkles
- 4 lollipop sticks
Instructions
- Prepare the Bananas: Peel the bananas and cut them in half. Insert a lollipop stick into each half.
- Melt the Chocolate: In a microwave-safe bowl, combine the chocolate chips and coconut oil. Microwave in 30-second intervals, stirring in between, until smooth.
- Dip the Bananas: Dip each banana half into the melted chocolate, making sure to coat it well. Let any excess chocolate drip off.
- Add Toppings: While the chocolate is still wet, sprinkle your choice of nuts or sprinkles on top.
- Chill: Place the banana pops on a parchment-lined tray and refrigerate for about 30 minutes, or until the chocolate hardens.
- Serve: Enjoy your chocolate-dipped banana pops as a delicious snack or dessert!
Indulgent Raw Brownie Bites
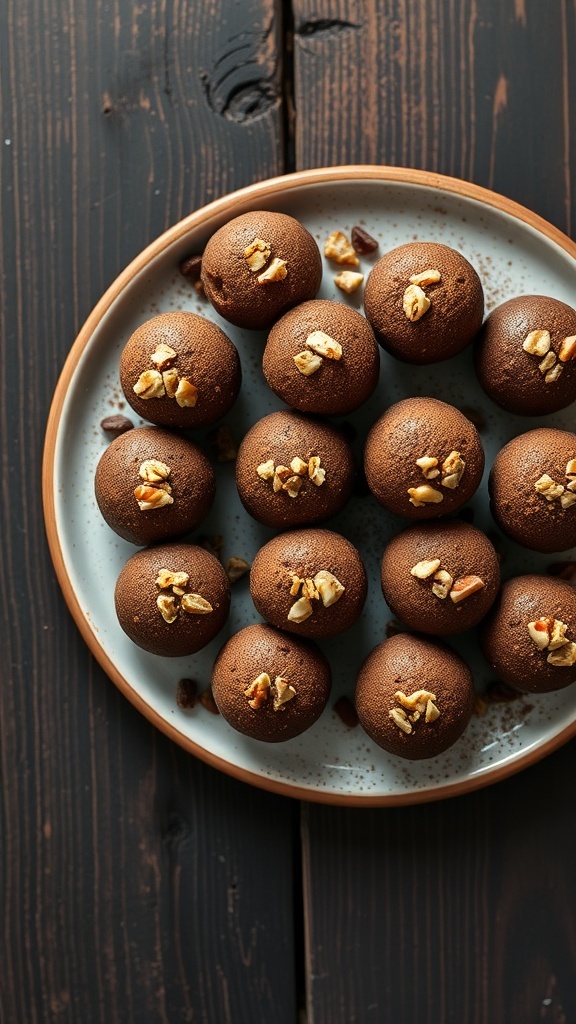
These raw brownie bites are a delightful treat that satisfies your sweet tooth without any baking. They are rich, chocolatey, and packed with wholesome ingredients. The image shows a beautiful plate of round brownie bites, topped with chopped nuts for a little crunch. The dark, fudgy texture is inviting, making them hard to resist!
Making these brownie bites is super easy. You’ll love how simple it is to whip up a batch. Just combine your ingredients, roll them into balls, and chill. They’re perfect for a quick snack or a sweet treat after dinner. Plus, they are vegan and gluten-free, so everyone can enjoy them!
Here’s how you can make your own indulgent raw brownie bites:
Ingredients
- 1 cup walnuts
- 1 cup medjool dates, pitted
- 1/2 cup raw cacao powder
- 1/4 teaspoon sea salt
- 1 teaspoon vanilla extract
- 1/4 cup chopped nuts for topping (optional)
Instructions
- Blend the walnuts in a food processor until they are finely chopped.
- Add the pitted dates, cacao powder, sea salt, and vanilla extract. Process until the mixture is sticky and holds together.
- Using your hands, roll the mixture into small balls, about 1 inch in diameter.
- Place the rolled bites on a plate and sprinkle with chopped nuts if desired.
- Chill in the refrigerator for at least 30 minutes before serving. Enjoy your delicious raw brownie bites!
Luscious Mango Coconut Sorbet
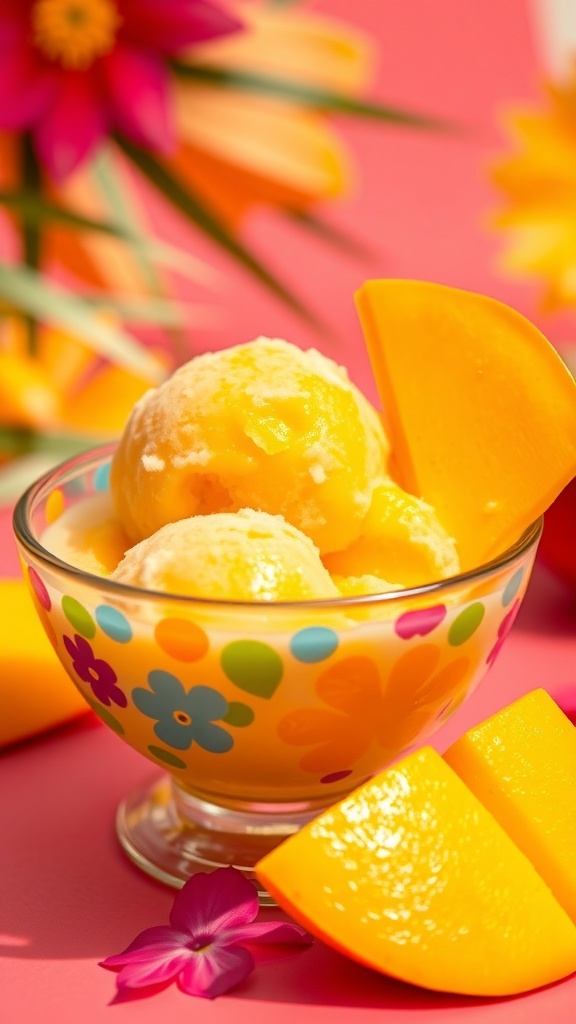
This Mango Coconut Sorbet is a refreshing treat that captures the essence of summer. The vibrant yellow color of the sorbet, paired with the creamy coconut, makes it a feast for the eyes and the taste buds. Served in a cheerful bowl, it’s garnished with a sprig of mint and a slice of fresh mango, adding a pop of color and flavor.
Making this sorbet is simple and requires no baking, making it perfect for warm days. The combination of ripe mango and coconut milk creates a smooth, creamy texture that feels indulgent without being heavy. It’s a delightful way to enjoy a vegan dessert that everyone will love.
Whether you’re hosting a summer gathering or just treating yourself, this sorbet is sure to impress. Plus, it’s easy to whip up with just a few ingredients!
Ingredients
- 2 ripe mangoes, peeled and diced
- 1 cup coconut milk
- 1/4 cup maple syrup (adjust to taste)
- 1 tablespoon lime juice
- Fresh mint leaves for garnish
- Slices of mango for serving
Instructions
- Blend the mangoes in a blender until smooth.
- Add coconut milk, maple syrup, and lime juice to the blender. Blend again until everything is well combined.
- Taste the mixture and adjust sweetness if needed by adding more maple syrup.
- Pour the mixture into a shallow dish and freeze for about 4 hours, stirring every hour to break up any ice crystals.
- Once the sorbet is fully frozen, scoop into bowls and garnish with mint leaves and mango slices before serving.
Simple No-Bake Oatmeal Cookies
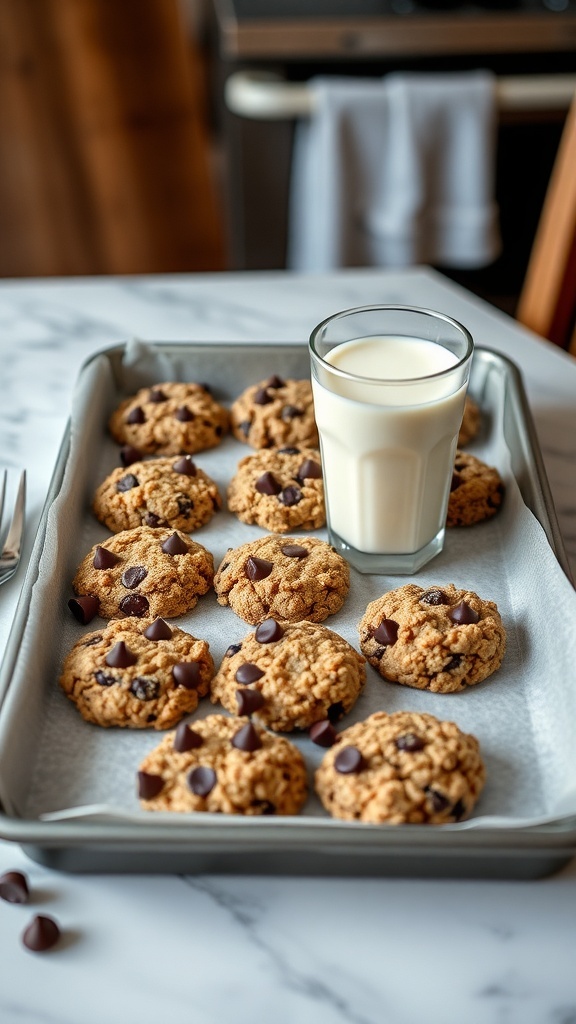
No-bake oatmeal cookies are a delightful treat that everyone can enjoy. They are easy to make and require no oven, making them perfect for warm days or quick snacks. The image shows a tray filled with these delicious cookies, paired with a glass of milk. The cookies are golden brown, dotted with chocolate chips, and look incredibly inviting.
These cookies are not only tasty but also packed with wholesome ingredients. Oats provide a great base, while nut butter adds creaminess and flavor. The chocolate chips give a sweet touch that makes them irresistible.
Making no-bake oatmeal cookies is simple. You just mix the ingredients, shape the cookies, and let them set. They are perfect for kids to help with, making it a fun activity for the whole family.
Ingredients
- 2 cups rolled oats
- 1/2 cup almond butter (or any nut butter)
- 1/4 cup maple syrup
- 1/4 cup cocoa powder
- 1/2 cup chocolate chips
- 1 teaspoon vanilla extract
- Pinch of salt
Instructions
- Mix Ingredients: In a large bowl, combine rolled oats, almond butter, maple syrup, cocoa powder, chocolate chips, vanilla extract, and a pinch of salt. Stir until everything is well combined.
- Shape Cookies: Using your hands, form small balls or patties from the mixture and place them on a lined baking sheet.
- Chill: Refrigerate the cookies for about 30 minutes to set.
- Enjoy: Once set, enjoy your no-bake oatmeal cookies with a glass of milk or your favorite beverage!
Delightful Almond Joy Energy Bites

These Almond Joy Energy Bites are a fun twist on the classic candy bar. They are packed with flavor and are super easy to make. The image shows these delightful bites rolled in chocolate and topped with almonds and coconut flakes, making them look as good as they taste.
Perfect for a quick snack or a sweet treat, these energy bites are a great way to satisfy your cravings without any baking involved. Just mix, roll, and enjoy! They are also vegan, making them a fantastic option for everyone.
Ingredients
- 1 cup dates, pitted
- 1 cup almond flour
- 1/2 cup unsweetened cocoa powder
- 1/4 cup maple syrup
- 1/2 cup shredded coconut
- 1/2 cup whole almonds
- 1/4 cup dark chocolate chips (vegan)
- 1 tablespoon coconut oil
Instructions
- Blend the Dates: In a food processor, blend the pitted dates until they form a sticky paste.
- Add Ingredients: Add almond flour, cocoa powder, maple syrup, and shredded coconut. Blend until well combined.
- Shape the Bites: Scoop out the mixture and roll it into small balls. Place them on a parchment-lined tray.
- Melt the Chocolate: In a microwave-safe bowl, melt the dark chocolate chips and coconut oil together until smooth.
- Coat the Bites: Dip each energy bite into the melted chocolate, then roll them in shredded coconut and top with an almond.
- Chill: Place the tray in the fridge for about 30 minutes to set the chocolate.
- Enjoy: Once set, enjoy your Almond Joy Energy Bites as a delicious snack!
Vegan Pumpkin Pie Pudding
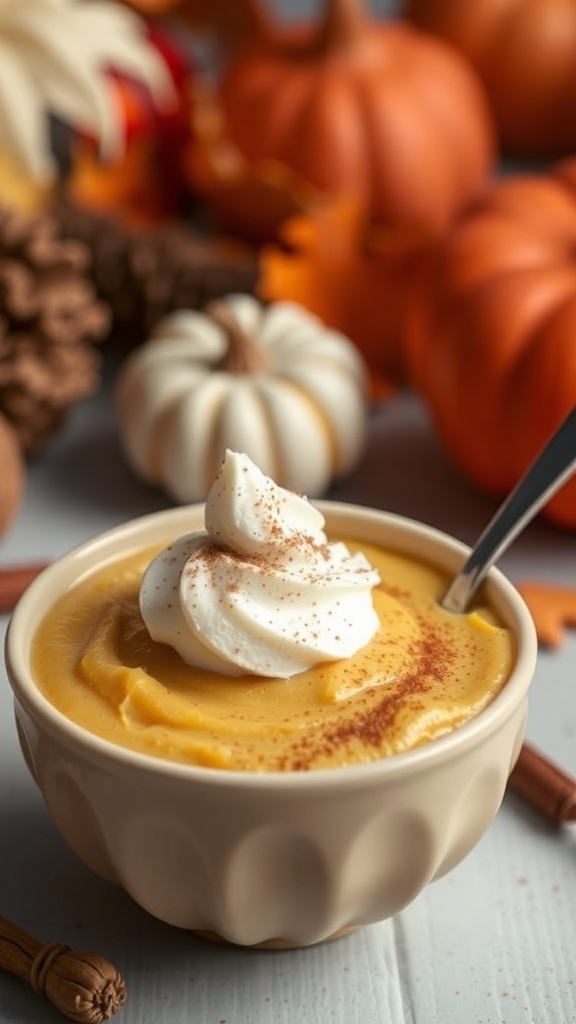
This Vegan Pumpkin Pie Pudding is a delightful treat that captures the essence of fall in every spoonful. The creamy texture and warm spices make it perfect for any occasion. The image shows a beautifully presented bowl of pumpkin pudding topped with a swirl of whipped cream and a sprinkle of cinnamon. Surrounding the bowl are charming autumn decorations, including small pumpkins and pinecones, adding to the cozy vibe.
Making this pudding is simple and requires no baking, making it a great option for those busy days. You’ll love how quick it comes together, and it’s a fantastic way to enjoy the flavors of pumpkin without the fuss of a traditional pie.
Ingredients
- 1 can (15 oz) pumpkin puree
- 1 cup coconut milk
- 1/4 cup maple syrup
- 1 teaspoon vanilla extract
- 1 teaspoon pumpkin pie spice
- 1/4 teaspoon salt
- 1 tablespoon cornstarch
- Whipped coconut cream for topping
Instructions
- In a medium saucepan, combine pumpkin puree, coconut milk, maple syrup, vanilla extract, pumpkin pie spice, and salt. Stir well to combine.
- In a small bowl, mix cornstarch with a few tablespoons of the pumpkin mixture to create a slurry. Add this back into the saucepan.
- Cook over medium heat, stirring constantly, until the mixture thickens, about 5-7 minutes.
- Remove from heat and let it cool slightly before transferring to serving bowls.
- Chill in the refrigerator for at least 1 hour. Serve topped with whipped coconut cream and a sprinkle of cinnamon.
Coconut Lime Mousse Cups

Coconut Lime Mousse Cups are a delightful treat that combines the tropical flavors of coconut and lime into a creamy, dreamy dessert. These little cups are perfect for any occasion, whether it’s a summer gathering or a cozy night in. The mousse is light and airy, making it a refreshing end to any meal.
The image showcases several mousse cups, each topped with a sprinkle of coconut and a slice of lime. The presentation is simple yet elegant, inviting you to dig in. The bright lime slices add a pop of color, while the creamy texture of the mousse promises a delicious experience.
Making these mousse cups is easy and requires no baking. You’ll love how quickly they come together, and they can be made ahead of time, allowing you to enjoy your time with friends and family.
Ingredients
- 1 can (13.5 oz) coconut milk
- 1/4 cup maple syrup
- 1/4 cup lime juice
- 1 teaspoon vanilla extract
- 1/4 cup coconut cream
- 1 tablespoon agar-agar powder
- 1/4 cup water
- Shredded coconut for topping
- Lime slices for garnish
Instructions
- Prepare the Agar-Agar: In a small saucepan, combine agar-agar powder and water. Bring to a boil, stirring constantly until dissolved. Remove from heat and let cool slightly.
- Mix the Mousse: In a blender, combine coconut milk, maple syrup, lime juice, vanilla extract, and coconut cream. Blend until smooth.
- Add Agar-Agar: Slowly pour the cooled agar-agar mixture into the blender while blending on low speed. Blend until fully incorporated.
- Chill: Pour the mixture into serving cups and refrigerate for at least 2 hours, or until set.
- Serve: Once set, top with shredded coconut and a slice of lime before serving. Enjoy your Coconut Lime Mousse Cups!
Zesty Lemon Cashew Cream Parfaits

These Zesty Lemon Cashew Cream Parfaits are a delightful treat that combines creamy cashew goodness with fresh fruits. The image shows beautifully layered parfaits in tall glasses, showcasing vibrant colors from strawberries, blueberries, and blackberries. The lemon slices on top add a refreshing touch, making them look as good as they taste.
To make these parfaits, you’ll need a few simple ingredients. The creamy layer is made from soaked cashews blended with lemon juice and sweetener, creating a smooth texture that pairs perfectly with crunchy granola and fresh berries. This dessert is not only vegan but also incredibly easy to prepare.
Layering is key here. Start with a spoonful of granola at the bottom, followed by a layer of the cashew cream, then a mix of your favorite berries. Repeat these layers until the glasses are full. The bright colors and textures make these parfaits a feast for the eyes and the taste buds.
Enjoy these parfaits as a light dessert or a refreshing snack. They are perfect for warm days and are sure to impress anyone who tries them!
Ingredients
- 1 cup raw cashews, soaked for 4 hours
- 1/4 cup maple syrup or agave syrup
- 1/4 cup fresh lemon juice
- 1 teaspoon vanilla extract
- 1 cup granola
- 1 cup mixed berries (strawberries, blueberries, blackberries)
- Fresh lemon slices for garnish
Instructions
- Drain and rinse the soaked cashews. In a blender, combine cashews, maple syrup, lemon juice, and vanilla extract. Blend until smooth and creamy.
- In tall glasses, start layering by adding a spoonful of granola at the bottom.
- Add a layer of the cashew cream on top of the granola.
- Next, add a layer of mixed berries.
- Repeat the layers until the glasses are filled, finishing with a layer of berries on top.
- Garnish with fresh lemon slices and serve immediately or chill in the fridge for a bit before serving.
No-Bake Chocolate Hazelnut Tart

This No-Bake Chocolate Hazelnut Tart is a delightful treat that’s both simple and satisfying. The rich chocolate filling pairs perfectly with the nutty flavor of hazelnuts, creating a dessert that’s hard to resist. The tart has a smooth, glossy top and is garnished with whole hazelnuts, making it look as good as it tastes.
Making this tart is a breeze. You don’t need to turn on the oven, which is a huge plus during warm days. The crust is made from crushed nuts and dates, providing a wholesome base that complements the creamy filling. The chocolate layer is rich and indulgent, yet vegan-friendly!
Perfect for any occasion, this tart can be served at parties, family gatherings, or just as a special treat for yourself. It’s a great way to enjoy a sweet without the guilt. Let’s get to the recipe!
Ingredients
- 1 ½ cups crushed hazelnuts
- 1 cup pitted dates
- 1/4 cup cocoa powder
- 1/4 cup coconut oil, melted
- 1/4 cup maple syrup
- 1 cup dark chocolate chips (dairy-free)
- 1/2 cup coconut milk
- 1 teaspoon vanilla extract
- Whole hazelnuts for garnish
Instructions
- Prepare the Crust: In a food processor, blend the crushed hazelnuts and pitted dates until they form a sticky mixture. Press this mixture firmly into the bottom of a tart pan to create an even layer.
- Make the Filling: In a saucepan, combine the dark chocolate chips and coconut milk over low heat. Stir until the chocolate is melted and smooth. Remove from heat and mix in the melted coconut oil, maple syrup, and vanilla extract.
- Assemble the Tart: Pour the chocolate filling over the crust in the tart pan. Spread it evenly and smooth the top with a spatula.
- Chill: Place the tart in the refrigerator for at least 4 hours or until set.
- Serve: Once set, remove the tart from the pan and garnish with whole hazelnuts. Slice and enjoy!
Frozen Strawberry Banana Pops
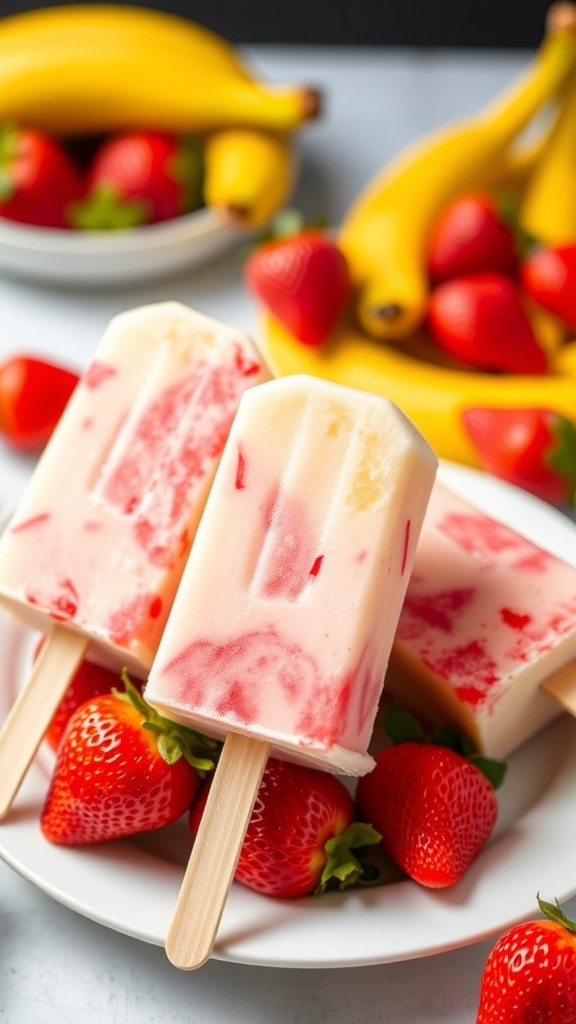
Frozen Strawberry Banana Pops are a delightful treat that combines the sweetness of ripe bananas with the juicy flavor of fresh strawberries. These pops are not only refreshing but also easy to make, making them perfect for warm days or a quick dessert. The image showcases beautifully layered pops, with vibrant red strawberry swirls against a creamy banana base. They look inviting and are sure to please anyone who tries them.
The best part? They’re completely vegan and require no baking! Just grab some simple ingredients, blend them up, and freeze. You’ll have a tasty snack ready in no time.
Ingredients
- 2 ripe bananas
- 1 cup strawberries, hulled
- 1 cup coconut milk
- 2 tablespoons maple syrup (optional)
- 1 teaspoon vanilla extract
Instructions
- Prepare the Strawberries: Blend the hulled strawberries in a blender until smooth. If you like, add a little maple syrup for extra sweetness.
- Make the Banana Mixture: In the same blender, combine the ripe bananas, coconut milk, and vanilla extract. Blend until creamy and smooth.
- Layer the Mixtures: In popsicle molds, alternate layers of the banana mixture and strawberry puree. Use a skewer to swirl them together for a fun effect.
- Freeze: Insert sticks into the molds and freeze for at least 4-6 hours or until solid.
- Enjoy: To remove the pops, run warm water over the outside of the molds for a few seconds. Enjoy your refreshing Frozen Strawberry Banana Pops!
Nutty Date And Coconut Balls

Nutty Date and Coconut Balls are a delightful treat that’s both healthy and satisfying. These little bites are packed with natural sweetness from dates and a creamy texture from nuts. The coconut coating adds a fun crunch and a tropical twist. Perfect for a quick snack or a sweet ending to your meal, they’re sure to please everyone.
Making these balls is super easy. You just blend the ingredients, roll them into balls, and coat them in shredded coconut. They require no baking, making them a great option for those hot days when you don’t want to turn on the oven. Plus, they are vegan and gluten-free!
These treats are not only tasty but also nutritious. Dates provide fiber and essential minerals, while nuts offer healthy fats and protein. Enjoy them as a post-workout snack or a midday pick-me-up!
Ingredients
- 1 cup Medjool dates, pitted
- 1 cup mixed nuts (like almonds and walnuts)
- 1/2 cup shredded coconut, plus more for coating
- 1 tablespoon almond butter (or any nut butter)
- 1 teaspoon vanilla extract
- A pinch of salt
Instructions
- Blend Ingredients: In a food processor, combine the pitted dates, mixed nuts, shredded coconut, almond butter, vanilla extract, and salt. Blend until the mixture is sticky and well combined.
- Form Balls: Take small portions of the mixture and roll them into balls, about 1 inch in diameter.
- Coat with Coconut: Roll each ball in additional shredded coconut until fully coated.
- Chill: Place the balls on a plate and refrigerate for at least 30 minutes to firm up.
- Serve: Enjoy your Nutty Date and Coconut Balls as a snack or dessert!


Comments
Post a Comment