13 Easy Christmas Desserts on a Budget That Taste Amazing
13 Easy Christmas Desserts on a Budget That Taste Amazing
Finding festive desserts that won't break the bank can be tricky, but it doesn't have to be! This collection of easy Christmas treats offers delicious recipes that are not only budget-friendly but also sure to impress friends and family alike. Get ready to whip up some sweet holiday magic without emptying your wallet!
Sweet And Simple Sugar Cookies For Festive Fun

When it comes to holiday baking, sugar cookies are a classic choice. They’re easy to make and can be decorated in so many fun ways. The image shows a delightful plate filled with star-shaped sugar cookies, some adorned with colorful sprinkles and icing. The festive decorations make these cookies perfect for any holiday gathering.
These cookies not only taste great but also bring a sense of joy to the kitchen. Baking together with family or friends can create lasting memories. Plus, you can customize the decorations to match your holiday theme!
Let’s jump into the recipe so you can whip up your own batch of these sweet treats!
Ingredients
- 2 3/4 cups all-purpose flour
- 1 teaspoon baking soda
- 1/2 teaspoon baking powder
- 1 cup unsalted butter, softened
- 1 1/2 cups white sugar
- 1 egg
- 1 teaspoon vanilla extract
- 1/2 teaspoon almond extract (optional)
- 3 to 4 tablespoons of decorating icing
- Sprinkles for decoration
Instructions
- Preheat your oven to 375°F (190°C).
- In a small bowl, stir together flour, baking soda, and baking powder. Set aside.
- In a large bowl, cream together the butter and sugar until smooth. Beat in the egg, vanilla extract, and almond extract.
- Gradually blend in the dry ingredients. Roll rounded teaspoonfuls of dough into balls, and place onto ungreased cookie sheets. Flatten each ball slightly with the bottom of a glass.
- Bake 8 to 10 minutes in the preheated oven, or until golden. Let cool on wire racks.
- Once cooled, decorate with icing and sprinkles as desired.
Classic Chocolate Chip Cookies With A Holiday Twist

Chocolate chip cookies are a timeless treat, and during the holiday season, they can be dressed up with festive touches. Imagine warm, gooey cookies fresh out of the oven, sprinkled with colorful holiday candies and a touch of sparkle. These cookies not only taste great but also look delightful on any holiday dessert table.
Making these cookies is simple and budget-friendly. You can whip up a batch without breaking the bank. The addition of holiday-themed candies brings a cheerful vibe, making them perfect for sharing with friends and family. Plus, they make a great gift when packaged in a cute box!
Gather your ingredients and let’s get baking. You’ll love how easy it is to create these classic cookies with a fun holiday twist!
Ingredients
- 2 1/4 cups all-purpose flour
- 1 teaspoon baking soda
- 1 teaspoon salt
- 1 cup unsalted butter, softened
- 3/4 cup granulated sugar
- 3/4 cup brown sugar, packed
- 1 teaspoon vanilla extract
- 2 large eggs
- 2 cups semi-sweet chocolate chips
- 1/2 cup holiday-themed candies (like M&Ms or sprinkles)
- 1/4 cup coarse sea salt (for topping)
Instructions
- Preheat the Oven: Start by preheating your oven to 375°F (190°C).
- Mix Dry Ingredients: In a bowl, whisk together the flour, baking soda, and salt. Set aside.
- Cream Butter and Sugars: In a large mixing bowl, beat the softened butter, granulated sugar, and brown sugar until creamy. Add the vanilla and eggs, mixing until well combined.
- Combine Mixtures: Gradually add the dry ingredients to the wet mixture, stirring until just combined. Fold in the chocolate chips and holiday candies.
- Scoop and Bake: Drop rounded tablespoons of dough onto ungreased baking sheets. Sprinkle a little coarse sea salt on top of each cookie. Bake for 9-11 minutes or until golden brown.
- Cool and Enjoy: Let the cookies cool on the baking sheets for a few minutes before transferring them to wire racks to cool completely.
Chewy Gingerbread Cookies For A Holiday Classic

Gingerbread cookies are a timeless holiday treat that brings warmth and cheer to any gathering. The image showcases a delightful assortment of colorful, decorated cookies, each shaped like stars and adorned with festive icing and candies. These treats are not just visually appealing; they are also packed with the classic flavors of ginger, cinnamon, and molasses.
Making gingerbread cookies is a fun and budget-friendly way to celebrate the season. You can involve family and friends in the decorating process, turning it into a joyful activity. Plus, these cookies can be made in large batches, making them perfect for sharing or gifting.
Here’s a simple recipe to create your own chewy gingerbread cookies at home. Enjoy the process and the delicious results!
Ingredients
- 3 cups all-purpose flour
- 1 tablespoon ground ginger
- 1 tablespoon ground cinnamon
- 1/2 teaspoon ground cloves
- 1 teaspoon baking soda
- 1/2 teaspoon salt
- 1/2 cup unsalted butter, softened
- 1 cup brown sugar, packed
- 1/2 cup molasses
- 1 large egg
- 1 teaspoon vanilla extract
- Decorative icing and candies for decorating
Instructions
- Preheat your oven to 350°F (175°C). Line baking sheets with parchment paper.
- In a bowl, whisk together flour, ginger, cinnamon, cloves, baking soda, and salt. Set aside.
- In a large bowl, beat the softened butter and brown sugar until creamy. Add molasses, egg, and vanilla, mixing until combined.
- Gradually add the dry ingredients to the wet mixture, stirring until a dough forms. If the dough is too sticky, refrigerate for about 30 minutes.
- Roll out the dough on a floured surface to about 1/4 inch thick. Cut out shapes using cookie cutters and place them on the prepared baking sheets.
- Bake for 8-10 minutes or until the edges are firm. Let them cool on the baking sheets for a few minutes before transferring to wire racks.
- Once cooled, decorate with icing and candies as desired. Let the icing set before serving or storing.
Quick And Easy Rice Krispie Treats With A Festive Spin

Rice Krispie treats are a classic favorite, and during the holiday season, they can be transformed into delightful festive trees. These treats are not only simple to make but also budget-friendly, making them perfect for holiday gatherings. The image showcases adorable little Christmas tree-shaped treats, decorated with chocolate drizzle and topped with star-shaped candies. They bring a fun and cheerful vibe to any holiday table.
To make these treats, you’ll need just a few ingredients. The combination of marshmallows and Rice Krispies creates a sweet and crunchy base. Adding a splash of green food coloring gives them that festive look. The chocolate drizzle adds a touch of elegance and flavor, while the star on top completes the holiday theme.
Ingredients
- 3 tablespoons unsalted butter
- 1 package (10 oz) mini marshmallows
- 6 cups Rice Krispies cereal
- Green food coloring
- 1/2 cup chocolate chips
- Star-shaped candies for decoration
Instructions
- Melt the Butter: In a large saucepan, melt the butter over low heat. Add the mini marshmallows and stir until completely melted and smooth.
- Add Color: Remove from heat and add a few drops of green food coloring, mixing until you achieve your desired shade.
- Mix in Cereal: Stir in the Rice Krispies cereal until well coated with the marshmallow mixture.
- Shape the Trees: Let the mixture cool slightly. Then, mold the mixture into small tree shapes, stacking them to create a layered look.
- Decorate: Melt the chocolate chips in the microwave or over a double boiler. Drizzle the melted chocolate over the trees and place a star-shaped candy on top.
- Let Set: Allow the treats to cool and the chocolate to harden before serving.
These quick and easy Rice Krispie treats with a festive spin will surely impress your guests and make your holiday celebrations even sweeter!
Delicious Peppermint Bark To Share With Loved Ones

Peppermint bark is a festive treat that brings joy to any holiday gathering. The image showcases a delightful arrangement of dark and white chocolate bark, topped with crushed peppermint candies. This sweet treat not only looks beautiful but also tastes amazing. It's perfect for sharing with family and friends during the holiday season.
Making peppermint bark is simple and budget-friendly. You can whip up a batch in no time, and it makes for a great gift or dessert to enjoy at home. The combination of rich chocolate and refreshing peppermint is a classic that everyone loves.
Gather your loved ones and enjoy the process of making this treat together. It’s a fun way to create memories while preparing something delicious. Plus, the aroma of melting chocolate and peppermint will fill your kitchen with holiday cheer!
Ingredients
- 8 ounces dark chocolate, chopped
- 8 ounces white chocolate, chopped
- 1/2 cup crushed peppermint candies
- 1 teaspoon peppermint extract (optional)
Instructions
- Melt the Dark Chocolate: In a microwave-safe bowl, melt the dark chocolate in 30-second intervals, stirring in between until smooth.
- Spread the Dark Chocolate: Pour the melted dark chocolate onto a parchment-lined baking sheet. Spread it into an even layer and let it cool for about 10 minutes.
- Melt the White Chocolate: In another bowl, melt the white chocolate using the same method as the dark chocolate.
- Add Peppermint Extract: If desired, stir in the peppermint extract to the melted white chocolate for an extra kick.
- Spread the White Chocolate: Pour the melted white chocolate over the cooled dark chocolate layer. Use a spatula to spread it evenly.
- Add Crushed Peppermint: Sprinkle the crushed peppermint candies over the top while the white chocolate is still warm. Press them down gently to ensure they stick.
- Chill: Place the baking sheet in the refrigerator for about 30 minutes or until the chocolate is completely set.
- Break into Pieces: Once set, remove the bark from the baking sheet and break it into pieces. Enjoy sharing this delightful treat!
Fruit-Filled Mini Cheesecakes For A Light Dessert

These fruit-filled mini cheesecakes are perfect for a light dessert during the holiday season. They look festive and are easy to make, making them a great choice for gatherings. Each mini cheesecake is topped with fresh berries, adding a pop of color and flavor. The creamy cheesecake filling pairs beautifully with the crunchy crust, creating a delightful treat that everyone will love.
Using simple ingredients, you can whip these up without breaking the bank. They’re not only delicious but also visually appealing, making them a hit at any holiday party. Plus, they can be made ahead of time, which is always a bonus during the busy holiday season.
Ingredients
- 1 cup graham cracker crumbs
- 1/4 cup granulated sugar
- 1/4 cup unsalted butter, melted
- 16 oz cream cheese, softened
- 1/2 cup powdered sugar
- 1 teaspoon vanilla extract
- 2 large eggs
- 1 cup mixed fresh berries (strawberries, blueberries, raspberries)
- Fresh mint leaves for garnish
Instructions
- Preheat the oven to 325°F (160°C). Line a muffin tin with paper liners.
- In a bowl, mix graham cracker crumbs, granulated sugar, and melted butter. Press this mixture into the bottom of each muffin liner to form the crust.
- In another bowl, beat the cream cheese until smooth. Add powdered sugar and vanilla extract, mixing until well combined.
- Beat in the eggs one at a time until just blended. Avoid overmixing.
- Pour the cheesecake mixture over the crusts in the muffin tin, filling each about 2/3 full.
- Bake for 18-20 minutes, or until the centers are set. Let them cool completely.
- Once cooled, top each mini cheesecake with fresh berries and a mint leaf for garnish.
- Chill in the refrigerator for at least 2 hours before serving.
Traditional Snickerdoodle Cookies For A Sweet Treat

Snickerdoodle cookies are a classic holiday favorite, known for their soft texture and delightful cinnamon-sugar coating. These cookies are not only easy to make but also budget-friendly, making them perfect for festive gatherings without breaking the bank.
In the image, you can see a stack of freshly baked snickerdoodle cookies, lightly dusted with sugar and cinnamon. They look warm and inviting, ready to be enjoyed with a glass of milk. The cozy kitchen setting in the background adds to the charm, making it feel like a perfect winter day.
Making snickerdoodles is a simple process. You’ll need common ingredients that you likely already have in your pantry. This recipe is a great way to bring some holiday cheer into your home without spending a lot.
Ingredients
- 1 cup unsalted butter, softened
- 1 1/2 cups granulated sugar
- 2 large eggs
- 2 3/4 cups all-purpose flour
- 2 teaspoons cream of tartar
- 1 teaspoon baking soda
- 1/4 teaspoon salt
- 3 tablespoons sugar (for rolling)
- 3 teaspoons ground cinnamon (for rolling)
Instructions
- Preheat your oven to 350°F (175°C) and line a baking sheet with parchment paper.
- In a large bowl, cream together the softened butter and granulated sugar until light and fluffy.
- Add the eggs one at a time, mixing well after each addition.
- In another bowl, whisk together the flour, cream of tartar, baking soda, and salt. Gradually add this dry mixture to the wet ingredients, mixing until just combined.
- In a small bowl, combine the sugar and cinnamon for rolling.
- Roll the dough into balls about 1 inch in diameter, then roll each ball in the cinnamon-sugar mixture.
- Place the coated dough balls on the prepared baking sheet, spacing them about 2 inches apart.
- Bake for 8-10 minutes, or until the edges are lightly golden. The centers may look slightly underbaked, but they will firm up as they cool.
- Let the cookies cool on the baking sheet for a few minutes before transferring them to a wire rack to cool completely.
Creamy Eggnog Pudding Cups For A Festive Delight
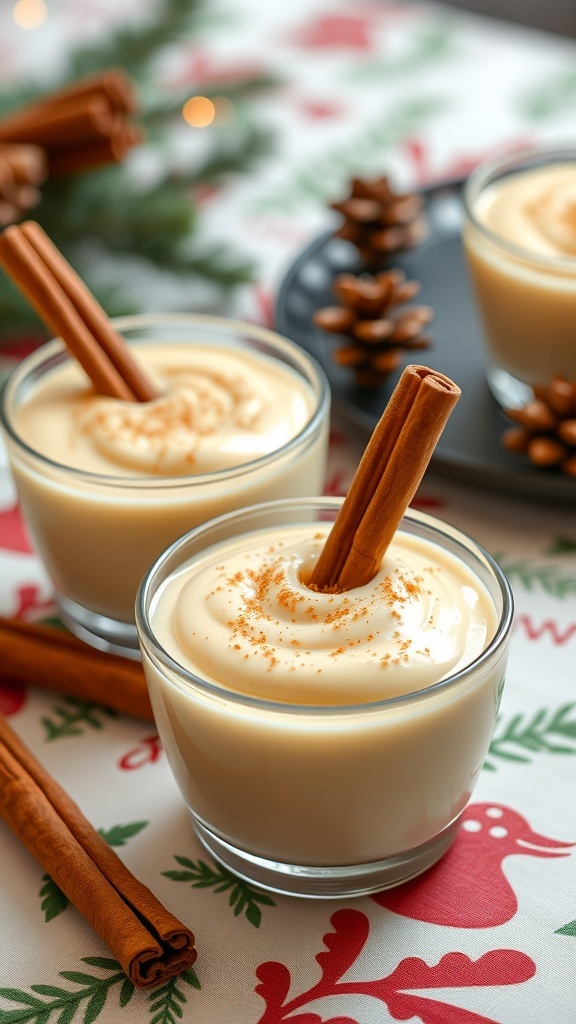
These creamy eggnog pudding cups are a delightful treat for the holiday season. They look festive with their smooth texture and are topped with a sprinkle of nutmeg and a cinnamon stick. Perfect for gatherings, these cups bring a touch of holiday cheer to any table.
Making these pudding cups is easy and budget-friendly. You can whip them up in no time, using simple ingredients that won’t break the bank. They are sure to impress your guests and satisfy your sweet tooth!
Ingredients
- 2 cups milk
- 1 cup eggnog
- 1/2 cup granulated sugar
- 1/4 cup cornstarch
- 1/4 teaspoon salt
- 1 teaspoon vanilla extract
- 1/2 teaspoon ground nutmeg
- Whipped cream for topping
- Cinnamon sticks for garnish
Instructions
- In a medium saucepan, combine milk, eggnog, sugar, cornstarch, and salt. Whisk until smooth.
- Cook over medium heat, stirring constantly until the mixture thickens and starts to bubble, about 5-7 minutes.
- Remove from heat and stir in vanilla extract and nutmeg.
- Pour the pudding into serving cups and let it cool to room temperature. Then refrigerate for at least 2 hours.
- Before serving, top with whipped cream and garnish with a cinnamon stick.
Easy Apple Crisp With A Crunchy Topping

Apple crisp is a classic dessert that brings warmth and comfort, especially during the holiday season. This dish features tender, sweet apples topped with a crunchy, buttery mixture that creates a delightful contrast in textures. The golden-brown topping is irresistible, especially when served warm with a scoop of vanilla ice cream melting on top.
Making apple crisp is simple and budget-friendly. You can use any apples you have on hand, and the ingredients for the topping are usually pantry staples. This recipe is perfect for gatherings, as it can easily be doubled or halved depending on your needs.
Ingredients
- 6 cups peeled and sliced apples (about 6 medium apples)
- 1/2 cup granulated sugar
- 1 teaspoon ground cinnamon
- 1 tablespoon lemon juice
- 1 cup rolled oats
- 1 cup all-purpose flour
- 1/2 cup packed brown sugar
- 1/2 cup unsalted butter, softened
- 1/2 teaspoon salt
Instructions
- Preheat your oven to 350°F (175°C).
- In a large bowl, mix the sliced apples with granulated sugar, cinnamon, and lemon juice. Spread this mixture evenly in a greased baking dish.
- In another bowl, combine the oats, flour, brown sugar, and salt. Add the softened butter and mix until crumbly.
- Sprinkle the oat mixture over the apples, covering them completely.
- Bake for 30-35 minutes, or until the topping is golden brown and the apples are bubbly.
- Let it cool slightly before serving. Enjoy it warm with a scoop of ice cream!
Chocolate-Dipped Pretzels For A Sweet And Salty Snack

Chocolate-dipped pretzels are a delightful treat that perfectly balances sweet and salty flavors. They are easy to make and can be a fun activity for the whole family. The image showcases a beautiful plate of these pretzels, adorned with colorful sprinkles, making them festive for the holiday season. The warm glow of candles and the holiday decorations in the background add to the cozy atmosphere, inviting everyone to indulge in this simple yet delicious snack.
These pretzels are not just tasty; they are also budget-friendly. With just a few ingredients, you can whip up a batch that will impress your guests or make for a great gift. Plus, they are versatile! You can customize them with different toppings or types of chocolate.
Ingredients
- 1 bag of pretzel rods or twists
- 2 cups chocolate chips (milk, dark, or white)
- 1 tablespoon coconut oil (optional, for smooth melting)
- Sprinkles or crushed nuts for topping
Instructions
- Melt the Chocolate: In a microwave-safe bowl, combine the chocolate chips and coconut oil. Heat in 30-second intervals, stirring in between, until the chocolate is fully melted and smooth.
- Dip the Pretzels: Hold each pretzel by one end and dip it into the melted chocolate, covering about half of it. Let the excess chocolate drip off.
- Add Toppings: While the chocolate is still wet, sprinkle your choice of toppings over the dipped pretzel.
- Set to Cool: Place the dipped pretzels on a baking sheet lined with parchment paper. Allow them to cool and harden at room temperature or in the fridge for quicker results.
- Serve and Enjoy: Once the chocolate has set, your pretzels are ready to be enjoyed! They make a great snack or a lovely gift for friends and family.
Simple White Chocolate Cranberry Bark For A Festive Treat
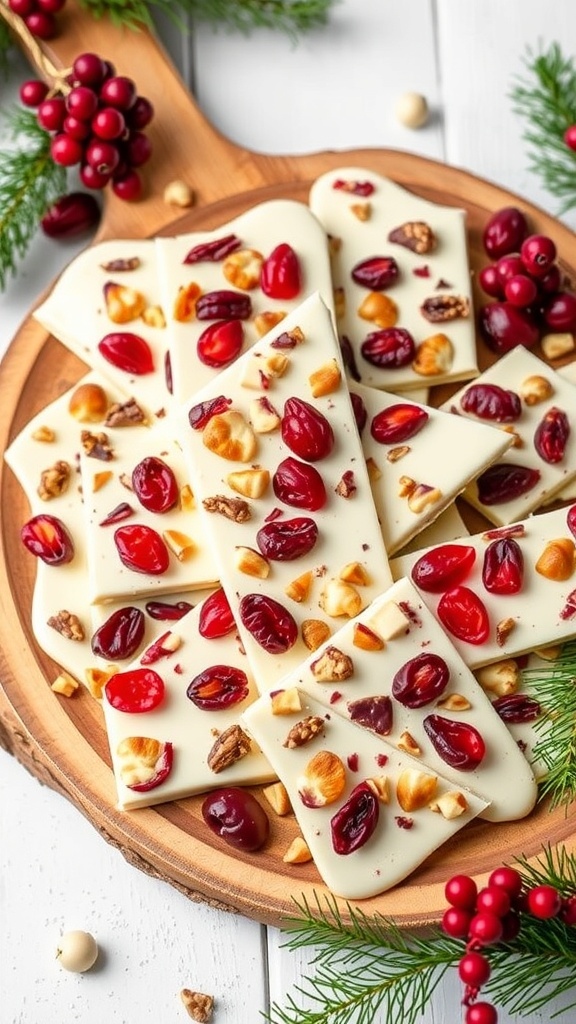
This white chocolate cranberry bark is a delightful and easy treat that captures the spirit of the holidays. The image shows a beautiful platter of white chocolate bark, topped with vibrant cranberries and crunchy nuts. It’s not only visually appealing but also a perfect blend of sweet and tart flavors.
Making this bark is a breeze, and it won’t break the bank. You can whip it up in no time, making it a great option for last-minute gifts or festive gatherings. The combination of creamy white chocolate and tangy cranberries creates a festive treat that everyone will love.
Gather your friends and family for a fun baking session, or make it solo while enjoying your favorite holiday tunes. This treat is sure to bring smiles and joy to your holiday celebrations!
Ingredients
- 2 cups white chocolate chips
- 1 cup dried cranberries
- 1/2 cup chopped nuts (like pecans or almonds)
- 1/4 teaspoon sea salt
Instructions
- Melt the White Chocolate: In a microwave-safe bowl, melt the white chocolate chips in 30-second intervals, stirring in between until smooth.
- Add Toppings: Once melted, pour the chocolate onto a parchment-lined baking sheet. Spread it out evenly. Sprinkle the dried cranberries and chopped nuts over the melted chocolate. Finish with a light sprinkle of sea salt.
- Chill: Place the baking sheet in the refrigerator for about 1-2 hours, or until the chocolate has completely hardened.
- Break into Pieces: Once set, remove the bark from the parchment paper and break it into pieces. Enjoy your festive treat!
Cinnamon Roll Casserole For A Holiday Breakfast Treat

Cinnamon Roll Casserole is a delightful way to start your holiday morning. This dish combines the classic flavors of cinnamon rolls with the ease of a casserole. It’s perfect for gatherings, allowing everyone to enjoy a warm, gooey treat without the fuss of individual rolls.
The image shows a beautifully baked cinnamon roll casserole topped with a creamy glaze. The rolls are golden brown and fluffy, inviting you to dig in. Surrounding the casserole are festive decorations, adding to the holiday spirit. A cup of coffee sits nearby, making it an ideal breakfast choice.
This recipe is not only delicious but also budget-friendly, making it a great option for those looking to save money during the holiday season. Let’s get into the ingredients and steps to make this tasty dish!
Ingredients
- 2 cans of refrigerated cinnamon rolls
- 4 large eggs
- 1 cup milk
- 1 teaspoon vanilla extract
- 1 teaspoon ground cinnamon
- 1/4 cup brown sugar
- 1/4 cup maple syrup (optional)
- 1/2 cup chopped pecans (optional)
Instructions
- Preheat your oven to 350°F (175°C).
- In a large bowl, whisk together the eggs, milk, vanilla extract, ground cinnamon, and brown sugar until well combined.
- Cut the cinnamon rolls into quarters and place them in a greased baking dish.
- Pour the egg mixture over the cinnamon rolls, making sure they are evenly coated.
- If using, drizzle maple syrup over the top and sprinkle with chopped pecans.
- Bake for 25-30 minutes, or until the casserole is puffed and golden brown.
- Remove from the oven and drizzle with the icing that comes with the cinnamon rolls.
- Serve warm and enjoy your festive breakfast!
Quick And Easy Banana Pudding For A Crowd-Pleaser
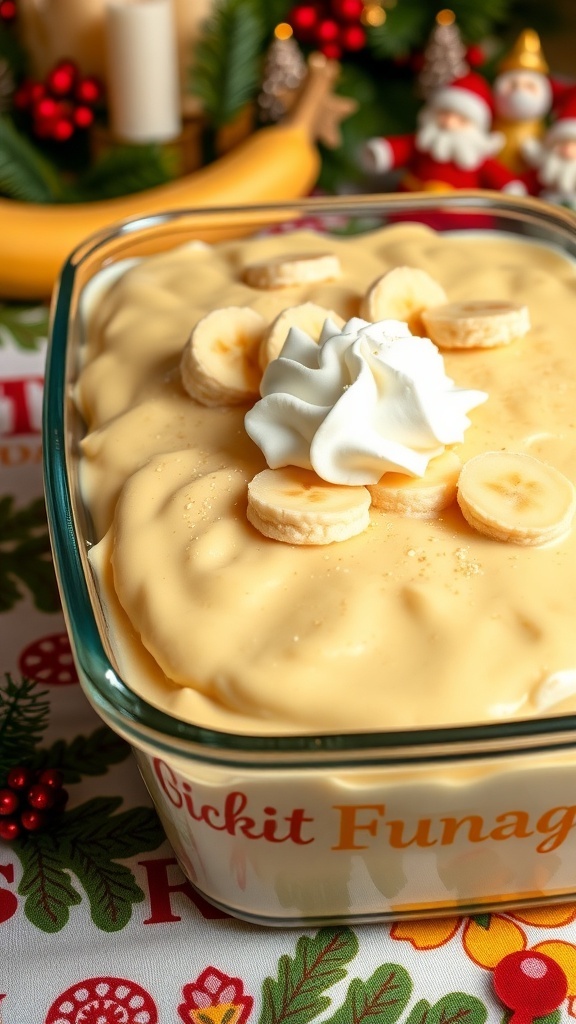
Banana pudding is a classic dessert that never fails to impress. It’s creamy, sweet, and oh-so-comforting, making it a perfect choice for holiday gatherings. This easy recipe is not only budget-friendly but also quick to whip up, ensuring you spend less time in the kitchen and more time enjoying the festivities.
The image showcases a delightful bowl of banana pudding topped with fresh banana slices and a dollop of whipped cream. The vibrant colors and festive decorations in the background hint at the holiday spirit, making this dessert a true crowd-pleaser.
Gather your friends and family around this delicious treat, and watch as they dig in with smiles on their faces. It’s a simple yet satisfying dessert that brings everyone together.
Ingredients
- 1 box (5.1 oz) instant vanilla pudding mix
- 2 cups cold milk
- 1 can (14 oz) sweetened condensed milk
- 1 container (8 oz) whipped topping, thawed
- 4-5 ripe bananas, sliced
- 1 box (12 oz) vanilla wafers
Instructions
- In a large bowl, whisk together the instant pudding mix and cold milk until smooth. Let it sit for about 5 minutes to thicken.
- Fold in the sweetened condensed milk and half of the whipped topping until well combined.
- In a serving dish, layer the vanilla wafers, banana slices, and the pudding mixture. Repeat the layers until all ingredients are used, ending with the pudding on top.
- Spread the remaining whipped topping over the top layer. Decorate with additional banana slices if desired.
- Chill in the refrigerator for at least 2 hours before serving to let the flavors meld together.


Comments
Post a Comment