15 Easy Christmas Desserts That Make Perfect Gifts
15 Easy Christmas Desserts That Make Perfect Gifts
Holiday season is the perfect time to whip up some simple yet delightful desserts that not only satisfy your sweet tooth but also make thoughtful gifts for friends and family. From cookies packed with flavor to beautifully jarred treats, these easy Christmas desserts are sure to bring joy and warmth to anyone lucky enough to receive them. Dive into these homemade ideas that blend creativity and kindness!
Decadent Chocolate Truffles For The Sweet Tooth
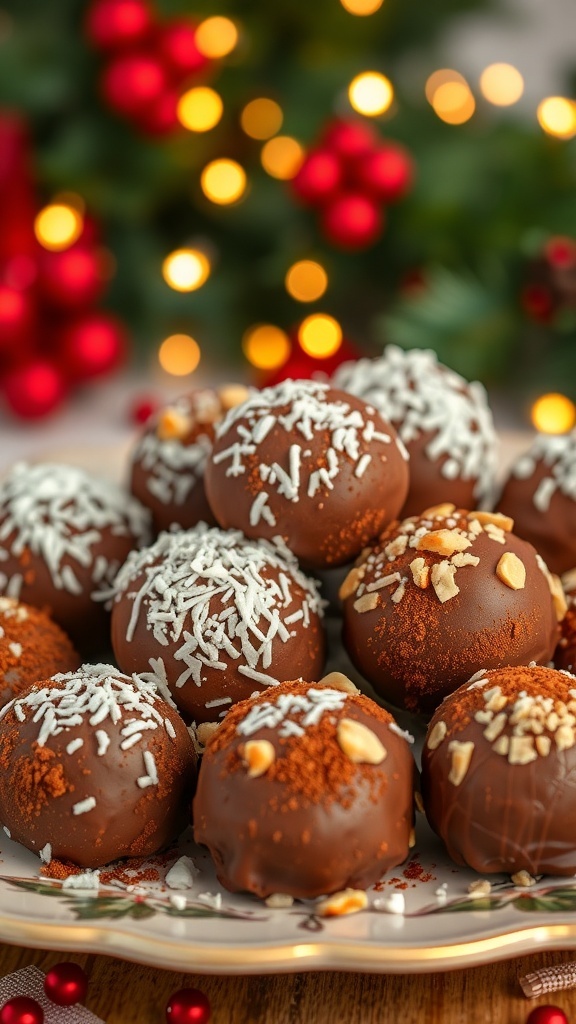
Chocolate truffles are a classic treat that never fails to impress. These little bites of joy are perfect for satisfying any sweet tooth. They come in various flavors and can be decorated in fun ways, making them a delightful gift for the holidays.
The image showcases a beautiful platter of chocolate truffles, each one lovingly coated in rich chocolate and adorned with toppings like shredded coconut, crushed nuts, and a sprinkle of cocoa powder. The festive backdrop of twinkling lights and red ornaments adds a warm holiday touch, making these truffles not just a treat, but a lovely gift idea.
Making chocolate truffles is simple and fun. You can customize them with your favorite flavors, whether it's classic chocolate, raspberry, or even a hint of espresso. They are great for sharing with friends and family or for enjoying on a cozy night in.
Ingredients
- 8 ounces bittersweet chocolate, chopped
- 1/2 cup heavy cream
- 1 teaspoon vanilla extract
- 1/4 cup cocoa powder
- 1/4 cup shredded coconut
- 1/4 cup crushed nuts (like almonds or hazelnuts)
- 1/4 cup powdered sugar
Instructions
- Heat the Cream: In a small saucepan, heat the heavy cream over medium heat until it just begins to simmer. Remove from heat.
- Melt the Chocolate: Add the chopped chocolate to the hot cream and let it sit for a minute. Stir until smooth and fully melted. Mix in the vanilla extract.
- Chill the Mixture: Allow the chocolate mixture to cool at room temperature, then refrigerate for about 1-2 hours until firm.
- Form the Truffles: Once the mixture is firm, use a small scoop or your hands to form small balls. Roll them gently to create a smooth surface.
- Coat the Truffles: Roll the truffles in cocoa powder, shredded coconut, or crushed nuts to coat them. Place them on a platter.
- Serve or Gift: Enjoy immediately or store in an airtight container in the fridge. These truffles make a wonderful gift when packaged in a decorative box!
Classic Gingerbread Cookies With A Twist

Gingerbread cookies are a holiday classic, and they bring a warm, festive spirit to any gathering. The image showcases beautifully decorated gingerbread cookies in various shapes, including stars, trees, and a cheerful gingerbread man. Each cookie is adorned with colorful icing and sprinkles, making them not just tasty but also visually appealing.
These cookies are perfect for gifting. You can package them in pretty boxes or tins, adding a personal touch with a handwritten note. They make thoughtful presents for friends, family, or even coworkers. Plus, baking them together can be a fun holiday activity!
To make your gingerbread cookies stand out, try adding a twist with unique spices or toppings. Think about incorporating cardamom or nutmeg for an extra layer of flavor. You can also experiment with different icing colors or edible glitter to make them sparkle.
Ingredients
- 3 cups all-purpose flour
- 1 tablespoon ground ginger
- 1 tablespoon ground cinnamon
- 1 teaspoon ground nutmeg
- 1 teaspoon baking soda
- 1/2 teaspoon salt
- 3/4 cup unsalted butter, softened
- 3/4 cup brown sugar, packed
- 1 large egg
- 1/2 cup molasses
- 1 teaspoon vanilla extract
- Royal icing for decoration
- Sprinkles and edible decorations
Instructions
- Mix Dry Ingredients: In a bowl, whisk together flour, ginger, cinnamon, nutmeg, baking soda, and salt.
- Beat Butter and Sugar: In another bowl, beat the softened butter and brown sugar until light and fluffy. Add the egg, molasses, and vanilla, mixing until combined.
- Combine Mixtures: Gradually add the dry ingredients to the wet mixture, stirring until a dough forms. Wrap the dough in plastic wrap and refrigerate for at least 1 hour.
- Preheat Oven: Preheat your oven to 350°F (175°C). Line baking sheets with parchment paper.
- Roll and Cut: Roll out the chilled dough on a floured surface to about 1/4 inch thick. Use cookie cutters to cut out shapes and place them on the prepared baking sheets.
- Bake: Bake for 8-10 minutes or until the edges are firm. Let them cool on a wire rack.
- Decorate: Once cooled, use royal icing and sprinkles to decorate your cookies as desired.
Creamy Peppermint Bark For Festive Cheer
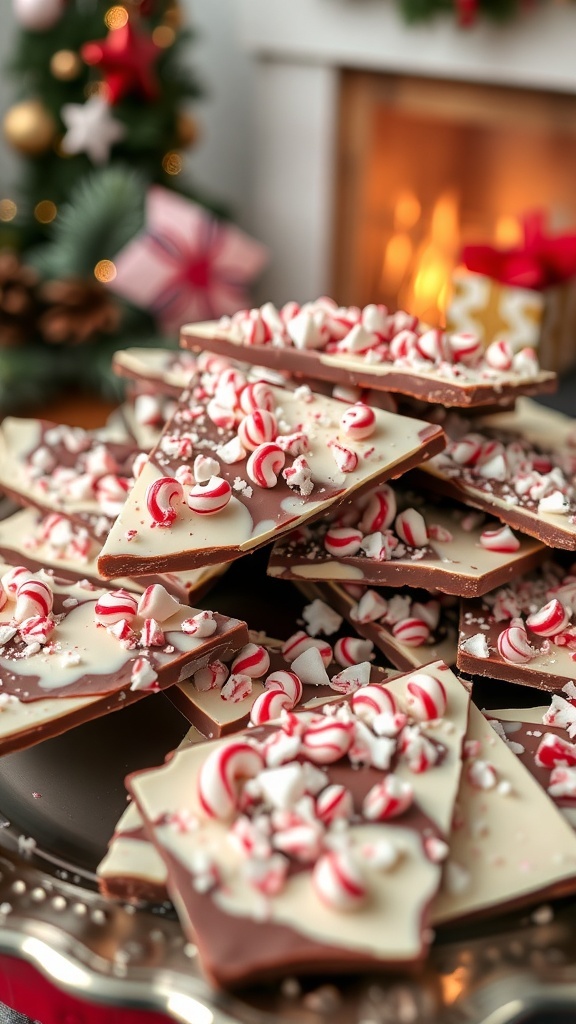
Nothing says holiday cheer quite like creamy peppermint bark. This delightful treat combines rich chocolate with a refreshing peppermint twist, making it perfect for gifting or enjoying at home. The image showcases a beautiful stack of peppermint bark, topped with crushed candy canes, all set against a cozy holiday backdrop. The warm glow of the fireplace and the festive decorations add to the charm, making it an inviting sight.
Making peppermint bark is simple and fun. You can easily whip up a batch to share with friends and family or package it nicely for a thoughtful gift. It’s a treat that brings smiles and spreads joy during the festive season.
Ingredients
- 8 ounces semi-sweet chocolate, chopped
- 8 ounces white chocolate, chopped
- 1 teaspoon peppermint extract
- 1/2 cup crushed candy canes
Instructions
- Melt the semi-sweet chocolate in a heatproof bowl over simmering water or in the microwave in 30-second intervals, stirring until smooth.
- Spread the melted chocolate evenly onto a parchment-lined baking sheet. Refrigerate for about 30 minutes until set.
- In another bowl, melt the white chocolate the same way. Stir in the peppermint extract.
- Pour the white chocolate over the set semi-sweet chocolate and spread evenly. Sprinkle crushed candy canes on top.
- Refrigerate again until fully set, about 1 hour. Once set, break into pieces and enjoy!
Delightful Mini Cheesecakes To Impress

Mini cheesecakes are a fun and festive treat that can brighten up any holiday gathering. These little delights not only look stunning but also taste amazing. Perfectly portioned, they make great gifts for friends and family. Imagine a beautiful display of mini cheesecakes topped with fresh berries and drizzled with fruit sauce, all set against a backdrop of twinkling lights and holiday cheer.
Each cheesecake sits on a buttery graham cracker crust, providing a delightful crunch that complements the creamy filling. The toppings can be customized to suit your taste, whether you prefer strawberries, blueberries, or a mix of both. These mini cheesecakes are sure to impress anyone who receives them!
Ingredients
- 1 cup graham cracker crumbs
- 1/4 cup granulated sugar
- 1/2 cup unsalted butter, melted
- 16 oz cream cheese, softened
- 1/2 cup powdered sugar
- 1 teaspoon vanilla extract
- 2 large eggs
- 1 cup sour cream
- Fresh berries for topping (strawberries, raspberries, blueberries)
- Fruit sauce (optional)
Instructions
- Preheat your oven to 325°F (160°C). Line a muffin tin with paper liners.
- In a bowl, mix graham cracker crumbs, sugar, and melted butter until combined. Press the mixture into the bottom of each muffin liner to form the crust.
- In another bowl, beat the cream cheese until smooth. Add powdered sugar and vanilla, mixing until well combined.
- Add eggs one at a time, mixing well after each addition. Finally, stir in the sour cream until smooth.
- Pour the cheesecake batter over the crusts in the muffin tin, filling each liner about 3/4 full.
- Bake for 18-20 minutes or until the edges are set but the centers are slightly jiggly. Let them cool completely.
- Once cooled, refrigerate for at least 4 hours or overnight. Before serving, top with fresh berries and drizzle with fruit sauce if desired.
Cozy Hot Chocolate Mix In A Jar
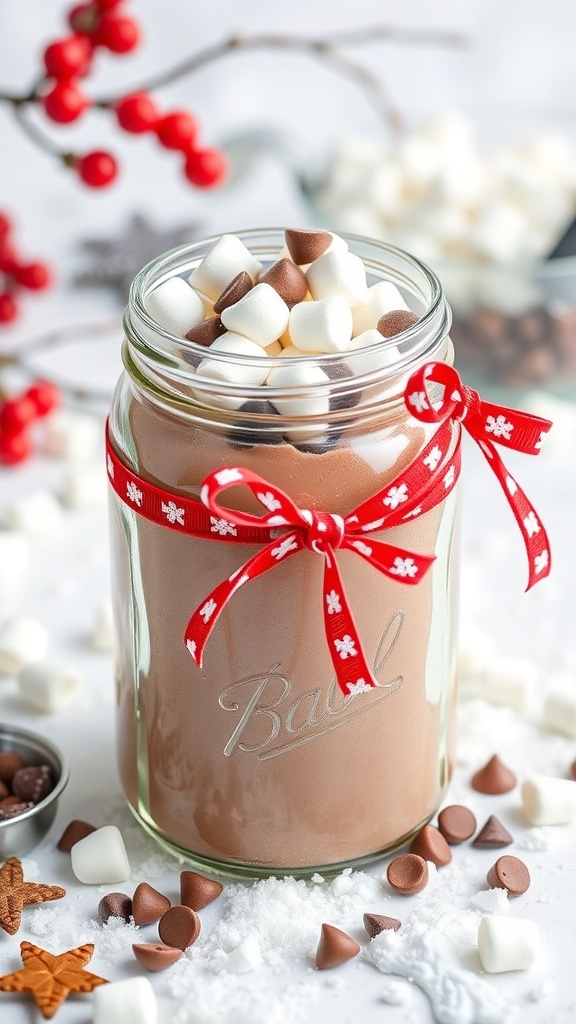
Nothing says cozy like a warm cup of hot chocolate, especially during the chilly holiday season. This hot chocolate mix in a jar makes for a delightful gift that friends and family will love. The jar is filled with rich cocoa powder, sugar, and mini marshmallows, all tied up with a festive ribbon. It’s simple, thoughtful, and perfect for spreading holiday cheer!
To make this hot chocolate mix, you’ll need a few basic ingredients. The beauty of this gift is that it’s not only easy to prepare but also customizable. You can add in chocolate chips, crushed peppermint, or even a sprinkle of cinnamon for a unique twist. The jar itself becomes part of the gift, making it a lovely keepsake for the recipient.
When it’s time to enjoy, all they need to do is mix the contents with hot milk or water, and they’ll have a delicious treat ready in minutes. This is a wonderful way to share the warmth of the season with loved ones.
Ingredients
- 1 cup unsweetened cocoa powder
- 2 cups powdered sugar
- 2 cups powdered milk
- 1/2 cup chocolate chips or mini marshmallows (optional)
- 1 teaspoon salt
- 1 teaspoon vanilla extract (optional)
Instructions
- Combine Ingredients: In a large bowl, mix together the cocoa powder, powdered sugar, powdered milk, and salt until well combined.
- Add Optional Ingredients: If desired, stir in chocolate chips or mini marshmallows for added flavor and texture.
- Jar It Up: Pour the hot chocolate mix into a quart-sized jar, layering it if desired for a decorative look. Seal the jar tightly.
- Add Instructions: Attach a tag with instructions for making hot chocolate: 'To make hot chocolate, mix 1/4 cup of the mix with 1 cup of hot water or milk. Stir until dissolved and enjoy!'
Fruity And Festive Cranberry Bliss Bars

Cranberry Bliss Bars are the perfect blend of sweet and tart, making them a delightful treat for the holiday season. These bars are not just a dessert; they also make a thoughtful gift for friends and family. The vibrant red cranberries add a festive touch, while the creamy frosting on top makes them irresistible.
Picture a platter filled with these beautifully cut bars, each topped with a sprinkle of cranberries and a smooth layer of cream cheese frosting. The warm glow of fairy lights in the background adds to the cozy holiday vibe, making these bars a perfect centerpiece for any gathering.
Making these bars is simple, and they can be prepared ahead of time, allowing you to enjoy the festivities without stress. They’re a great way to share the holiday spirit with loved ones.
Ingredients
- 1 cup unsalted butter, softened
- 1 cup brown sugar, packed
- 1/2 cup granulated sugar
- 2 large eggs
- 1 teaspoon vanilla extract
- 2 cups all-purpose flour
- 1 teaspoon baking powder
- 1/2 teaspoon salt
- 1 1/2 cups dried cranberries
- 1/2 cup white chocolate chips
- 8 oz cream cheese, softened
- 2 cups powdered sugar
- 1 tablespoon lemon juice
- Fresh cranberries for garnish
Instructions
- Preheat your oven to 350°F (175°C) and grease a 9x13 inch baking pan.
- In a large bowl, cream together the softened butter, brown sugar, and granulated sugar until light and fluffy. Beat in the eggs and vanilla extract.
- In another bowl, whisk together the flour, baking powder, and salt. Gradually add this mixture to the butter mixture, stirring until just combined. Fold in the dried cranberries and white chocolate chips.
- Spread the batter evenly in the prepared baking pan. Bake for 25-30 minutes or until a toothpick inserted in the center comes out clean. Let it cool completely.
- For the frosting, beat together the cream cheese, powdered sugar, and lemon juice until smooth. Spread the frosting over the cooled bars.
- Garnish with fresh cranberries and cut into squares. Serve and enjoy!
Charming Snowball Cookies For Holiday Gatherings

Snowball cookies are a delightful treat that perfectly capture the spirit of the holidays. These little bites of joy, dusted with powdered sugar, resemble snowballs and are sure to bring smiles at any gathering. Their soft, buttery texture makes them a favorite among friends and family.
These cookies are not just tasty; they also make wonderful gifts. Pack them in a festive tin or box, and you have a thoughtful present that shows you care. Plus, they’re easy to make, so you can whip up a batch without spending all day in the kitchen.
To make these charming cookies, you’ll need simple ingredients that you probably already have at home. The process is straightforward, making it a fun activity to do with kids or friends. Enjoy them with a warm cup of tea or coffee, and you’ll feel the holiday spirit in every bite!
Ingredients
- 1 cup unsalted butter, softened
- 1/2 cup powdered sugar, plus extra for dusting
- 1 teaspoon vanilla extract
- 2 cups all-purpose flour
- 1/4 teaspoon salt
- 1 cup finely chopped nuts (walnuts or pecans work well)
Instructions
- Preheat your oven to 350°F (175°C) and line a baking sheet with parchment paper.
- In a large bowl, cream together the softened butter and 1/2 cup of powdered sugar until light and fluffy.
- Add the vanilla extract and mix well.
- Gradually add the flour and salt to the butter mixture, mixing until just combined.
- Fold in the chopped nuts until evenly distributed.
- Roll the dough into small balls, about 1 inch in diameter, and place them on the prepared baking sheet.
- Bake for 12-15 minutes, or until the bottoms are lightly golden. The tops should remain pale.
- Once baked, let the cookies cool for a few minutes, then roll them in powdered sugar while they are still warm.
- Allow them to cool completely on a wire rack before dusting them again with powdered sugar for a snowy finish.
Nutty And Delicious Pecan Pie Bars
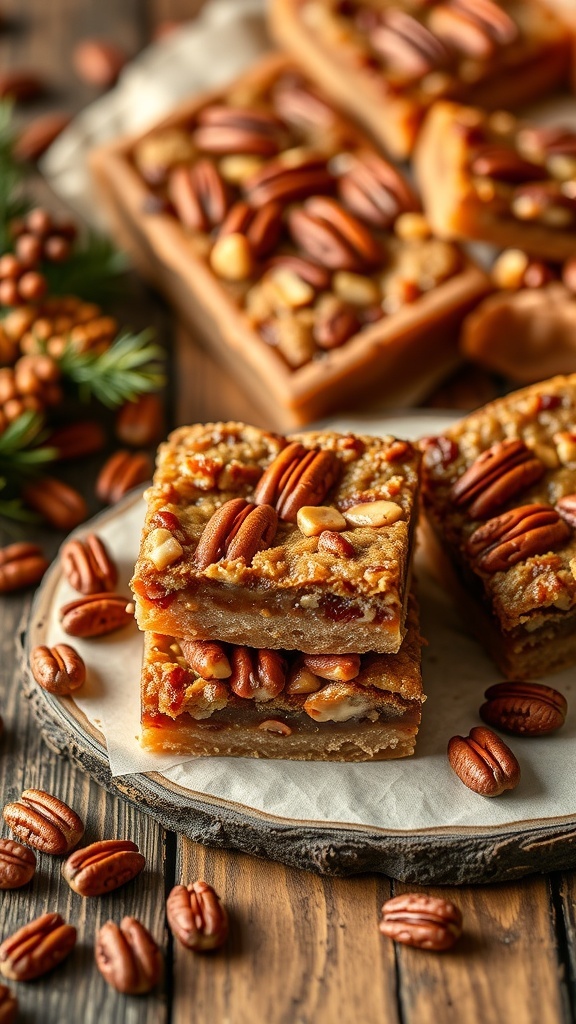
Pecan pie bars are a delightful twist on the classic pecan pie. These treats are perfect for the holiday season, offering a rich, nutty flavor that everyone loves. The image showcases beautifully layered bars topped with crunchy pecans, making them not just tasty but also visually appealing.
These bars are easy to make and can be packaged as thoughtful gifts. They have a buttery crust that complements the gooey pecan filling perfectly. Plus, they’re portable, making them ideal for sharing at holiday gatherings or giving to friends and family.
Let’s get to the good stuff! Here’s how to whip up these nutty delights.
Ingredients
- 1 cup unsalted butter, softened
- 1/2 cup granulated sugar
- 1/2 cup brown sugar, packed
- 2 cups all-purpose flour
- 1/4 teaspoon salt
- 4 large eggs
- 1 cup corn syrup
- 1 teaspoon vanilla extract
- 2 cups pecans, chopped
Instructions
- Preheat your oven to 350°F (175°C). Grease a 9x13 inch baking dish.
- In a large bowl, cream together the softened butter, granulated sugar, and brown sugar until smooth.
- Add the flour and salt, mixing until just combined. Press the mixture into the bottom of the prepared baking dish to form a crust.
- Bake the crust for 15 minutes, then remove it from the oven.
- In another bowl, whisk together the eggs, corn syrup, and vanilla extract until well combined.
- Stir in the chopped pecans, then pour the mixture over the pre-baked crust.
- Bake for an additional 25-30 minutes, or until the filling is set and the top is golden brown.
- Let the bars cool completely in the pan before slicing into squares.
These pecan pie bars are sure to be a hit at your holiday gatherings. Enjoy sharing them with loved ones!
Elegant Chocolate-Covered Pretzels For Gifting
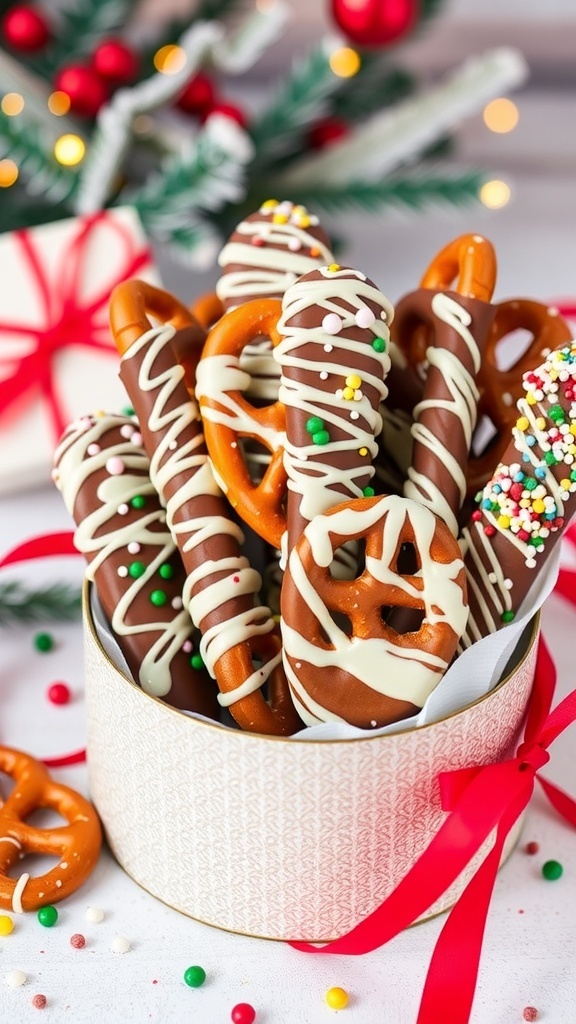
Chocolate-covered pretzels are a delightful treat that brings together sweet and salty flavors. They make a fantastic gift during the holiday season. The image showcases a beautiful assortment of these treats, elegantly arranged in a festive box. The pretzels are coated in rich chocolate and drizzled with white chocolate, adding a touch of sophistication. Sprinkles and colorful decorations enhance their visual appeal, making them perfect for gifting.
Making chocolate-covered pretzels is simple and fun. You can customize them with different toppings to suit your taste. They are not only delicious but also a thoughtful gift for friends and family. Package them in a decorative box or jar, and you have a charming present that anyone would love.
Ingredients
- 1 bag of pretzel rods or traditional pretzels
- 2 cups semi-sweet chocolate chips
- 1 cup white chocolate chips
- Sprinkles (optional)
- Wax paper
Instructions
- Melt the Chocolate: In a microwave-safe bowl, melt the semi-sweet chocolate chips in 30-second intervals, stirring in between until smooth.
- Dip the Pretzels: Dip each pretzel into the melted chocolate, allowing excess to drip off. Place them on a sheet of wax paper.
- Add Toppings: While the chocolate is still wet, sprinkle with colorful sprinkles if desired.
- Drizzle with White Chocolate: Melt the white chocolate chips and drizzle over the pretzels for a decorative touch.
- Let Them Set: Allow the pretzels to cool completely until the chocolate hardens. This can be sped up by placing them in the refrigerator for about 15 minutes.
- Package for Gifting: Once set, arrange the pretzels in a decorative box or jar, and tie with a ribbon for a lovely presentation.
Decadent Salted Caramel Brownies

These salted caramel brownies are a delightful treat that brings together rich chocolate and sweet caramel. The image shows a stack of brownies drizzled with golden caramel, making them look irresistible. The warm glow from the candle and festive decorations in the background add to the cozy holiday vibe.
Perfect for gifting, these brownies are easy to make and sure to impress anyone who receives them. The combination of gooey caramel and fudgy chocolate creates a mouthwatering experience that’s hard to resist. Plus, they’re a great way to spread some holiday cheer!
Ingredients
- 1 cup unsalted butter
- 2 cups granulated sugar
- 4 large eggs
- 1 teaspoon vanilla extract
- 1 cup all-purpose flour
- 1 cup unsweetened cocoa powder
- 1 teaspoon salt
- 1 cup caramel sauce
- 1 teaspoon sea salt for topping
Instructions
- Preheat your oven to 350°F (175°C) and grease a 9x13 inch baking pan.
- In a large saucepan, melt the butter over medium heat. Stir in the sugar until well combined.
- Remove from heat and let it cool slightly. Then, whisk in the eggs and vanilla extract.
- In another bowl, mix the flour, cocoa powder, and salt. Gradually add this to the butter mixture, stirring until just combined.
- Pour half of the brownie batter into the prepared pan. Drizzle half of the caramel sauce over it, then pour the remaining batter on top.
- Finish by drizzling the rest of the caramel sauce over the top. Use a knife to swirl it gently.
- Bake for 25-30 minutes or until a toothpick comes out with a few moist crumbs.
- Once cooled, sprinkle sea salt on top before cutting into squares and serving.
Zesty Lemon Bars For A Refreshing Treat

These zesty lemon bars are a delightful way to brighten up your holiday dessert table. With their vibrant yellow color and dusting of powdered sugar, they look as cheerful as they taste. The combination of a buttery crust and a tangy lemon filling creates a perfect balance of flavors. They’re not just a treat for yourself; they make wonderful gifts too!
Imagine presenting a box of these lemon bars to friends or family. They’re homemade, thoughtful, and sure to bring smiles. Plus, they’re easy to slice and package, making them a great choice for gifting during the festive season.
Let’s get into the recipe so you can whip up these delicious lemon bars!
Ingredients
- 1 cup all-purpose flour
- 1/4 cup powdered sugar
- 1/2 cup unsalted butter, softened
- 2 large eggs
- 1 cup granulated sugar
- 1/4 cup fresh lemon juice
- 1 tablespoon lemon zest
- 1/2 teaspoon baking powder
- 1/4 teaspoon salt
- Powdered sugar for dusting
Instructions
- Preheat your oven to 350°F (175°C). Grease an 8x8 inch baking dish.
- Make the crust: In a bowl, mix flour and powdered sugar. Cut in the softened butter until crumbly. Press this mixture into the bottom of the prepared dish.
- Bake the crust for about 15 minutes or until lightly golden.
- While the crust is baking, prepare the filling: In another bowl, whisk together eggs, granulated sugar, lemon juice, lemon zest, baking powder, and salt until smooth.
- Pour the lemon filling over the hot crust and bake for an additional 20-25 minutes, or until the filling is set.
- Let the bars cool completely in the dish. Once cooled, dust with powdered sugar and cut into squares.
- Serve and enjoy, or package them up for a lovely gift!
Homemade Fudge: A Classic Holiday Delight
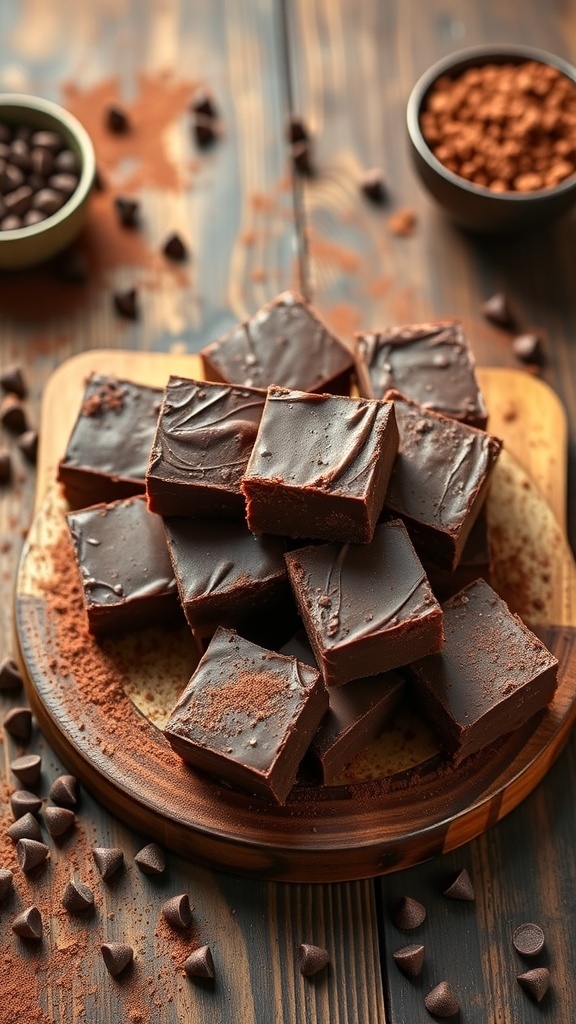
Homemade fudge is a timeless treat that brings warmth and joy during the holiday season. This rich, creamy dessert is perfect for sharing with loved ones or wrapping up as a thoughtful gift. The image shows a beautiful arrangement of fudge squares, showcasing their glossy finish and inviting texture. The scattered chocolate chips and cocoa powder add a delightful touch, hinting at the deliciousness that awaits.
Making fudge at home is easier than you might think. With just a few simple ingredients, you can whip up a batch that will impress everyone. It’s a fun activity to do with family or friends, and the end result is always rewarding. Plus, who wouldn’t love receiving a box of homemade fudge as a gift?
Let’s get started with this classic fudge recipe that’s sure to become a holiday favorite!
Ingredients
- 2 cups granulated sugar
- 1/2 cup unsweetened cocoa powder
- 1/2 cup milk
- 1/4 cup unsalted butter
- 1 teaspoon vanilla extract
- 1 cup chocolate chips
- 1/2 cup chopped nuts (optional)
Instructions
- Prepare the Pan: Line an 8-inch square baking dish with parchment paper, leaving some overhang for easy removal.
- Combine Ingredients: In a medium saucepan, mix together sugar, cocoa powder, milk, and butter. Cook over medium heat, stirring constantly until the mixture comes to a boil.
- Boil: Allow the mixture to boil for about 5 minutes without stirring. Remove from heat.
- Add Flavor: Stir in vanilla extract and chocolate chips until melted and smooth. If using nuts, fold them in at this stage.
- Pour and Set: Pour the fudge into the prepared pan, spreading it evenly. Let it cool at room temperature until set, about 2 hours.
- Cut and Serve: Once set, lift the fudge out using the parchment paper and cut into squares. Enjoy your homemade fudge or package it up as a delightful gift!
Classic Rice Krispie Treats With A Holiday Twist
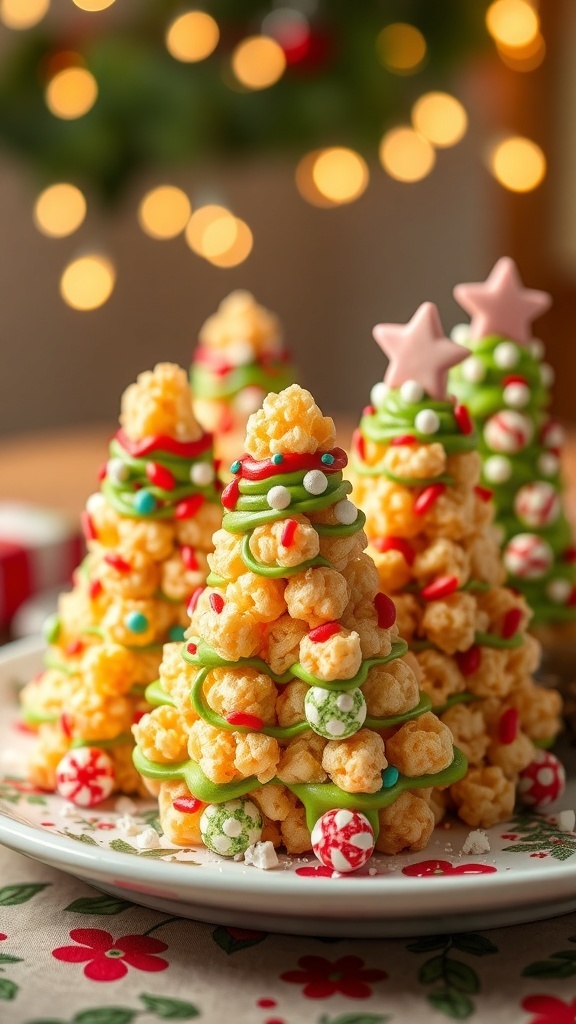
Rice Krispie treats are a timeless favorite, but this holiday season, let’s give them a fun twist! Imagine little Christmas trees made from crispy rice cereal, marshmallows, and festive decorations. These treats are not only easy to make but also perfect for gifting. They bring a smile to anyone who sees them, and they taste just as good as they look!
To make these delightful treats, start by melting butter and marshmallows together until smooth. Then, mix in the Rice Krispies until everything is well coated. Once cooled slightly, shape the mixture into tree forms. Decorate with green icing, colorful sprinkles, and candy ornaments to make them truly festive. These treats are sure to be a hit at any holiday gathering!
Ingredients
- 3 tablespoons unsalted butter
- 4 cups mini marshmallows
- 6 cups Rice Krispies cereal
- Green icing
- Assorted candies (like M&Ms, sprinkles, and candy canes)
- Powdered sugar (for dusting)
Instructions
- Melt the Butter: In a large pot, melt the butter over low heat. Add the mini marshmallows and stir until completely melted and smooth.
- Add the Cereal: Remove from heat and quickly stir in the Rice Krispies until evenly coated with the marshmallow mixture.
- Shape the Trees: Allow the mixture to cool slightly. Grease your hands and shape the mixture into small tree forms, stacking them to create a layered effect.
- Decorate: Use green icing to pipe around the trees and add your favorite candies as ornaments. Get creative!
- Serve: Dust with powdered sugar for a snowy effect and enjoy your festive treats!
Satisfying Chocolate Chip Cookies With A Surprise

Chocolate chip cookies are a classic treat, especially during the holiday season. They bring warmth and joy to any gathering. Imagine biting into a soft, chewy cookie, only to discover a delightful surprise inside. This twist makes them perfect for gifting!
The image shows freshly baked chocolate chip cookies cooling on a rack. Their golden edges and gooey chocolate chips are simply irresistible. Nearby, two glasses of milk sit ready for dipping, adding to the cozy holiday vibe. The festive decorations in the background hint at the season, making these cookies an ideal homemade gift.
These cookies are not just tasty; they are easy to make and can be customized with different fillings. You can add caramel, peanut butter, or even a piece of chocolate in the center for an extra treat. Wrap them up in a cute box or a festive tin, and you have a thoughtful gift that anyone would love!
Ingredients
- 2 1/4 cups all-purpose flour
- 1/2 teaspoon baking soda
- 1 cup unsalted butter, softened
- 3/4 cup granulated sugar
- 3/4 cup packed brown sugar
- 1 teaspoon salt
- 2 teaspoons vanilla extract
- 2 large eggs
- 2 cups semi-sweet chocolate chips
- Optional: 1/2 cup caramel or peanut butter for surprise filling
Instructions
- Preheat your oven to 350°F (175°C) and line a baking sheet with parchment paper.
- In a small bowl, whisk together flour and baking soda. Set aside.
- In a large bowl, cream together the softened butter, granulated sugar, brown sugar, and salt until smooth.
- Add in the vanilla extract and eggs, mixing until well combined.
- Gradually add the flour mixture to the wet ingredients, stirring until just combined. Fold in the chocolate chips.
- If you're adding a surprise filling, scoop a tablespoon of dough, flatten it, place a small amount of caramel or peanut butter in the center, and wrap the dough around it. Roll into a ball.
- Place cookie dough balls on the prepared baking sheet, spacing them about 2 inches apart.
- Bake for 10-12 minutes, or until the edges are golden brown. Let them cool on the baking sheet for a few minutes before transferring to a wire rack.
Delicious S'Mores Bars For A Sweet Treat
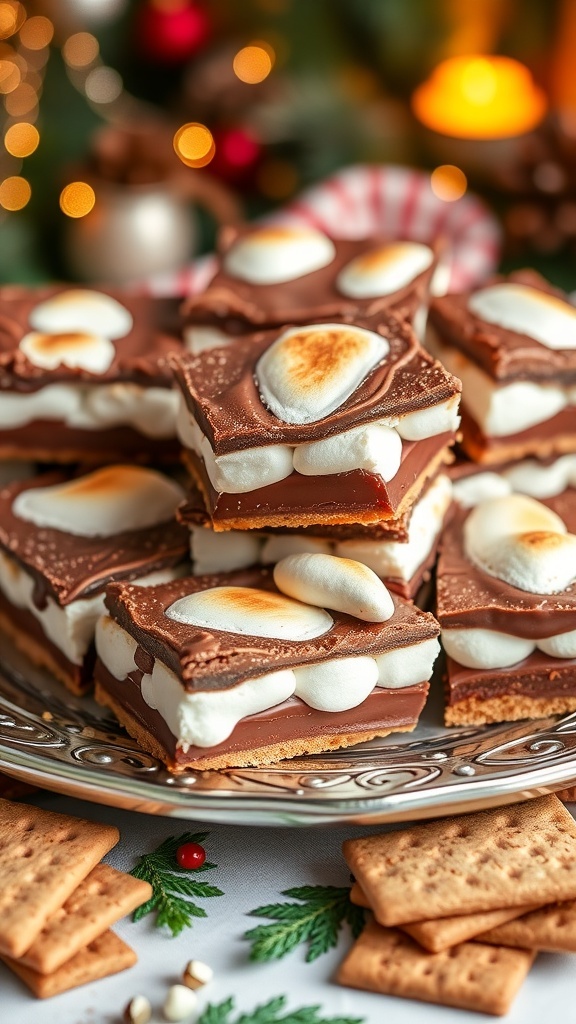
These S'mores bars are a delightful twist on the classic campfire treat. Imagine layers of graham crackers, rich chocolate, and fluffy marshmallows all coming together in one easy-to-make dessert. They’re perfect for sharing during the holidays or wrapping up as gifts for friends and family.
The image showcases these scrumptious bars, stacked high and ready to impress. The golden-brown marshmallows on top look perfectly toasted, adding a touch of nostalgia to each bite. The warm, inviting colors and festive background make these bars even more appealing during the holiday season.
Making S'mores bars is simple and fun. You can whip them up in no time, making them a great option for last-minute gifts. Just slice them into squares, package them nicely, and you’ve got a thoughtful homemade gift that everyone will love!
Ingredients
- 1 cup graham cracker crumbs
- 1/4 cup granulated sugar
- 1/2 cup unsalted butter, melted
- 2 cups milk chocolate chips
- 2 cups mini marshmallows
- 1 teaspoon vanilla extract
- 1/4 cup chocolate syrup (optional, for drizzling)
Instructions
- Preheat your oven to 350°F (175°C). Grease a 9x9-inch baking dish.
- In a bowl, mix graham cracker crumbs, sugar, and melted butter until combined. Press this mixture into the bottom of the prepared baking dish.
- Layer the chocolate chips evenly over the graham cracker crust.
- Spread the mini marshmallows on top of the chocolate layer.
- Bake for about 15 minutes, or until the marshmallows are golden brown.
- Let cool for a few minutes, then drizzle with chocolate syrup if desired. Cut into squares and enjoy!


Comments
Post a Comment