15 Easy Desserts for Meal Prep: Make Once, Enjoy All Week
15 Easy Desserts for Meal Prep: Make Once, Enjoy All Week
If you're looking to satisfy your sweet tooth without spending hours in the kitchen every day, this book has got your back! "Easy Desserts for Meal Prep" is packed with simple, make-ahead recipes that allow you to whip up delicious treats in no time. Enjoy your favorite desserts throughout the week with minimal effort, so you can spend more time doing what you love.
Decadent No-Bake Chocolate Cheesecake For Effortless Indulgence
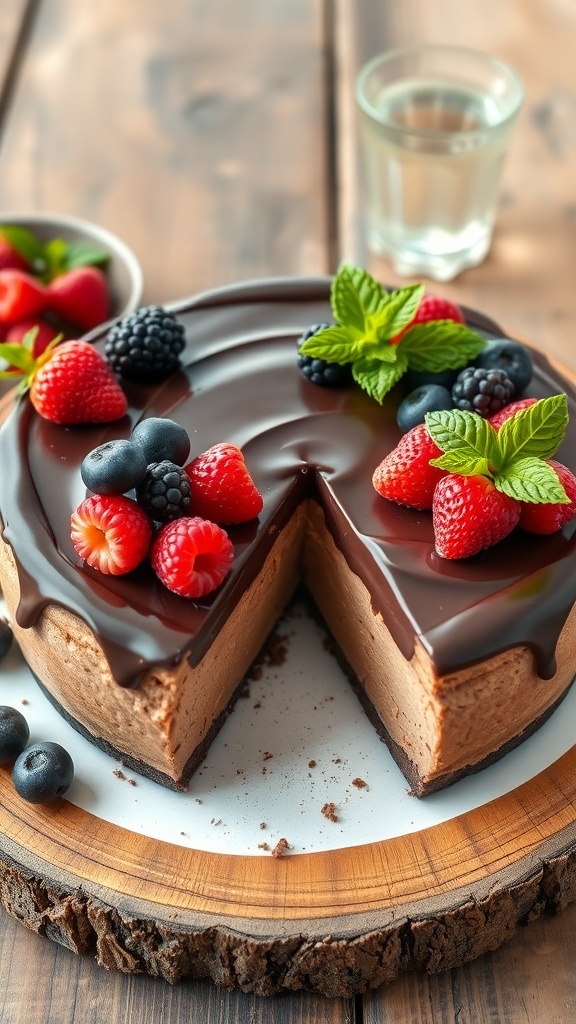
This no-bake chocolate cheesecake is a dream come true for dessert lovers. It’s rich, creamy, and perfect for meal prep. The image showcases a beautifully crafted cheesecake topped with fresh berries and a glossy chocolate ganache. The vibrant colors of the berries contrast beautifully with the deep chocolate tones, making it a feast for the eyes as well as the palate.
Making this cheesecake is simple and requires minimal effort. You can whip it up in no time, and it will be ready to enjoy throughout the week. Just slice it, store it in the fridge, and grab a piece whenever you want a sweet treat!
Ingredients
- 1 ½ cups chocolate cookie crumbs
- ½ cup unsalted butter, melted
- 2 cups cream cheese, softened
- 1 cup powdered sugar
- 1 cup heavy whipping cream
- 1 teaspoon vanilla extract
- 1 cup semi-sweet chocolate chips
- Fresh berries for topping
Instructions
- Prepare the Crust: In a bowl, mix the chocolate cookie crumbs with melted butter until combined. Press this mixture into the bottom of a springform pan to form an even layer.
- Make the Filling: In a large bowl, beat the softened cream cheese and powdered sugar until smooth. In another bowl, whip the heavy cream and vanilla extract until stiff peaks form. Gently fold the whipped cream into the cream cheese mixture.
- Melt the Chocolate: In a microwave-safe bowl, melt the chocolate chips in 30-second intervals, stirring until smooth. Let it cool slightly, then fold it into the cream cheese mixture.
- Combine and Chill: Pour the filling over the crust in the springform pan. Smooth the top with a spatula. Cover and refrigerate for at least 4 hours or until set.
- Serve: Once set, remove the cheesecake from the pan. Top with fresh berries and drizzle with extra chocolate if desired. Slice and enjoy!
Delightful Mini Fruit Tarts For A Burst Of Freshness
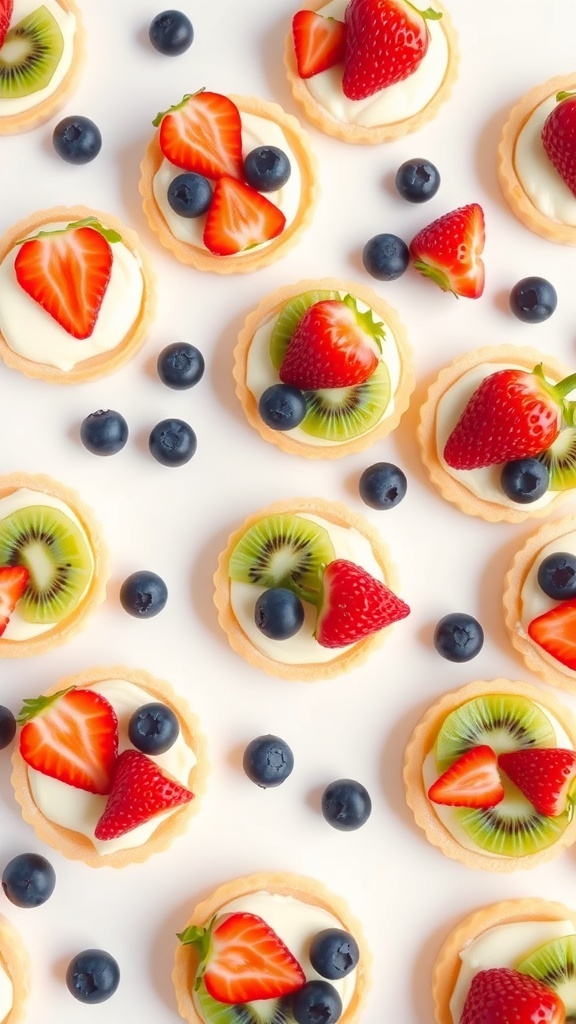
Mini fruit tarts are a perfect way to enjoy a burst of freshness in every bite. These little treats are not only visually appealing but also packed with flavor. Each tart features a crisp pastry shell filled with creamy goodness and topped with vibrant fruits like strawberries, blueberries, and kiwi. They make a great addition to any meal prep plan, allowing you to indulge in something sweet throughout the week.
Making mini fruit tarts is simple and fun. You can customize them with your favorite fruits or even add a drizzle of honey for extra sweetness. They are great for parties, snacks, or even a light dessert after dinner. Plus, they look stunning on any table!
Ingredients
- 1 package of pre-made tart shells
- 1 cup heavy cream
- 1/2 cup powdered sugar
- 1 teaspoon vanilla extract
- 1 cup strawberries, sliced
- 1 cup blueberries
- 1 cup kiwi, sliced
Instructions
- Prepare the Cream: In a mixing bowl, whip the heavy cream until soft peaks form. Gradually add powdered sugar and vanilla extract, continuing to whip until stiff peaks form.
- Fill the Tarts: Spoon the whipped cream into each tart shell, filling them generously.
- Add the Fruit: Top each tart with slices of strawberries, blueberries, and kiwi. Arrange them however you like for a beautiful presentation.
- Chill: Place the filled tarts in the refrigerator for about 30 minutes to set.
- Serve: Enjoy these delightful mini fruit tarts chilled as a refreshing dessert!
Simple Chocolate Chip Cookie Bars For Sharing And Enjoying

Chocolate chip cookie bars are a fantastic treat that everyone loves. They are easy to make and perfect for sharing. Just look at that plate of golden-brown bars, dotted with chocolate chips and a sprinkle of sea salt on top. These bars are chewy, sweet, and oh-so-delicious. Pair them with a glass of milk, and you have a classic dessert that brings back childhood memories.
Making these cookie bars is a breeze. You can whip up a batch in no time, and they store well, making them ideal for meal prep. Whether you’re hosting friends or just want a sweet snack throughout the week, these bars are a great choice. They’re perfect for lunchboxes, after-school snacks, or even a late-night treat.
Ingredients
- 1 cup unsalted butter, softened
- 1 cup brown sugar, packed
- 1/2 cup granulated sugar
- 2 large eggs
- 2 teaspoons vanilla extract
- 3 cups all-purpose flour
- 1 teaspoon baking soda
- 1/2 teaspoon salt
- 2 cups chocolate chips
- 1/4 cup sea salt for topping (optional)
Instructions
- Preheat your oven to 350°F (175°C). Grease a 9x13 inch baking pan.
- In a large bowl, cream together the softened butter, brown sugar, and granulated sugar until smooth.
- Add in the eggs one at a time, mixing well after each addition. Stir in the vanilla extract.
- In another bowl, whisk together the flour, baking soda, and salt. Gradually add this dry mixture to the wet ingredients, mixing until just combined.
- Fold in the chocolate chips until evenly distributed.
- Spread the dough evenly in the prepared baking pan. If desired, sprinkle sea salt on top.
- Bake for 25-30 minutes, or until the edges are golden and a toothpick inserted in the center comes out clean.
- Let cool in the pan before cutting into squares. Enjoy your delicious cookie bars!
Creamy Vanilla Pudding Cups For A Nostalgic Treat
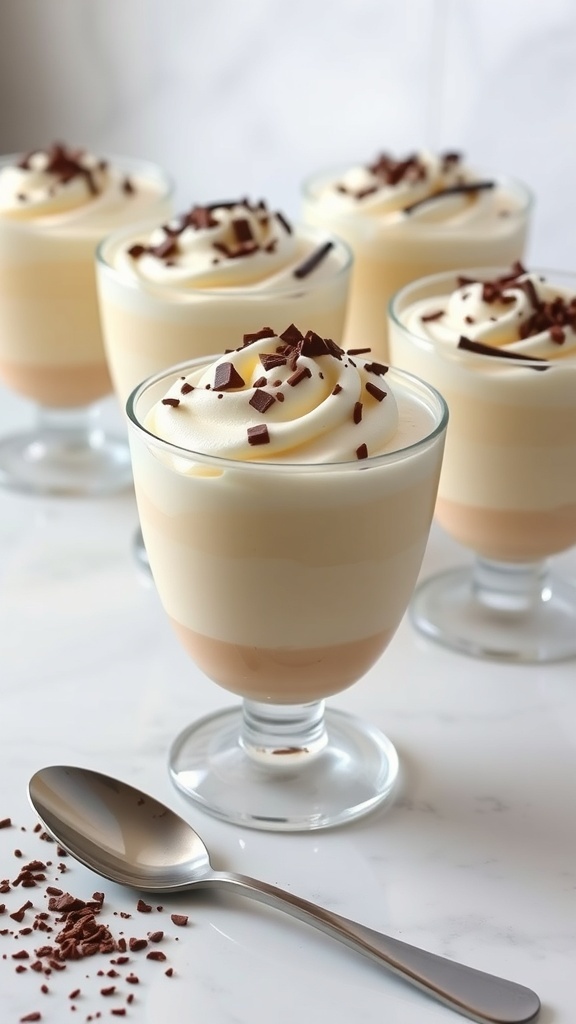
Vanilla pudding cups are a delightful throwback to simpler times. These creamy treats are not just delicious; they bring a sense of nostalgia that many of us cherish. The image shows beautifully layered pudding cups topped with whipped cream and chocolate shavings, making them both visually appealing and tempting to taste.
Making these pudding cups is a breeze. You can prepare them in advance and enjoy them throughout the week. They are perfect for satisfying your sweet tooth without much fuss. Plus, they can be customized with your favorite toppings, making them versatile for any occasion.
Here’s how to whip up these creamy vanilla pudding cups at home!
Ingredients
- 2 cups whole milk
- 1/2 cup granulated sugar
- 1/4 cup cornstarch
- 1/4 teaspoon salt
- 1 teaspoon vanilla extract
- 2 tablespoons unsalted butter
- Whipped cream, for topping
- Chocolate shavings or sprinkles, for garnish
Instructions
- In a medium saucepan, whisk together the sugar, cornstarch, and salt.
- Gradually add the milk while whisking to combine. Cook over medium heat, stirring constantly until the mixture thickens and starts to bubble.
- Remove from heat and stir in the vanilla extract and butter until smooth.
- Pour the pudding into individual cups and let it cool to room temperature. Then, refrigerate for at least 2 hours to set.
- Before serving, top each cup with whipped cream and sprinkle with chocolate shavings or your favorite toppings.
Classic Rice Pudding With A Touch Of Cinnamon

Rice pudding is a timeless dessert that brings comfort and warmth to any meal. This classic dish combines creamy rice with sweet milk, creating a delightful treat that’s perfect for meal prep. The touch of cinnamon adds a cozy flavor, making it even more inviting.
In the image, you can see a bowl of rice pudding topped with a sprinkle of cinnamon and a few dried cranberries. The soft texture and warm colors make it look so appealing. It’s served in a simple bowl, emphasizing the homemade feel of this dessert.
This rice pudding is not just easy to make; it’s also versatile. You can enjoy it warm or cold, and it keeps well in the fridge for several days. Perfect for those busy weeks when you want a sweet treat without the hassle!
Ingredients
- 1 cup Arborio rice
- 4 cups whole milk
- 1/2 cup granulated sugar
- 1 teaspoon vanilla extract
- 1/2 teaspoon ground cinnamon
- 1/4 teaspoon salt
- 1/2 cup dried cranberries (optional)
Instructions
- Rinse the rice under cold water until the water runs clear.
- In a medium saucepan, combine the rinsed rice, milk, sugar, salt, and cinnamon. Bring to a gentle boil over medium heat.
- Reduce the heat to low and simmer for about 25-30 minutes, stirring occasionally, until the rice is tender and the mixture thickens.
- Remove from heat and stir in the vanilla extract. If using, add the dried cranberries and mix well.
- Let it cool slightly before serving. You can enjoy it warm or refrigerate it for later. Serve with an extra sprinkle of cinnamon on top.
Fruity Overnight Oats For A Quick Morning Delight

Fruity overnight oats are a fantastic way to kickstart your day. They are not only easy to prepare but also packed with nutrients. Imagine waking up to a jar filled with creamy oats, fresh fruits, and crunchy nuts. It’s a breakfast that’s both satisfying and delicious!
The beauty of overnight oats lies in their versatility. You can mix and match your favorite fruits, nuts, and even seeds. In the image, you see a vibrant combination of strawberries, blueberries, and mangoes layered beautifully with oats and yogurt. This colorful treat is sure to brighten your morning!
To make these fruity overnight oats, simply layer your ingredients in a jar the night before. By morning, the oats will have absorbed the flavors and softened perfectly. It’s a quick, grab-and-go breakfast that fits right into a busy schedule.
Ingredients
- 1 cup rolled oats
- 1 cup milk (or plant-based milk)
- 1/2 cup yogurt (optional)
- 1 tablespoon honey or maple syrup
- 1/2 cup mixed fresh fruits (strawberries, blueberries, mangoes)
- 1/4 cup nuts (almonds, walnuts, or your choice)
- 1 tablespoon chia seeds (optional)
- Mint leaves for garnish
Instructions
- In a jar, combine rolled oats, milk, yogurt, and honey or maple syrup. Stir well to combine.
- Add chia seeds if using, and mix again.
- Layer the fresh fruits on top of the oat mixture.
- Sprinkle nuts over the fruits for added crunch.
- Seal the jar and refrigerate overnight.
- In the morning, give it a good stir, garnish with mint leaves, and enjoy!
Chewy Brownies Packed With Nutty Goodness
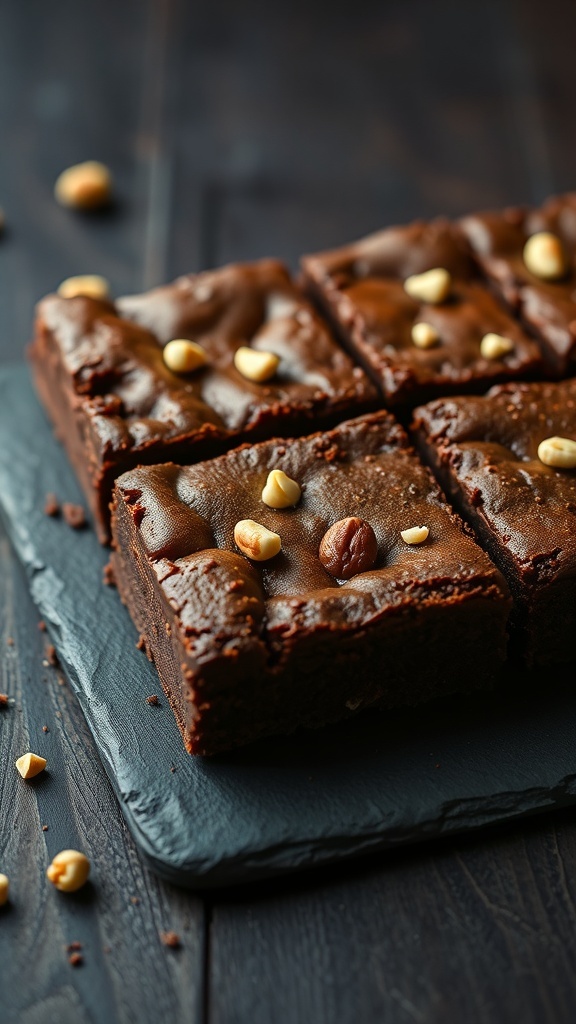
These chewy brownies are a delightful treat that combines rich chocolate with crunchy nuts. The image shows perfectly baked brownies, cut into squares, with a glossy top and scattered nuts on top. They look inviting and ready to be enjoyed!
Making brownies is simple and fun. You can whip them up in no time, and they store well, making them perfect for meal prep. Just grab a square whenever you need a sweet pick-me-up during the week.
These brownies are not just about chocolate; the addition of nuts adds a wonderful texture and flavor. You can use any nuts you like, such as walnuts or pecans, to customize your treat. They are great for sharing or keeping all to yourself!
Ingredients
- 1 cup unsalted butter
- 2 cups granulated sugar
- 4 large eggs
- 1 teaspoon vanilla extract
- 1 cup all-purpose flour
- 1 cup unsweetened cocoa powder
- 1/2 teaspoon salt
- 1 cup chopped nuts (walnuts or pecans)
Instructions
- Preheat your oven to 350°F (175°C) and grease a 9x13 inch baking pan.
- In a large saucepan, melt the butter over low heat. Remove from heat and stir in the sugar, eggs, and vanilla.
- Mix in the flour, cocoa powder, and salt until just combined. Be careful not to overmix.
- Fold in the chopped nuts until evenly distributed.
- Pour the batter into the prepared pan and spread it evenly.
- Bake for 25-30 minutes, or until a toothpick inserted in the center comes out with a few moist crumbs.
- Let the brownies cool in the pan before cutting them into squares.
Refreshing Lemon Bars With A Zesty Twist

These lemon bars are a delightful treat that brings a burst of sunshine to your week. The bright yellow squares are topped with a light dusting of powdered sugar, making them look as refreshing as they taste. Each bite offers a perfect balance of sweet and tart, making them an ideal dessert for any occasion.
With a buttery crust and a zesty lemon filling, these bars are not just easy to make; they also store well in the fridge. You can whip up a batch at the start of the week and enjoy them throughout. Pair them with a cup of tea or coffee for a delightful afternoon snack.
Let’s get to the recipe so you can enjoy these tasty lemon bars!
Ingredients
- 1 cup all-purpose flour
- 1/2 cup unsalted butter, softened
- 1/4 cup granulated sugar
- 1/4 teaspoon salt
- 2 large eggs
- 1 cup granulated sugar (for filling)
- 1/4 cup freshly squeezed lemon juice
- 1 tablespoon lemon zest
- 1/4 teaspoon baking powder
- Powdered sugar for dusting
Instructions
- Preheat your oven to 350°F (175°C). Grease an 8x8-inch baking dish.
- In a mixing bowl, combine flour, softened butter, 1/4 cup granulated sugar, and salt. Mix until crumbly. Press the mixture into the bottom of the prepared baking dish to form the crust.
- Bake the crust for 15 minutes until lightly golden.
- While the crust is baking, prepare the filling. In another bowl, whisk together the eggs, 1 cup granulated sugar, lemon juice, lemon zest, and baking powder until smooth.
- Pour the filling over the hot crust and return to the oven. Bake for an additional 20 minutes, or until the filling is set.
- Let the bars cool completely in the dish. Once cooled, dust with powdered sugar and cut into squares.
- Enjoy your refreshing lemon bars throughout the week!
Easy Strawberry Shortcake For A Summery Delight

Strawberry shortcake is a classic dessert that brings a taste of summer to any table. This delightful treat features layers of fluffy sponge cake, fresh strawberries, and whipped cream. It's not only easy to make but also perfect for meal prep. You can whip it up once and enjoy it throughout the week!
The image showcases a beautifully stacked strawberry shortcake, with vibrant red strawberries peeking out between the layers. The whipped cream adds a light and airy touch, making it look irresistible. This dessert is not just a feast for the taste buds but also for the eyes!
Let’s get into how you can make this scrumptious dessert at home. It’s simple and requires just a few ingredients.
Ingredients
- 2 cups all-purpose flour
- 1/2 cup granulated sugar
- 2 teaspoons baking powder
- 1/2 teaspoon salt
- 1/2 cup unsalted butter, softened
- 1 cup milk
- 2 large eggs
- 2 cups fresh strawberries, sliced
- 1 cup heavy whipping cream
- 1/4 cup powdered sugar
Instructions
- Preheat your oven to 350°F (175°C). Grease and flour two 9-inch round cake pans.
- In a large bowl, mix flour, sugar, baking powder, and salt. Add softened butter, milk, and eggs. Beat until smooth.
- Divide the batter evenly between the prepared pans. Bake for 25-30 minutes until a toothpick comes out clean.
- Let the cakes cool in the pans for 10 minutes, then transfer to wire racks to cool completely.
- While the cakes cool, whip the cream with powdered sugar until soft peaks form.
- Once the cakes are cool, slice each in half horizontally. Layer the bottom half of one cake with whipped cream and strawberries. Repeat with the second layer.
- Top with the final cake layer and add more whipped cream and strawberries on top.
- Serve immediately or refrigerate for later. Enjoy your delicious strawberry shortcake!
Wholesome Banana Bread For A Comforting Snack

Banana bread is a classic comfort food that brings warmth and joy to any snack time. The image shows a beautifully baked loaf, golden brown and perfectly sliced, revealing its soft, moist interior. The addition of nuts adds a delightful crunch, making each bite satisfying.
This recipe is not only easy to make but also a fantastic way to use up overripe bananas. It's a great option for meal prep, as it stays fresh for several days. You can enjoy it plain, spread with butter, or even topped with a bit of peanut butter for extra flavor.
Gather your ingredients and let’s get baking!
Ingredients
- 3 ripe bananas, mashed
- 1/3 cup melted butter
- 1 teaspoon baking soda
- Pinch of salt
- 3/4 cup sugar
- 1 large egg, beaten
- 1 teaspoon vanilla extract
- 1 cup all-purpose flour
- 1/2 cup chopped nuts (optional)
Instructions
- Preheat your oven to 350°F (175°C) and grease a 4x8 inch loaf pan.
- In a mixing bowl, mash the ripe bananas with a fork until smooth. Stir in the melted butter.
- Add the baking soda and salt. Mix well.
- Stir in the sugar, beaten egg, and vanilla extract until combined.
- Finally, mix in the flour until just incorporated. If using, fold in the chopped nuts.
- Pour the batter into the prepared loaf pan and smooth the top.
- Bake for 60-65 minutes or until a toothpick inserted into the center comes out clean.
- Let it cool in the pan for about 10 minutes, then transfer to a wire rack to cool completely.
Sweet And Tart Key Lime Pie For A Tropical Escape

Key lime pie is a classic dessert that brings a taste of the tropics right to your kitchen. The bright yellow filling, topped with fluffy whipped cream, is both sweet and tart, making it a perfect treat for any occasion. The vibrant colors of the pie, paired with a graham cracker crust, create a visual delight that’s hard to resist.
This dessert is not just easy to make, but it also keeps well in the fridge. You can whip it up once and enjoy it throughout the week. Each slice offers a refreshing burst of flavor, perfect for those warm days or whenever you need a little escape.
Ingredients
- 1 ½ cups graham cracker crumbs
- ½ cup granulated sugar
- ½ cup unsalted butter, melted
- 4 large egg yolks
- 1 can (14 ounces) sweetened condensed milk
- ½ cup fresh key lime juice
- 1 teaspoon lime zest
- 1 cup heavy whipping cream
- 2 tablespoons powdered sugar
- Extra lime slices for garnish
Instructions
- Preheat your oven to 350°F (175°C). In a bowl, combine graham cracker crumbs, sugar, and melted butter. Press this mixture firmly into the bottom and sides of a pie pan to form the crust.
- Bake the crust for about 8-10 minutes until lightly golden. Remove from the oven and let it cool.
- In another bowl, whisk together egg yolks, sweetened condensed milk, key lime juice, and lime zest until smooth. Pour this mixture into the cooled crust.
- Bake for an additional 15 minutes. Remove from the oven and let it cool to room temperature, then refrigerate for at least 3 hours.
- Before serving, whip the heavy cream with powdered sugar until soft peaks form. Spread or pipe the whipped cream over the chilled pie and garnish with lime slices.
Classic Apple Crisp For A Cozy Dessert Experience

There's something warm and inviting about a classic apple crisp. This dessert combines tender apples with a crunchy topping, making it a perfect choice for any time of year. The image shows a delightful bowl filled with baked apples, topped with a golden crumble and a scoop of creamy vanilla ice cream. The cinnamon sticks and fresh apples nearby hint at the comforting flavors waiting to be enjoyed.
Making apple crisp is simple and rewarding. You can prepare it in advance and enjoy it throughout the week. It’s great on its own or served with ice cream for an extra treat. The combination of sweet and tart apples, along with the crunchy topping, creates a cozy dessert experience that feels like a warm hug.
Let’s get to the recipe so you can whip up this delicious dessert!
Ingredients
- 6 cups of peeled and sliced apples (Granny Smith or Honeycrisp work well)
- 1 tablespoon lemon juice
- 1/2 cup granulated sugar
- 1 teaspoon ground cinnamon
- 1/4 teaspoon salt
- 1 cup rolled oats
- 1 cup all-purpose flour
- 1/2 cup brown sugar, packed
- 1/2 cup unsalted butter, softened
Instructions
- Preheat your oven to 350°F (175°C).
- In a large bowl, toss the sliced apples with lemon juice, granulated sugar, cinnamon, and salt. Spread this mixture evenly in a greased baking dish.
- In another bowl, combine rolled oats, flour, brown sugar, and softened butter. Mix until crumbly.
- Sprinkle the oat mixture over the apples in the baking dish.
- Bake for 30-35 minutes, or until the topping is golden brown and the apples are bubbly.
- Let it cool slightly before serving. Enjoy it warm with a scoop of vanilla ice cream on top!
Silky Chocolate Pudding For The Ultimate Comfort Food

Chocolate pudding is a classic dessert that brings a smile to anyone's face. This silky treat is rich, creamy, and oh-so-comforting. Just look at that bowl of chocolate goodness topped with whipped cream and chocolate shavings! It’s the perfect dessert for meal prep, allowing you to whip up a batch and enjoy it throughout the week.
Making chocolate pudding is simple and requires just a few ingredients. You can easily customize it to your taste by adding flavors like vanilla or a pinch of sea salt. Serve it in individual bowls for a fun presentation or keep it in one big bowl for family-style serving. Either way, this dessert is sure to be a hit!
Ingredients
- 2 cups whole milk
- 1/2 cup granulated sugar
- 1/3 cup unsweetened cocoa powder
- 1/4 cup cornstarch
- 1/4 teaspoon salt
- 1 teaspoon vanilla extract
- 2 tablespoons unsalted butter
- Whipped cream and chocolate shavings for topping
Instructions
- In a medium saucepan, whisk together the sugar, cocoa powder, cornstarch, and salt.
- Gradually add the milk, whisking until smooth. Cook over medium heat, stirring constantly until the mixture thickens and starts to bubble.
- Remove from heat and stir in the vanilla extract and butter until fully melted and combined.
- Pour the pudding into serving dishes and let it cool. Cover with plastic wrap to prevent a skin from forming.
- Chill in the refrigerator for at least 2 hours. Serve topped with whipped cream and chocolate shavings.
Decadent Peanut Butter Cups For A Nutty Sweet Treat
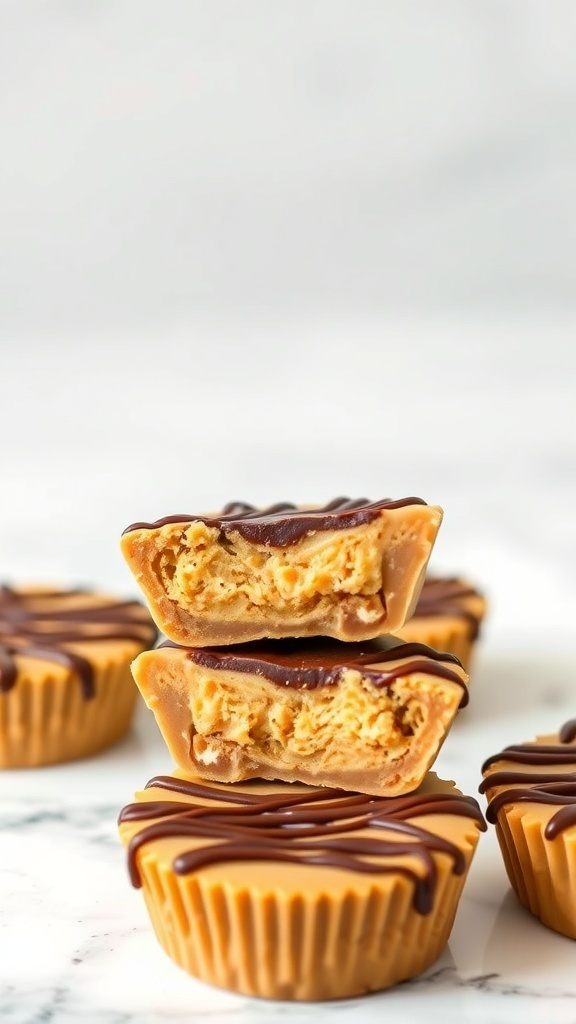
Peanut butter cups are a classic treat that brings joy with every bite. These homemade versions are rich and creamy, making them a perfect dessert for meal prep. You can whip up a batch and enjoy them throughout the week, satisfying your sweet tooth without the guilt of store-bought options.
The image showcases these delightful cups, stacked high to reveal their luscious filling. The smooth peanut butter center is encased in a layer of chocolate, topped with a drizzle for that extra touch. They look tempting and are sure to impress anyone who tries them!
Making these peanut butter cups is simple and requires just a few ingredients. You’ll love how easy it is to prepare them ahead of time. Let’s get into the recipe so you can start enjoying this nutty sweet treat!
Ingredients
- 1 cup creamy peanut butter
- 1/2 cup powdered sugar
- 1 teaspoon vanilla extract
- 1 1/2 cups milk or dark chocolate chips
- 1 tablespoon coconut oil (optional for smoothness)
- Sea salt for sprinkling (optional)
Instructions
- Prepare the Cupcake Liners: Line a muffin tin with cupcake liners.
- Make the Peanut Butter Filling: In a mixing bowl, combine peanut butter, powdered sugar, and vanilla extract. Mix until smooth and well combined.
- Melt the Chocolate: In a microwave-safe bowl, combine chocolate chips and coconut oil. Microwave in 30-second intervals, stirring in between, until melted and smooth.
- Assemble the Cups: Pour a small amount of melted chocolate into the bottom of each cupcake liner, just enough to cover the bottom. Use a spoon to spread it evenly.
- Add Peanut Butter Filling: Place a spoonful of the peanut butter mixture on top of the chocolate layer in each liner, smoothing it out slightly.
- Top with Chocolate: Pour more melted chocolate over the peanut butter filling, ensuring it is completely covered. Tap the muffin tin gently to remove any air bubbles.
- Chill: Place the muffin tin in the refrigerator for about 30 minutes or until the chocolate is set.
- Serve: Once set, remove the peanut butter cups from the liners and enjoy. Optionally, sprinkle with sea salt before serving.
Cheesecake Bars Made Easy For A Crowd-Pleasing Dessert

Cheesecake bars are a fantastic option when you want to impress without spending hours in the kitchen. These bars are creamy, rich, and perfect for sharing. The image shows a beautifully arranged platter of cheesecake bars, showcasing their smooth texture and golden top. They are cut into neat squares, making them easy to serve and enjoy.
These bars are not just delicious; they are also simple to make. With a buttery crust and a luscious filling, they can be prepared ahead of time and stored in the fridge. This makes them an ideal dessert for meal prep. Whether you’re hosting a gathering or just want a sweet treat throughout the week, these cheesecake bars will hit the spot.
Let’s get to the recipe so you can whip these up in no time!
Ingredients
- 1 ½ cups graham cracker crumbs
- ½ cup unsalted butter, melted
- 2 cups cream cheese, softened
- 1 cup granulated sugar
- 3 large eggs
- 1 teaspoon vanilla extract
- ½ cup sour cream
- ¼ cup all-purpose flour
Instructions
- Preheat your oven to 325°F (160°C). Grease a 9x13 inch baking dish.
- Make the crust: In a bowl, mix graham cracker crumbs and melted butter until combined. Press the mixture firmly into the bottom of the prepared dish.
- In a large mixing bowl, beat the cream cheese and sugar until smooth. Add the eggs one at a time, mixing well after each addition.
- Stir in the vanilla extract, sour cream, and flour until fully combined.
- Pour the cream cheese mixture over the crust and spread evenly.
- Bake for 30-35 minutes, or until the center is set and slightly jiggly. Let it cool completely before refrigerating for at least 4 hours.
- Once chilled, cut into squares and serve. Enjoy your delicious cheesecake bars!


Comments
Post a Comment